
What is Antimalware Service Executable? Why is it consuming high CPU, Memory, Disk?
- The Tech Platform

- Jan 28, 2021
- 5 min read
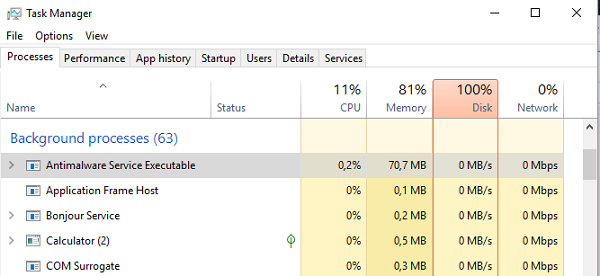
If you have seen the program “Antimalware Service Executable” in the Task Manager, don’t be worried. It’s not a third party service or a virus mimicking an antivirus. It’s an official program from Windows which makes sure to secure your Windows PC. Here we answer all your queries for the question – What is Antimalware Service Executable (msmpeng.exe) and why does it show high CPU, Disk or Memory usage in Windows 10? Is it a virus? Do I need to disable it? Find all your answers to these questions in this post.
The Antimalware Service Executable process plays an important role in the Windows Defender antivirus that is native to Windows 10. This Antimalware Service Executable has been reported, at times, to be consuming far more than its fair share of CPU processing power, and can even impact your computer’s speed to a snail’s speed.
What is Antimalware Service Executable
Windows 10 and Windows Defender, now integrated within the core of OS, and primed as Windows Defender Antivirus System, has come a long way. Like many other programs that need to run continuously in the background, WDAS also runs in the background with the name of Antimalware Service Executable (MsMpEng.exe).
If for some reason, you have seen it listed in the Task Manager consuming memory, and CPU more than ever, don’t be worried. Many a time the antivirus program needs to run the background with scheduled scanning, checking files for malware, runtime software installation, and continuously monitor files for changes.

The best way to cross-check is to right-click on the program name, when in Task Manager, and open its file location. You will notice that its available under C:\ProgramData\Microsoft\Windows Defender\Platform\4.16.17656.18052-0. You can also invoke the Defender program manually to perform the scan, and this will increase the CPU and Memory usage.
Antimalware Service Executable High CPU, Memory, Disk usage
I have seen this program sitting in the background, and doing nothing. At times, I have seen it consuming 30% CPU usage. If you have seen it taking a high CPU portion, the chances are that it is scanning your files in the background. This is to make sure of a potential virus or malware.
You will notice these types of surges happens at certain events. When your PC boots, software installation is in progress, when you download the file from the internet or check your emails in Outlook with attachments.
The best part of this Antimalware Service Executable or Windows Defender is that it only does background scans when your PC is sitting idle. This makes sure that your PC is not slow when you are working, and running scans in the idle stage give the program advantage of using more CPU resources.
If you’re faced with this high CPU, Disk, or Memory usage issue, you can try our recommended solutions below in no particular order and see if that helps to resolve the issue.
Check for malware infections
Change Windows Defender scheduling options
Add Antimalware Service Executable to Windows Defender’s exclusion list
Run System File Checker
Disable Windows Defender (not recommended)
Let’s take a look at the description of the process involved concerning each of the listed solutions.
1] Check for malware infections
It’s possible that your PC has a case of malware infection which is causing Windows Defender to disrupt your computer’s performance. In this case, run a full system scan using any standalone on-demand AV scanners. You may want to run Windows Defender Offline Scan at boot time or use bootable AntiVirus Rescue Media to invasively clean your system.
2] Change Windows Defender scheduling options


In some cases, the high memory usage caused by Antimalware Service Executable typically happens when Windows Defender is running a full scan. You can configure this scheduled scans to take place at a time when you’re less likely to feel the drain on your CPU.
Do the following:
Press Windows key + R to invoke the Run dialog.
In the Run dialog, type taskschd.msc and hit Enter to open Task Scheduler.
On the left pane, navigate to the path below:
Task Scheduler Library > Microsoft > Windows > Windows DefenderNow, in the middle pane, double-click the Windows Defender Scheduled Scan entry.
On the General tab, uncheck Run with highest privileges option.
Next, click the Conditions tab and uncheck all the items in the section.
Click OK to clear your scheduled scans.
To protect your computer, it is important to schedule/create some new scans, but we can do this in a way that will reduce the impact on your system’s performance.
Do the following:
Double-click Windows Defender Scheduled Scan entry.
Select the Triggers tab.
Click the New button.


You can now create a new scan schedule that suits your needs – selecting options that strike the balance between protection and system efficiency. As a guideline, we recommend (at minimum) weekly scans at a time when you’ll be unlikely to notice the increased CPU usage.
Click OK when done.
Repeat the process for the three remaining services (Windows Defender Cache Maintenance, Windows Defender Cleanup, Windows Defender Verification) in the middle pane.
If the issue still persists after you have tried this solution, proceed with the next.
3] Add Antimalware Service Executable to Windows Defender exclusion list


During its scans, Windows Defender checks every single file on your computer – including itself. This can occasionally result in system lag. In this case, you can add Antimalware Service Executable to Windows Defender exclusion list. Here’s how:
Press Windows key + R to invoke the Run dialog box.
In the Run dialog box, type windowsdefender: and hit Enter to open Windows Security Center.
Click Virus & threat protection settings on the Navigation menu on the left.
In the Virus & threat protection settings page, scroll down to the Exclusions section.
Click the Add or remove exclusions link.
In the Exclusions page, click the + Add an exclusion button.
Select Process from the menu.
In the Enter process name field, type Antimalware Service Executable.
Click the Add button.
4] Run System File Checker
Running System File Checker may help replace potentially corrupted Defender files.
5] Disable Windows Defender (not recommended)
As a last resort, if none of the above solutions yielded any positive result, you can disable Windows Defender altogether. Keep in mind that doing so leaves you vulnerable to a range of cyberattacks, so it’s critical that you install a reputable and lightweight third-party security software on your Windows 10 computer before disabling Windows Defender.
Should you disable Antimalware Service Executable
We do not recommend that all, as mentioned above. The biggest reason that goes into our support is that it works along with a third-party antivirus solution. This gives you enough reason not to disable Windows Defender.
Windows Defender disables it automatically when you install a third-party antivirus.
There are many more reasons. Windows Defender is the last protection you have got when it comes to ransomware which can lock down your files. Microsoft has implemented this feature with OneDrive to make sure your files are safe and can be recovered back.
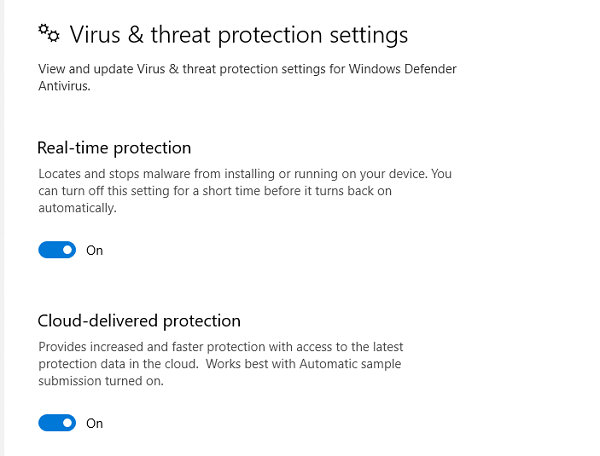
However, if you feel like it’s taking too much resources, you can turn off the real-time protection.
Go to Settings > Update & Security > Virus & threat protection > Virus & threat protection settings and disable Real-time protection. It will automatically enable it when it doesn’t find any AntiVirus software installed on your PC.

As I said, Windows Defender works along with other antivirus solutions. Even though it disables itself, from time to time, it will scan your PC. It will figure out risks that could have been missed by your primary antivirus solution.
Source: Windowshelp
The Tech Platform


Comments