
PowerShell Trend Reporting, Part 1: Data Gathering
- The Tech Platform

- Aug 27, 2020
- 4 min read
The first step to get an accurate view is to get the most current data.


Unless you have some third-party tool available, odds are you are not tracking your disk space on any of your servers. Sure, you might be running a script once or twice a day which puts the data into an Excel spreadsheet that you can view as a point in time view of where you are at with drive space, but that becomes very hard to manage when you want to go back and diagnose a sudden increase in used drive space or if you want to provide some data to your manager showing the current trend of drive space on one of your drives hosting user home directories. Can you imagine the fun of taking all of those reports that you have e-mailed out from an automated script and then performing the tedious task of copying and pasting that data into a single spreadsheet just to look at how the data is trending? I know, it is completely crazy and is unnecessary work that can and should be automated using PowerShell! The big difference here is that we are sending that data to a SQL database that we can then query to and pull down and create reports much quicker and easier than anything that we would do manually.
Before we start down the road to reporting, we need to look at just how we are going to gather the data. This means that we need to accomplish the following things in this article:
Determine the approach to gathering the data
Pull the data
Seems simple enough, right? We just need to query our systems for the drive space and send it over to a SQL server so it can be looked at another time when we need it.
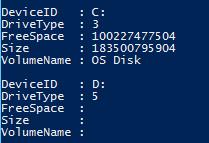
Determining the Approach The ideal approach to gathering data from a system usually comes from querying the WMI repository and this is no different when it comes to looking at drive space. The bigger question is what class will we be using to pull the data from? A common class to use is Win32_LogicalDisk as it has all of the information we need: DeviceID, DriveType, FreeSpace, Size and VolumeName. The results would look similar to this:
Normally this would probably cover everything we need, but instead I am going to go with Win32_Volume as I want to ensure that if there are mount points involved in a system such as what you may see on an Exchange or SQL server. Mount points are not visible in Win32_LogicalDisk and can actually cover the true size of a disk because of this.
With this determined, we now need to build out our WMI query so we can be sure to pull all of the data we need to ensure that all of the data is accurate and can be used to generate a report at a later date. The concept of "splatting" lends itself nicely here as we can set up the parameters that will be splatted to the Get-WMIObject cmdlet and cover what each one does as well!
$WMIParams = @{

  Class =  'Win32_Volume'

  ErrorAction =  'Stop'

  Filter=  "DriveType='3'"

  Property =  'DriveLetter','Label','Capacity','FreeSpace'

  }
The first parameter, Class, is where we specify the WMI class that this query will be performed against. In this case, we have made the decision to use Win32_Volume as it will provide the most useful results.
Up next is ErrorAction which specifies how PowerShell will handle errors that occur while running the cmdlet. I went with Stop as it will make any error a terminating error and that means that we are able to use Try/Catch to catch the error and then provide useful feedback about the error or at least handle the error appropriately if the error warrants it.
Moving onto Filter, this is a very important parameter in that we can specify a string filter that uses Windows Query Language (WQL) which can be applied to the query on a local or remote system so we only pull down the data which actually matches what we want. This is very useful when making remote WMI queries.
Lastly is the Property parameter which defines what property values we are interested in returning from the query. Much like the Filter parameter, this is a great thing to use against remote systems to only pull back what you need rather than taking the whole object with its properties and then picking what we need.
Missing is the Computername parameter and this is by design. The idea is to be able to query multiple systems and in order to meet this requirement, we will be adding the Computername parameter during a loop of all of the systems that we want to query.
Gathering the Drive Space Data We can run the following code to pull drive space from a remote system or systems:
$Computername = $env:COMPUTERNAME

  $WMIParams = @{

  Class =  'Win32_Volume'

  ErrorAction =  'Stop'

  Filter=  "DriveType='3'"

  Property =  'DriveLetter','Label','Capacity','FreeSpace'

  }

  ForEach ($Computer  in $Computername)  {

  $WMIParams.Computername =  $Computer

  Try {

  Get-WMIObject  @WMIParams |  ForEach {

  [pscustomobject]@{

  Computername = $Computer

  DriveLetter = $_.DriveLetter

  Label =  $_.Label

  FreeSpace = $_.Freespace

  Capacity = $_.Capacity

  UsedSpace = ($_.Capacity - $_.FreeSpace)

  }

  }

  } Catch  {

  Write-Warning  "$($Computer): $_"

  }

} 
I took the liberty of adding an extra property to the output that showed the used drive space by simply subtracting the free space from the capacity. This can be useful in future reports to show space trends. I have chosen to not format the size from bytes to something more readable such as GB as I would prefer to keep the raw data so I can format it as I see fit when the data is being pulled from the SQL server. You can also see where I am using the Try/Catch to support any error handling that needs to happen if the query happens to fail for one reason or another.
With that, we now have a great approach to pulling the data as well as the code to actually pull the data so it can be shipped to a database. Speaking of databases and shipping data to one, the next article will focus on just that by building out a command that will pass the data we have just collected to a SQL server and then also pull the same data so it can be compiled into a report! Be sure to watch for it!
Source: Powershell pipeline


Comments