
Microsoft Fabric: Sharing and Permissions Guide
- The Tech Platform

- Oct 6, 2023
- 4 min read
If you're new to Microsoft Fabric, you're in the right place! Microsoft Fabric provides user-friendly tools to help you share items and control who can access them, making teamwork a breeze. Whether you're dealing with documents, files, or other resources, knowing how to share effectively within Microsoft Fabric ensures your collaborative journey is smooth and secure.
In this guide, we'll take you step by step through the process of sharing items and managing permissions in Microsoft Fabric. By the end, you'll be ready to tap into the full potential of Microsoft Fabric's collaboration features, even if you're just starting out.
Check out other articles:
How to Share Items in Microsoft Fabric
Sharing items in Microsoft Fabric serves several important purposes:
Collaboration: It enables multiple users to work together on the same documents, files, or resources simultaneously, fostering collaboration and teamwork.
Accessibility: Sharing allows you to make content available to others, ensuring that team members or colleagues can access necessary information from anywhere, at any time.
Efficiency: By sharing items, you avoid the need to send large files via email or other means, streamlining communication and reducing data duplication.
Version Control: Shared items often come with version control features, which help you keep track of changes, revisions, and updates made by different contributors.
Security: Microsoft Fabric provides permission settings, so you can control who has access to your shared items, ensuring that sensitive data remains protected.
Real-time Updates: Collaborators can work on shared items simultaneously, seeing each other's changes in real-time, which enhances productivity and minimizes delays.
Convenience: Sharing simplifies the process of distributing and managing content, making it easier to distribute resources across a team or organization.
Here are the simple steps to share items in Microsoft Fabric:
STEP 1: Select which item you want to share.
STEP 2: Now, click on the "Share" button.

STEP 3: The dialog box will appear: "Create and send link"
Select the "People in your organization can view" option.

Here, select the option to whom you want to share the item with. There are three options available:
People in your organization
People with existing access
Specific people
The first option "People in your organization" will grant access to people who are within the organization. No external user can access this item.
The second option "People with existing access" will not grant any access to the item. It will simply create a URL that you can send to somebody who already has access.

The third option "Specific people" will allow you to grant permission to the specific people. You have to enter the following details:
Name
Email Address

STEP 4: Now, choose the permission you want to grant via the link. There are two options:
Share - Prefered for "People with existing access"
Edit - Preferred for "People in your organization" and "Specific people"

STEP 5: Click Apply.
Additional Options
In the "Create and send link" dialog box, you will get three options to share a link:
Copy link
by Email
by Teams

Copy Link: This button makes a link that you can easily share. Just click "Copy" when a box pops up, and it's saved to your computer.
by Email: Clicking this sends the link through your email. It opens your email app with the link ready to send.
by Teams: Choosing this opens Teams and starts a new message with the link in it. Easy for sharing in Teams.
How to Manage Item Links in Microsoft Fabric
Managing item links in Microsoft Fabric is crucial for maintaining control over who can access your shared content and ensuring that the links function as intended.
Managing item links is necessary for several reasons:
Control: It allows you to maintain control over who has access to your shared content. You can modify permissions and user access as needed.
Security: Managing links helps ensure that only authorized individuals can use them, thereby enhancing the security of your shared resources.
Accuracy: Modifying links allows you to correct any errors or outdated information, ensuring that the links remain accurate and functional.
Organization: By managing links, you can keep your shared content organized and up-to-date, improving the overall user experience.
Follow the below steps to Manage the item links in Microsoft Fabric:
STEP 1: Select the "Manage permissions" icon located in the upper right corner (see the below image).

STEP 2: Here, you have the option to both copy the link and modify an existing link. If you wish to make changes to a link, click on "Edit" located next to the link you want to modify.

STEP 3: You can now modify the link itself. Additionally, you can adjust the permissions associated with the link, specify who can use this link, or even delete the link altogether.
STEP 4: Select Apply.
How to Grant and Manage Access Directly in Microsoft Fabric
In certain situations within Microsoft Fabric, there may be a need to grant permissions directly to users or accounts rather than simply sharing a link. This is especially relevant when granting permissions to service accounts, for instance.
STEP 1: Select the item that you want to manage access. Click "..." and select "Manage permission" from the context menu.

STEP 2: Select "Direct access".
This option will give access to a resource directly, without relying on a shared link. It's useful for cases where you want to specify who has access to a particular item.

STEP 3: Select "+ Add user".
This action lets you add individuals or accounts to your access list. You can choose what level of access they have and even notify them via email if needed.

STEP 4: Here, you can enter the names of the people or accounts that you want to grant access to directly. You can also choose the specific permissions you want to grant them. If you prefer, you can send them a notification by email as well.
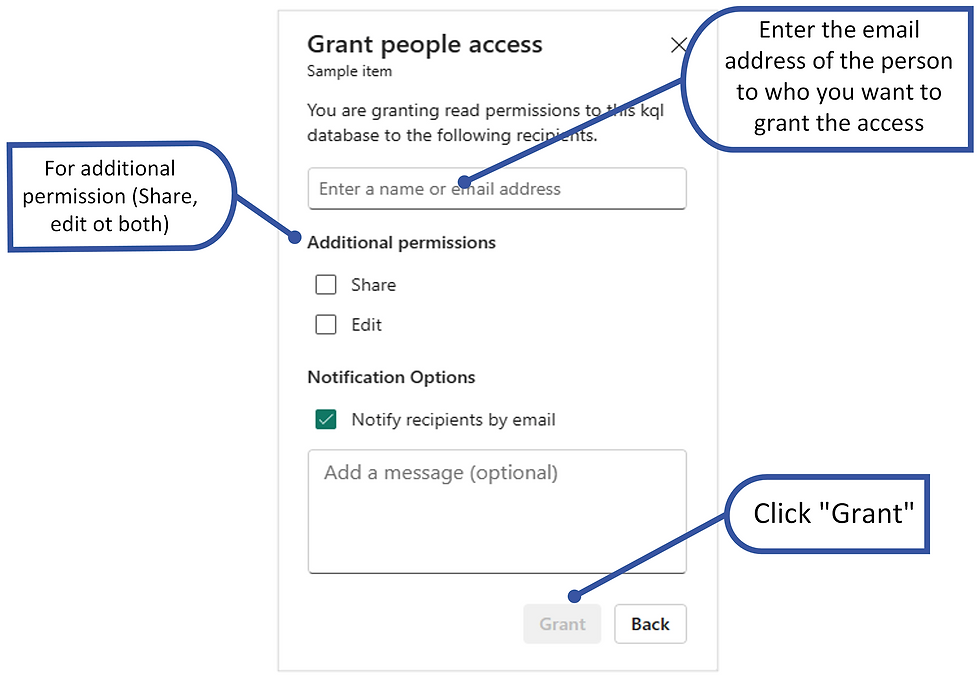
STEP 5: Finally, click on "Grant."
Once you've completed these steps, you'll be able to see a list of all the people, groups, and accounts that have access to the permission management page. You can also view their respective workspace roles, permissions, and more. If you need to make changes or remove permissions, you can do so by selecting the context menu.
Conclusion
Sharing items and managing permissions in Microsoft Fabric is essential for smooth collaboration. Whether you're new or experienced, these skills are key to success.
By following this guide, you've learned how to use Microsoft Fabric effectively. Now you can confidently share resources and control access.


Hey! How about making a video tutorial on this topic? I think many readers of your articles would appreciate this. If you've never done this, here are several ways to record your screen on a Mac. I advise you to try this, what if your videos become very relevant?