
Improving API Documentation With AWS Lambda
- The Tech Platform

- Mar 18, 2021
- 7 min read


As a serverless service, AWS Lambda lets you run code without having to set up supporting infrastructure. Simple API calls, like I was planning, are perfect for Lambda, and to make it even better, I wouldn’t have to worry about provisioning servers or making sure they are running when people want to test the example code.
AWS Lambda supports a number of different programming languages, but I determined that using Node.js would make it as quick and simple as possible. I wanted to keep the deployment simple (just copying and pasting my code in the AWS Console), so that seemed like the best option. I’ve written a number of API tests using Node.js, so that, at least, wouldn’t be new territory.
Deciding What To Demonstrate
My next task was to decide which API calls I wanted to include. There should be enough to be useful, but not too many to be confusing or overwhelming. I decided on making three calls: one to authenticate (which is required by any other API call) and one for each of our two APIs’ main endpoints. These examples will clearly demonstrate how to use the authentication call and how to use its results in two different services we support.
Because I’d be using a sensitive API key in my code, I’d also need to use some sort of secret management. I can’t put plain text keys in my code! I searched around and found Secrets Manager in AWS — perfect! Just another thing I’d need to learn as I implemented the example.
So, as usual, this little Hack Week project was starting to get more complicated, but I was confident in my ability (and also confident in the amazing engineers on my team who could help me if I got stuck).
Getting Started With The Code
I found the Node.js AWS Lambda example documentation from AWS, opened Visual Studio Code and created a new file named index.js. I scrolled down to the Async Handlers section in the documentation since I’d be making API calls, and Async is generally the way to go.
I started with the handler function and, knowing this would be managing all the other calls, I used it to plan the Lambda’s flow. To genericize the code, let’s say I have my authentication API, then I have a fruits API and a veggies API, as shown in Listing 1
Listing 1 — Fruits and Veggies APIs
exports.handler = async(event)=>{
    //get client_id and client_secret from Secrets Manager

    //get apikey from Secrets Manager

    //get token from auth endpoint

    //call fruits endpoint w/ token

    //call veggies endpoint w/ token
};
Now with my plan in place, I had to tackle getting credentials from AWS Secrets Manager.
Learning Secrets Manager
The first thing I needed to do was learn about Secrets Manager. I found this article from Amazon really helpful for getting started.
I logged into the AWS Console, went to Secrets Manager and created a new secret. I added two key/value pairs — one for the client_id, and one for the client_secret, which are needed to authenticate across an API Gateway. After creating those pairs, I noticed AWS provided sample code in a variety of languages to retrieve the values. I created another secret to hold the apikey, which is needed for authenticating against my APIs. I copied the sample code and pasted it into a new function in my index.js file called getSecret, which I made async as well. I made a few modifications to ensure it returned the values for the key/value pairs I added and to make it take the secret name as a parameter (since I had two). Then it was ready to go! It was actually pretty easy to work with, which was a nice surprise. I’m not including the sample code here as it’s available in the AWS Console tailored to the secret you create.
Making The API Calls
First, I needed to make an authenticating API call, which takes the client_id, client_secret and the apiKey and returns a token, which is used in the rest of the API calls. Generally, my experience making API calls in Node.js is with using the SuperTest library. I didn’t want to have to handle package management in a Lambda (remember, trying to keep this as simple as possible), so I searched and found that the https library is widely used and doesn’t need separate package handling.
Now, I needed to learn how https handles requests and responses. I was able to find some code examples for a POST request, which is what I would be doing, and tried them out in Listing 2:
Listing 2 –Making The API Calls (Auth)
exports.getToken=async function(apiKey, clientId, clientSecret){
    let reqBody=`
    {
        "key": "${apiKey}"    \
    }`

    let url='https://my/url/authentication';
        const options={
            method: 'POST',
            headers: {
                'Content-Type': 'application/json',
                'Content-Length': reqBody.length,
                'client_id': clientId,
                'client_secret': clientSecret}};

         const response=await new Promise((resolve, reject)=>{
             const req=https.request(url, options,(res)=>{
                 var body='';

                 res.on('data', function(chunk){
                     body=body+chunk;
                 });
                 res.on('end', function(){
                     if(res.statusCode!=200){
                         console.log(`Call to get key failed with
                                 response code ${res.statusCode}`);
                      }
                     resolve(body);
                  });

              }).on("error",(err)=>{
                  console.log("Error: ",err.message);
                  reject(err);}
               );

               req.write(reqBody);
               req.end();
         })
    return response;
 };
I should mention, Node.js isn’t my strongest language, but this code gets the job done. It’s clear enough that we’re taking in the apiKey value, as well as clientId and clientSecret, making a POST request, and if we get a 200 OK response, we’ll return that token.
The other two API calls — Fruits and Veggies — look pretty similar. I didn’t abstract too much (such as the code that handles the actual API call) because this code is supposed to be quick and very clear to the reader. It’s not the most DRY (Don’t Repeat Yourself), to be sure, but it’s useful for documentation.
These calls are very similar to the authentication calls, except they perform a GET request.
Listing 3 — Making The API Calls (Fruits And Veggies)
exports.getFruits = async function(token, clientId, clientSecret){
    let url='https://my/url/fruits';
    const options={
        method: 'GET',
        headers: {
            'Content-Type': 'application/json',
            'Accept': 'application/json',
            'client_id': clientId,
            'client_secret': clientSecret,
            'Authorization': `Bearer ${token}`
         }
     };

     const response = await new Promise((resolve,reject)=>{
         const req=https.get(url, options,(res)=>{
             var body='';
                 res.on('data', function(chunk)
                 {
                     body=body+chunk;
                 });
                 res.on('end', function(){
                     if(res.statusCode!=200){
                         console.log("Api call failed with response
                                         code "+res.statusCode);}
                      resolve();
                  });
             }).on("error",(err)=>{
                 console.log("Error: ",err.message);
                 reject(err);
             });
             req.end();
        })
 };
Putting The Calls Together
Now I can fill my handler function with calls to each of the other functions to pass on variables, and so on.
Listing 4 — Putting The Calls Together
exports.handler = async(event)=>
{
    //get client_id and client_secret from Secrets Manager
    let creds_raw = await this.getSecret("my_proxy_credentials");
    let creds = JSON.parse(creds_raw);
    let client_id = creds.client_id;
    let client_secret = creds.client_secret;

    //get apikey from Secrets Manager
    let keys_raw = await this.getSecret("my_api_key");
    let keys = JSON.parse(keys_raw);
    let key = keys.key;

    //get token from auth endpoint
    let token = await this.getToken(key,client_id,client_secret);

    //call fruits endpoint w/ token
    await this.getFruits(token,client_id,client_secret);

    //call veggies endpoint w/ token
    await this.getVeggies(token,client_id,client_secret);
};
Keeping my original comments about what needs to be done in the code helps readers understand what I was doing without reading all of the code. Again, we’re getting the client_id and client_secret from Secrets Manager, the apiKeyfrom Secrets Manager, then getting the token from our authenticating API and finally making our calls to the fruits and veggies APIs.
Testing The Code
To test my code, I needed to create the AWS Lambda and use the Test function. I went into AWS Console and created a new Lambda function, chose “Author from scratch” and made sure it used the Node.js 12.x runtime.

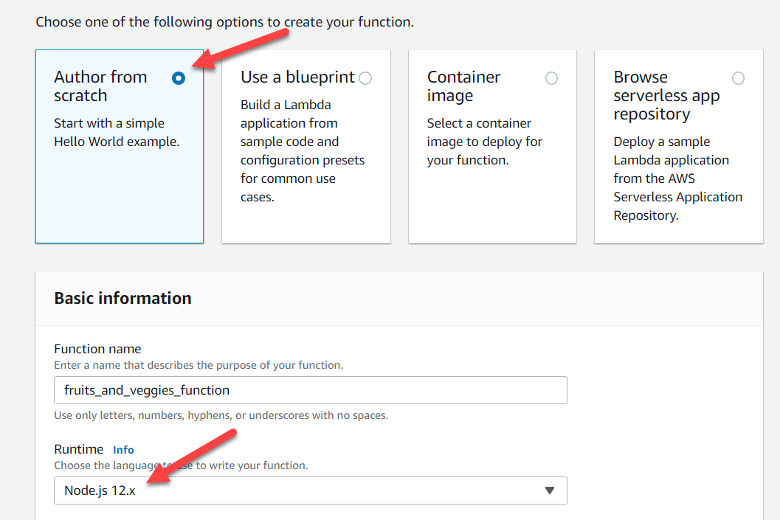
Figure 1 — Create New Lambda Screen
In the Function Code section, I pasted in my index.js file, as it was so far, and hit the big orange Deploy button.

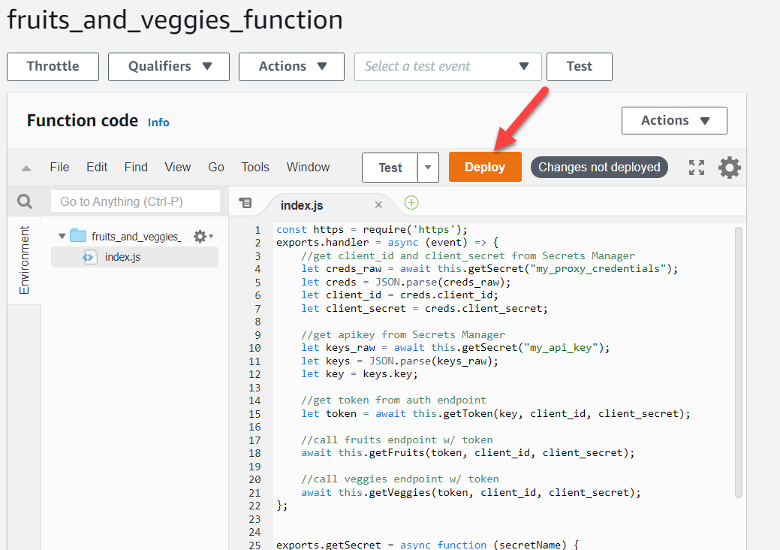
Figure 2 — Deploying Lambda Code
Once deployed, I could test it out. I hit the Test button on the upper-right of the interface and was prompted to create an event. My Lambda function didn’t really consume an event, which means it didn’t matter what was sent, so I chose the default hello-world template, named it and created it.

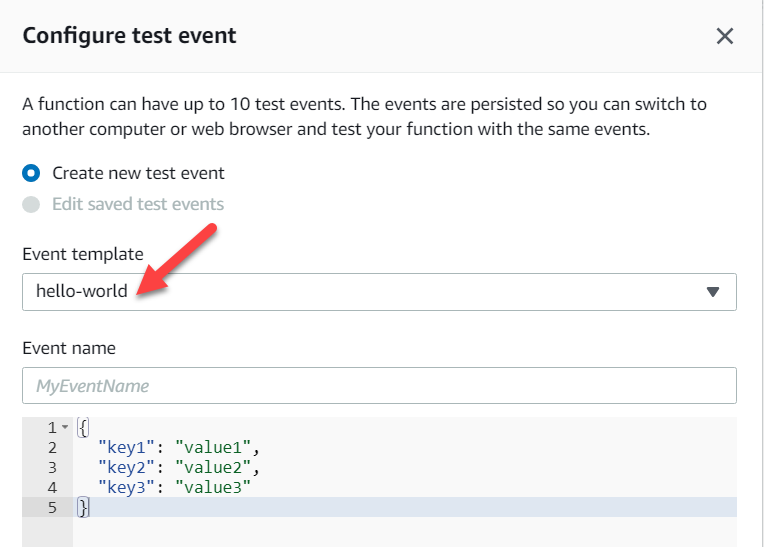
Figure 3 — Configure Test Event
When I hit Test, it would execute the Lambda function and display an Execution Result screen with relevant information, including a link to the logs in CloudWatch. It seemed to work, but I needed to add some logging to be sure. Time to learn more about CloudWatch!

Figure 4 — Testing The Function
Logging To CloudWatch
I realized quickly that you can just use console.log to log to CloudWatch from your Lambda function, and it’ll create a log group automatically. That’s a pretty cool feature of AWS Lambda!
So, I went into CloudWatch, then the logs section and found my log group by searching for the name of my Lambda function. The log streams show detailed logs from my Lambda.

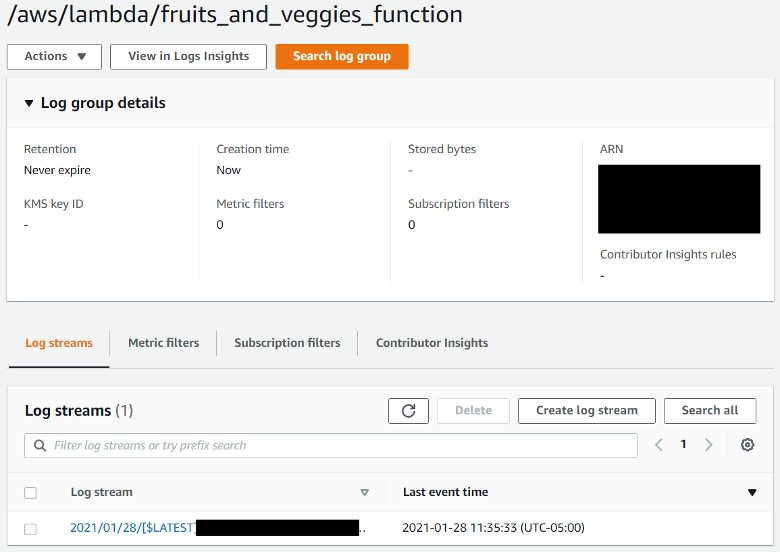
Figure 5 — CloudWatch Log Groups
All I needed to do was add in some console.log statements. I included logging statements for troubleshooting, but, once everything was working properly, what else would be useful for the consumers to see logged? I thought about what I’d want to see as a consumer and added logging statements for the following:
The response code for each API call
The response body for the calls to the fruits and veggies APIs
Obviously, any errors (log statements are already there)
What Else To Include With The Code
I was already planning on checking the code into GitHub, but I figured I could include a Postman Collection of the API calls as well. That way, someone can use it to run the examples instead of digging into JavaScript code. It’s easy enough to export a Collection from Postman and add it to a repository, which can add a lot of value for our consumers.
What To Include In The Documentation
Now, I have this functioning Lambda in AWS, all of this code and the Postman Collection checked into GitHub (which includes a README for the code itself and where to find the Lambda function in AWS Console). But what should I include in the documentation?
I decided on a simple short paragraph, near the top of the documentation:
You can find an example Lambda and Postman collection that utilizes all three of the APIs mentioned above in GitHub (link). The Lambda utilizes AWS Secrets Manager to handle the client_id and client_secret from the API Gateway and the API key.
This doesn’t clutter up the documentation with lots of code and duplication, and it links to a place where more information can be found.
Our consumers now have a clear example of how they can fully utilize our APIs from authentication to getting those fruits and veggies!
Conclusion
By the end of Hack Week, I added only two sentences to the documentation. However, I learned more about AWS Lambda (and implemented one!), CloudWatch, Secrets Manager and the https library. I acted as a consumer of our APIs and was able to clarify a few things in other areas of our documentation as well. Overall, my week was well-spent, and I made it much easier to be a consumer of our APIs!
Source: Medium
The Tech platform


Comments