
How to make a call to chat API using REST API in Azure OpenAI Services
- The Tech Platform

- Feb 28, 2024
- 5 min read
In the evolving world of technology, APIs have become the building blocks of software development. They allow different software systems to communicate and share data, thereby enhancing their functionality. One such powerful tool is the Azure OpenAI Services’ Chat API.
This article aims to guide you through making a call to the Chat API using REST API in Azure OpenAI Services. We will cover the basics of REST APIs, delve into the specifics of Azure OpenAI Services, and finally, walk you through the step-by-step process of making a call to the Chat API.

Rest API in Azure OpenAI Services
REST (Representational State Transfer) is an architectural style defining a set of constraints for creating web services. A REST API (also known as RESTful API) is an application programming interface (API) that conforms to these constraints. It provides a flexible, lightweight way to integrate applications and connect components in microservices architectures.
REST APIs work by sending HTTP requests (like GET, POST, PUT, PATCH, and DELETE) to perform standard database functions like creating, reading, updating, and deleting records within a resource. The responses from these requests can be in various formats, but JSON is the most popular format being used in Web Services.
Importance of REST API in Azure OpenAI Services
Azure OpenAI Service provides REST API access to OpenAI’s powerful language models. With Azure OpenAI, customers get the security capabilities of Microsoft Azure while running the same models as OpenAI. This allows developers to create applications that can interact with a web service4, enabling them to leverage the power of AI in their applications.
API Versioning in Azure OpenAI Services
API versioning is a key aspect of Azure OpenAI Services. The service APIs are versioned using the api-version query parameter.
All versions follow the YYYY-MM-DD date structure. For example, an API version could look like this: 2023-05-15.
This allows Azure to manage changes and updates to the API over time, ensuring backward compatibility and enabling developers to choose which version of the API they want to use.
How to make a call to chat API using REST API in Azure OpenAI Services?
STEP 1: Create an Azure OpenAI Resource
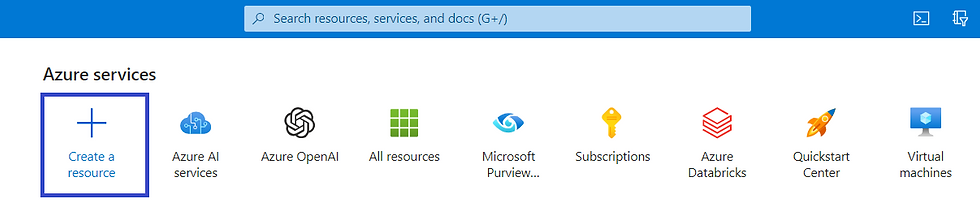
Sign in to the Azure portal. In the left-hand menu, click on “Create a resource”.
In the “Search the Marketplace” box, type “OpenAI” and select it from the dropdown list.
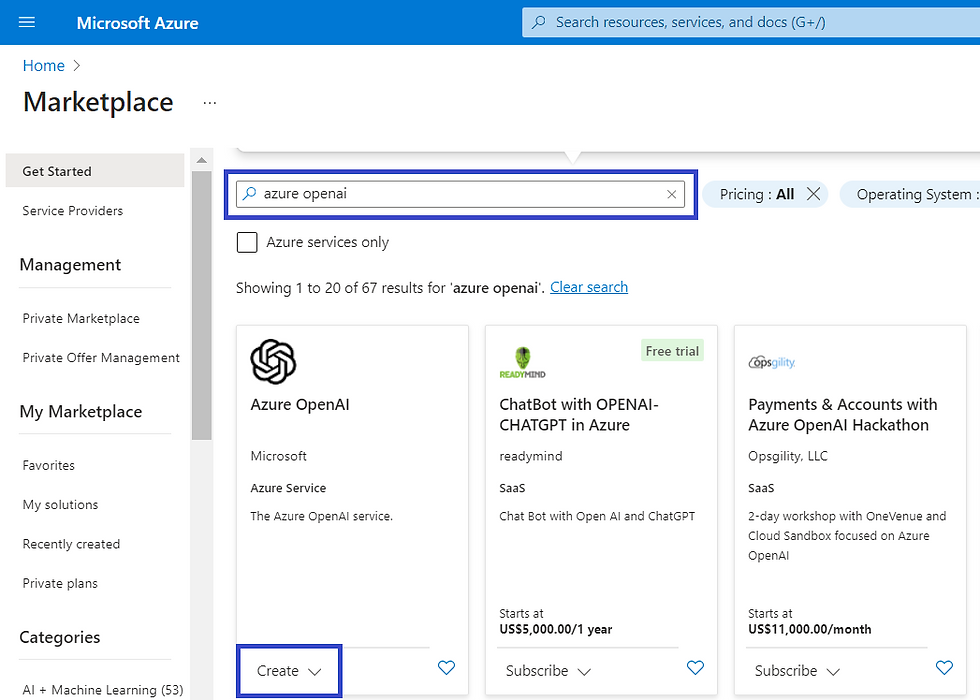
Click the “Create” button and fill in the details for your new resource.
STEP 2: Obtain your API key
Once the Azure OpenAI resource is created, navigate to the resource dashboard. Look for the “Keys and Endpoint” section.
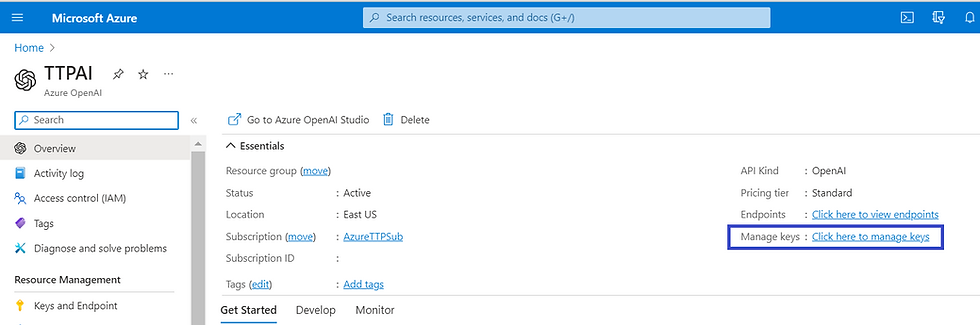
Here, you’ll find your API key. Make sure to save this key securely as you will need it for authentication.
STEP 3: Choose an Authentication Method:
Azure OpenAI Service supports two authentication methods:
API Key authentication:
For this type of authentication, all API requests must include the API Key in the api-key HTTP header. Here’s an example of how to include the API key in a Python requests call:
headers = {
    "api-key": "your-api-key",
    "Content-Type": "application/json"
}
Remember to replace "your-api-key" with your actual API key.
Microsoft Entra ID authentication:
You can authenticate an API call using a Microsoft Entra token. Authentication tokens are included in a request as the Authorization header. The token provided must be preceded by Bearer, for example Bearer YOUR_AUTH_TOKEN. This method is more secure but also more complex.
Here’s an example of how to include the Microsoft Entra token in a Python requests call:
headers = {
    "Authorization": "Bearer YOUR_AUTH_TOKEN",
    "Content-Type": "application/json"
}
Remember to replace "YOUR_AUTH_TOKEN" with your actual Microsoft Entra token.
The choice between these two methods depends on your specific needs and the level of security required for your application. For example, if you’re building a simple application with less sensitive data, API Key Authentication might be sufficient. But if you’re dealing with more sensitive data or need more robust security features, Microsoft Entra ID Authentication would be a better choice.
Making a Completion Call
In the context of Azure OpenAI Services, a “completion” is a text that the model generates based on a given prompt. The “Completions” operation is used to generate one or more predicted completions for a provided prompt.
To make a completion call, you need to send a POST request to the Completions endpoint of the Azure OpenAI API. The endpoint URL looks like this:
url = https://{your-resource-name}.openai.azure.com/openai/deployments/{deployment-id}/completions?api-version={api-version}In this URL, you need to replace {your-resource-name}, {deployment-id}, and {api-version} with your actual resource name, deployment id, and API version respectively.
Code Example
Here’s an example of how to create a completion in Python using the requests library:
import requests

url = "https://{your-resource-name}.openai.azure.com/openai/deployments/{deployment-id}/completions?api-version={api-version}"
headers = {
    "api-key": "your-api-key",
    "Content-Type": "application/json"
}
data = {
    "prompt": "Translate the following English text to French: '{}'",
    "max_tokens": 60
}

response = requests.post(url, headers=headers, json=data)
print(response.json())
In this code:
We first import the requests library, which allows us to send HTTP requests in Python.
We define the URL of the Completions endpoint, replacing {your-resource-name}, {deployment-id}, and {api-version} with our actual values.
We define the headers for our request, including our API key and the content type.
We define the data for our request, including our prompt and the maximum number of tokens we want the model to generate.
We send a POST request to the Completions endpoint with our headers and data.
We print the response from the API, which will be the generated completion.
prompt: The prompt or prompts to generate completions for (encoded as a string or an array of strings). If not specified, the model generates as if from the beginning of a new document.
max_tokens: The maximum number of tokens to generate in the completion.
Secure Handling of API Keys
Secure handling of API keys is crucial as they provide access to your resources. Here are some best practices for handling API keys securely:
Never Share Your Keys: API keys are sensitive information. They should never be shared, posted publicly, or included in version control systems like Git.
Environment Variables: Instead of hardcoding your API keys into your code, you can store them in environment variables. This way, the keys won’t be in your code at all. In Python, you can use the os module to access environment variables:
import os

api_key = os.getenv('API_KEY')
.env Files: Another common practice is to store your keys in a .env file which is then added to your .gitignore file. You can use libraries like python-dotenv to load the keys from the .env file into environment variables.
Azure Key Vault: If you’re using Azure, you can also consider using Azure Key Vault for storing and accessing your API keys securely.
Regularly Rotate Your Keys: Regularly changing your API keys can help to mitigate the impact if a key is compromised.
Use Least Privilege Principle: Only grant the minimum permissions necessary for the API key. If a key is compromised, this will limit what an attacker can do.
Monitor Usage: Keep an eye on the usage of your API keys to detect any unusual activity.
Conclusion
Azure OpenAI Services provides a powerful platform for leveraging AI in your applications. Through its REST API, you can make calls to the Chat API and generate completions based on given prompts. The process involves setting up an Azure OpenAI resource, obtaining an API key, and choosing an authentication method. It’s important to handle API keys securely and to use error handling in your API calls.


Dive into the wild world of Brazzers3x, where fantasies turn into high-quality adult entertainment. Featuring top-rated stars, sizzling scenes, and steamy storytelling, it's your one-stop destination for bold, erotic fun. Discover what makes this site a fan favorite and indulge in exclusive content that satisfies every craving and desire.