
How to fix Kinect v2 not working in Windows 10
- The Tech Platform

- Sep 22, 2020
- 2 min read
Updated: Mar 22, 2023


Kinect v2 is a motion-sensingR input device developed by Microsoft for use with Windows PCs and the Xbox One console. It was released in 2014 as an upgrade to the original Kinect for Xbox 360.
Kinect v2 uses a combination of infrared and colour cameras, as well as depth sensors, to track the movements and gestures of users in front of the device. It can recognize faces, voices, and hand gestures, and can be used for gaming, motion-controlled applications, and virtual reality experiences.
The Kinect for Windows SDK allows developers to create software that can utilize the Kinect v2's sensing capabilities, making it useful for a wide range of applications, from gaming and entertainment to healthcare and education.
There could be several reasons why Kinect v2 is not working in Windows 10, such as:
Outdated drivers: The Kinect v2 requires specific drivers to function properly. If these drivers are outdated or not installed correctly, the device may not work properly.
Incompatible hardware: The Kinect v2 requires a USB 3.0 port and a compatible processor to function correctly. If your computer does not meet these requirements, the device may not work.
Compatibility issues with Windows 10 updates: Some Windows 10 updates may cause compatibility issues with the Kinect v2 drivers, leading to the device not working properly.
Power issues: The Kinect v2 requires a certain amount of power to function properly. If the USB port or power supply is not providing enough power to the device, it may not work correctly.
Hardware or software issues: There could be hardware or software issues with the device itself, such as a faulty sensor or a corrupted driver file.
How to fix Kinect v2 not working in Windows 10
Here we have several solutions to solve this problem:
Using Windows Registry Editor
Other Solutions
Solution 1: Using Windows Registry Editor
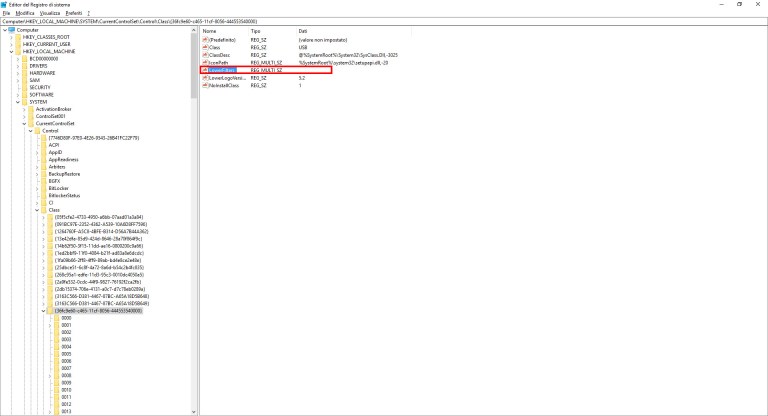
STEP 1: Open the Windows Registry. Press Windows key + R, type “regedit.exe” and then press ENTER.
STEP 2: Navigate the following path:
HKEY_LOCAL_MACHINE\SYSTEM\CurrentControlSet\Control\Class\{36fc9e60-c465-11cf-8056-444553540000}

STEP 3: Double click on the “Lower Filters” item
STEP 4: A pop-up will show you. Delete all the characters written inside the Value Data textbox (mine contained “AiChargerPlus”)


STEP 5: Click OK to close the dialog, then close the registry

STEP 6: Close the Registry Window and restart your PC.
Other Solutions
Solution 1: Check device manager: Open Device Manager and look for any warnings or errors related to the Kinect sensor. If you see any warnings or errors, try uninstalling and reinstalling the device driver for the sensor.
Solution 2: Update drivers: Go to the Microsoft Download Center and download the latest version of the Kinect for Windows SDK. Install the SDK, which will automatically install the necessary drivers for the sensor.
Solution 3: Check Windows updates: Make sure that you have installed all available Windows updates, as these updates often include important driver updates for devices like the Kinect sensor.
Solution 4: Reinstall Kinect runtime: Uninstall the Kinect runtime and then reinstall it from the Microsoft website.
Solution 5: Check USB ports: Try plugging the Kinect sensor into a different USB port, as some USB ports may not provide enough power to the sensor.
Solution 6: Check compatibility: Make sure that your computer meets the minimum system requirements for the Kinect sensor. The sensor requires a USB 3.0 port and a compatible processor.
Solution 7:Disable energy saving: Make sure that energy-saving features are disabled for USB ports in your computer's power management settings.
That's It!


Comments