How to enable LSA protection in Windows 11
- Sofia Sondh

- Mar 30, 2023
- 3 min read
LSA - Local Security Authority protection is a security feature in Microsoft Windows that helps prevent unauthorized access to the Local Security Authority (LSA) subsystem. The LSA is a component of Windows that is responsible for managing security policies and authentication.
LSA protection works by restricting access to the LSA subsystem to trusted system processes only. This helps prevent malicious programs or users from tampering with the security settings or credentials stored by the LSA. Additionally, LSA protection can help prevent pass-the-hash attacks, where an attacker steals the hashed password from the LSA and uses it to gain access to other resources on the network.
LSA protection is enabled by default on modern versions of Windows and is an important security feature for maintaining the integrity of the operating system.
How to enable LSA protection in Windows 11
There are three methods to enable local security authority protection in Windows 11:
Using Windows Security
Using Local Group Policy Editor
Using Registry Editor
Method 1: Enable LSA using Windows Security
Windows Security is an inbuilt tool that is constantly monitoring the Windows system for viruses, malware, and other security threats. This tool allows you to manage the Local Security Authority protection.
If the Local Security Authority protection feature is disabled, you may receive a warning message in Windows Security stating "Local Security Authority protection is off, Your device may be vulnerable". This warning message indicates that cyber attackers could gain unauthorized access to your system by stealing your credentials, putting your device and system resources at risk.
To avoid such security threats, you need to enable the Local Security Authority protection feature in Windows Security and then restart your PC. This action will fix the warning message and prevent cyber criminals from compromising your system.
Follow the below steps to enable LSA protection:
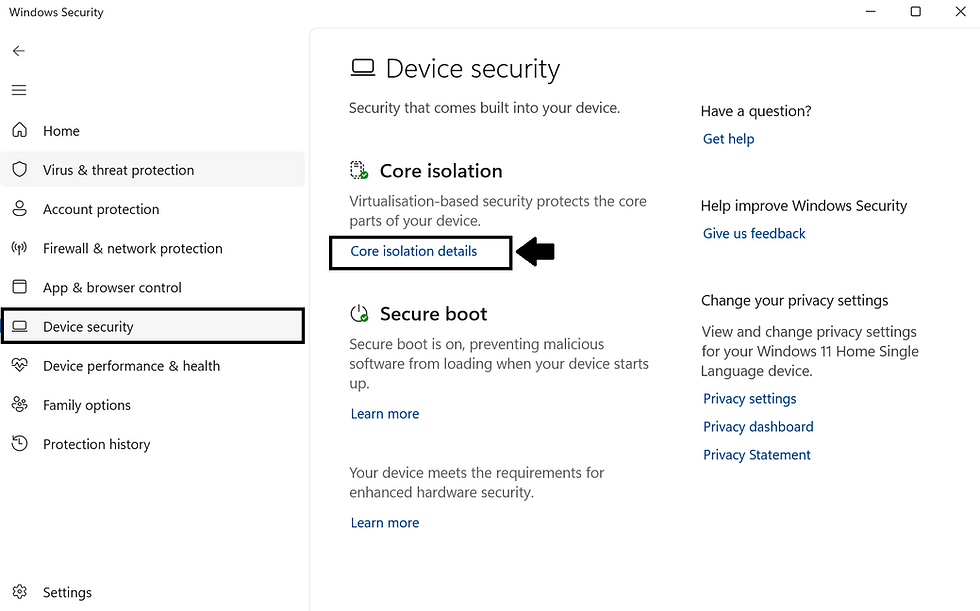
STEP 1: Open the Windows Security app and go to the "Device Security" option.
STEP 2: Now, under the Core isolation section, click on the Core isolation details link.

STEP 3: Here, turn On the toggle button for the Local Security Authority protection option.

STEP 4: User Account Control prompt that appears. Click YES.
STEP 5: Close the Window and restart your PC to apply the changes.
Method 2: Enable Local Security Authority Protection using Local Group Policy Editor
You can use Local Group Policy Editor to enable LSA protection in Windows. Follow the below steps to do so:
STEP 1: Press the Windows Key + R. Type "gpedit.msc" and click OK.
STEP 2: Navigate the following path:
Computer Configuration => Administrative Templates => Local Security Authority.STEP 3: Now, double-click on the ‘Configure LSASS to run as a protected process‘ policy.

STEP 4: A prompt box will appear.
Select "Enable" to enable the LSA protection.
Here, under the "Configure LSA to run as a protected" process, select "Enabled with UEFI Lock". With this setting, LSA will run as a protected process and the configuration will be UEFI Locked, which means, it cannot be disabled remotely. If you don’t want this restriction, you can select Enabled without UEFI Lock in the dropdown.

STEP 5: Click OK followed by Apply.
STEP 6: Close the Local Group Policy Window and restart your PC to apply the changes.
Method 3: Enable LSA protection using Registry Editor
You can also enable the LSA protection with Registry Editor. Follow the below steps to do so:
STEP 1: Press the Windows key + R. Type "regedit.exe" and click OK.
STEP 2: Navigate the following path:
Computer\HKEY_LOCAL_MACHINE\SYSTEM\CurrentControlSet\Control\LsaSTEP 3: In the right panel, double-click on "RunAsPPL".

STEP 4: A prompt box will appear. Set the value to 1 and click OK.

STEP 5: Close the Registry window and restart the PC to apply the settings.
Conclusion
LSA Protection is a security feature in Windows that uses Protected Process Light to isolate and protect the Local Security Authority process and its associated secrets from unauthorized access, helping to improve the security of the system.


Comments