
Handling the new UIDatePicker in Xamarin.Forms
- The Tech Platform

- Jan 30, 2021
- 2 min read


In iOS14, Apple introduced us to a new UIDatePicker. However, you may want to revert back to the old wheel-like style. How can we do it? Let’s check it out!
Today we’ll be taking a look at the UIDatePicker. If you’ve ever used an iOS device you probably know about it. It’s had a typical look-and-feel for ages where you spin a few wheels to pick your date of choice. From iOS14 onwards, we are getting some new options straight out of the box though!

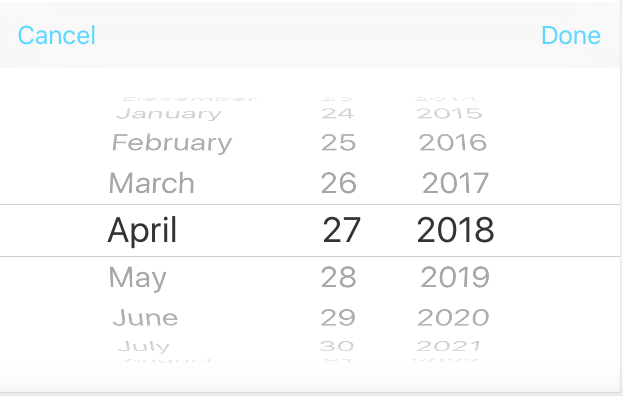
The classic UIDatePicker with its wheels.
Xamarin.Forms now exposes a new property on UIDatePicker called PreferredDatePickerStyle, which is an enumeration with a few different values. If you were afraid the old wheel-style was gone forever, fear not! It is still there, it just isn’t the default anymore. Here are your current options, which we’ll explore in-depth a bit more:
Automatic
Compact
Inline
Wheels
Automatic
You can choose the automatic style to let the system use the current platform and date picker mode to determine an appropriate display style. This is the new default value.
Compact
This style displays a label that expands to display an editing view in a modal window. Depending on whether you’re picking a date, time or both this dialog will slightly differ.

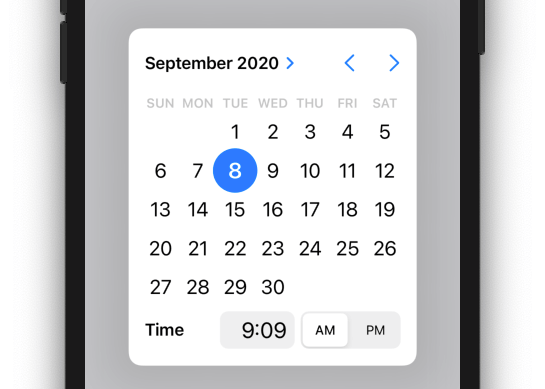
The modal shown when using UIDatePicker in compact mode.
Inline
The inline style, while similar to compact, cuts out the label that you have to tap to open the modal window. Instead, it just displays the content of the modal window shown above inline with where you place your DatePicker control.

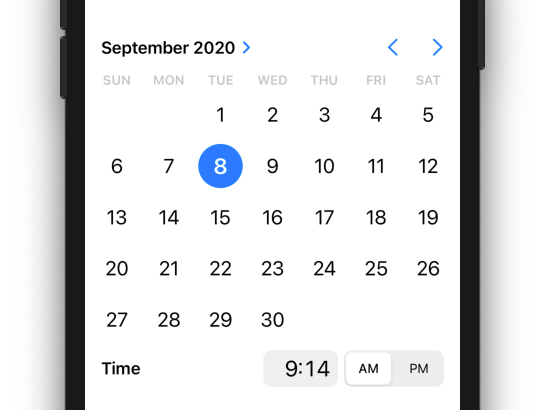
The UIDatePicker in inline mode.
Wheels
The traditional set of scrolling wheels as pictured earlier on in this post.
How to change the UIDatePicker style
Unfortunately, at the time of this writing, there’s no platform-specific that we can leverage to set this PreferredDatePickerStyle. This means we will have to resort to something like a custom renderer to be able to influence the style. Luckily, the amount of code for it is quite manageable.
[assembly: ExportRenderer(typeof(DatePicker), typeof(MyDatePickerRenderer))]
namespace MyProject.iOS.Renderers
{
    public class MyDatePickerRenderer : DatePickerRenderer
    {
         protected override void OnElementChanged(ElementChangedEventArgs<DatePicker> e)
        {
            base.OnElementChanged(e);
            if (e.NewElement != null && Control != null)
            {
            if (UIDevice.CurrentDevice.CheckSystemVersion(14, 0))
            {
            UIDatePicker picker = (UIDatePicker)Control.InputView;
            picker.PreferredDatePickerStyle = UIDatePickerStyle.Wheels;
                }
            }
       }
   }
}
Here you can see that we inherit from DatePickerRenderer. If you already have a custom renderer inheriting from this, you could alternatively add the required code snippet below into the existing renderer. In the snippet we can see that we first check whether or not we’re running on iOS14 or above by using CheckSystemVersion, since the APIs don’t exist in lower versions. Next, we grab the InputView from our Control variable, as that’s where the UIDatePicker resides. We then proceed to set the PreferredDatePickerStyle to the required value.
Conclusion
In this post we took a look at the different UIDatePicker options at our disposal from iOS14 onwards. We also looked at how we could leverage a custom renderer to be able to select our preferred type of UIDatePicker.
Source: Paper.li
The Tech platform


Comments