
Data Binding in Blazor
- The Tech Platform

- Apr 6, 2021
- 7 min read
Updated: Jan 6, 2024
Data binding is a fundamental concept in web development that plays a crucial role in creating dynamic and interactive user interfaces. In the realm of Blazor, a web framework developed by Microsoft, data binding empowers developers to establish seamless connections between the user interface and the underlying data model. In this article, we will delve into the intricacies of data binding in Blazor, exploring its various forms and understanding how it contributes to the development of modern, responsive, and user-friendly web applications.

Table of Contents:
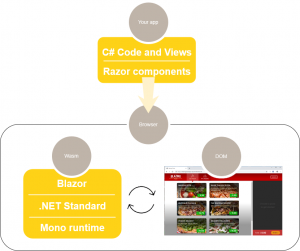
Data Binding in Razor Components
Data Binding in DOM Elements
Role in Blazor
One-Way Data Binding
Two-Way Data Binding
Event Binding
What is Data Binding?
Data binding is a powerful concept in web development that allows you to establish a connection between the user interface (UI) and the underlying data model. In the context of Blazor, a web framework developed by Microsoft, data binding plays a crucial role in creating dynamic and interactive web applications.
Read - Tools to build ASP.NET Blazor Apps
Blazor supports two-way data binding, and it can be applied to both Razor components and DOM elements. Here's an explanation of data binding and its role in Blazor:
Data Binding in Razor Components
Two-Way Binding:
Blazor enables two-way data binding, meaning changes in the UI automatically update the underlying data model, and vice versa.
@bind Directive: The @bind directive is used in Razor components to establish a two-way binding between a property in the component and a corresponding attribute or parameter in the child component or the calling code.
Example:
<input type="text" @bind="UserName" />In this example, the UserName property in the component is bound to the value of the input element. Any changes in the input element update the UserName, and changes in UserName update the input element.
Event Handling:
You can use event handlers to respond to user interactions and update the data model accordingly.
Example:
<button @onclick="UpdateCounter">Click me</button>In this example, the UpdateCounter method is called when the button is clicked, allowing you to update the data model.
Data Binding in DOM Elements
Binding HTML Attributes: You can bind HTML attributes directly to properties in the component.
Example:
<img src="@ImageUrl" alt="Blazor Logo" />Here, the src attribute of the img element is bound to the ImageUrl property in the component.
Binding CSS Classes: You can bind CSS classes dynamically based on the state of your data model.
Example:
<div class="@ (IsHighlighted ? "highlight" : "")">Content</div>The highlight class is applied when IsHighlighted is true.
Role in Blazor
Dynamic UI Updates: Data binding in Blazor allows for dynamic updates of the UI based on changes in the underlying data model. This provides a more interactive and responsive user experience.
Simplified Code: Data binding reduces the amount of boilerplate code needed to synchronize the UI with the data model. This leads to cleaner and more maintainable code.
Consistent State: By establishing a two-way binding, Blazor ensures that the UI and the data model are always in sync, leading to a consistent application state.

Read - Blazor Hosting Models
Types of Data Binding in Blazor
Blazor, as a Single Page Application (SPA) framework, brings forth powerful features like components and various types of data binding. It operates entirely within the browser, providing a seamless and responsive user experience.
Blazor supports three essential types of data binding:
One-way Data Binding:
Involves updating the view based on changes in the model.
Allows for a straightforward flow of information from the model to the UI.
Two-way Data Binding:
Enables bidirectional synchronization between the model and the view.
Changes in the model reflect in the UI, and vice versa.
Event Binding:
Facilitates responding to user interactions by associating methods with specific events.
Offers flexibility in handling various events such as clicks, keypresses, etc.
Pre-requisites
For those new to Blazor, consider reviewing fundamental articles on Blazor for a comprehensive understanding.
Basic knowledge of Razor syntax is recommended. Refer to the official Microsoft docs for a quick overview.
Ensure Visual Studio or Visual Studio Code is installed on your system.
Install Blazor language services.
Command Line: dotnet new -i Microsoft.AspNetCore.Blazor.Templates
1. One-way data binding
One-way data binding in Blazor involves rendering the view based on the current value of the model, which can be a property or a simple variable. In the context of a Blazor component, the rendering logic is typically defined in the Razor file (e.g., Counter.cshtml). Let's analyze an example of one-way data binding in a Blazor Counter component:
@page "/counter"

<h1>Counter</h1>
<p>Current count: @currentCount</p>

@functions {
	int currentCount = 0;
}
In this example, we have a Counter component with a single member defined in the @functions block. The currentCount variable represents the model, and its value will be displayed in the view. The view is updated based on the current value of currentCount.
Explanation of the code:
@page "/counter": Specifies the route for the Counter component. When the application navigates to "/counter," this component will be displayed.
<h1>Counter</h1>: Displays a heading for the Counter component.
<p>Current count: @currentCount</p>: Renders the current value of the currentCount variable. This is where one-way data binding occurs. The view is updated whenever the currentCount value changes.
@functions: Defines the members and logic for the component.
int currentCount = 0;: Initializes the currentCount variable with an initial value of 0.
Now, let's simplify the code by removing the button and associated logic:
@page "/counter"

<h1>Counter</h1>
<p>Current count: @currentCount</p>

@functions {
	int currentCount = 0;
}
In this simplified version, the Counter component only displays the current count without the button to increment it. The value of currentCount will still be updated based on the component's rendering.
As per one-way binding logic, the view gets updated when it renders, reflecting the value set to the variable (currentCount in this case). The HTML element <p>Current count: @currentCount</p> acts as the binding point, and the content inside the element gets dynamically updated as the currentCount variable changes.
Output
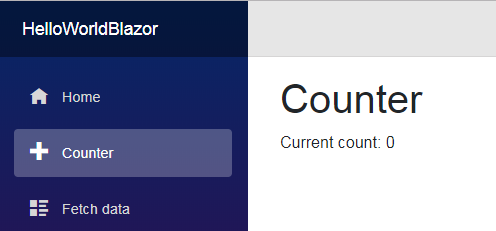
This output is a result of the one-way data binding where the view is rendered based on the current value of the currentCount variable.
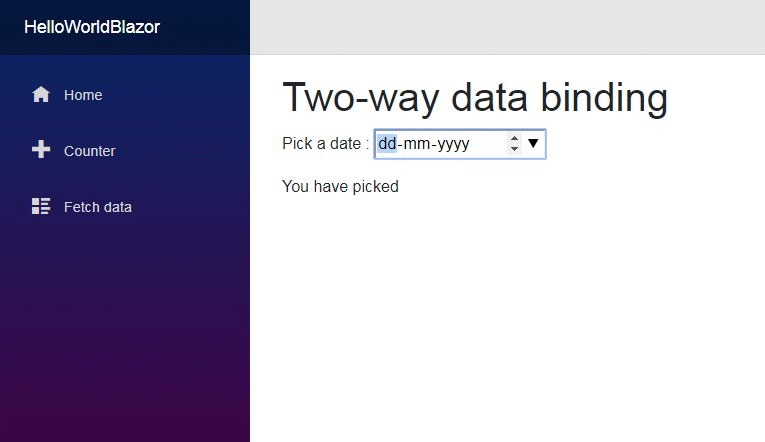
2. Two-way data binding
In two-way data binding, changes in the model automatically update the view, and vice versa. In Blazor, this is achieved using the bind attribute. Let's go through an example to demonstrate two-way data binding in a Blazor component named twowaybinding.cshtml:
 @page "/twowaybinding"
 <h1>Two-way data binding</h1>
 <p>Pick a date : <input type="date" bind="@pickeddate" /></p>
 <p>You have picked @pickeddate</p>

 @functions {
 string pickeddate;
 }
In the above code:
@page "/twowaybinding": Specifies the route for the twowaybinding component. When the application navigates to "/twowaybinding," this component will be displayed.
<h1>Two-way data binding</h1>: Displays a heading for the component.
<p>Pick a date: <input type="date" bind="@pickeddate" /></p>: This line creates an input element of type date. The bind attribute is used to establish two-way data binding with the pickeddate variable. Any changes made in the input field will automatically update the value of pickeddate, and conversely, changes to the pickeddate variable will be reflected in the input field.
<p>You have picked @pickeddate</p>: Displays the picked date from the model (pickeddate). This line demonstrates that changes in the model automatically update other portions of the view.
@functions: Defines the members and logic for the component.
string pickeddate;: Declares the pickeddate variable, which is used for two-way data binding with the input field.
The twowaybinding component showcases two-way data binding in Blazor. The input field is bound to the pickeddate variable, enabling automatic synchronization between the model and the view. When a user picks a date, it updates the pickeddate variable, and the corresponding display is automatically updated to show the selected date. Similarly, changes to the pickeddate variable will be immediately reflected in the input field and the associated display.
Output
3. Event Binding
Event binding in Blazor allows you to respond to user interactions by associating methods with specific events. Events can range from simple button clicks to more complex interactions like keyboard or mouse events.
Here, we'll explore three examples of event binding in Blazor:
Example 1: Simple Click Event
@page "/counter"

<h1>Counter</h1>
<p>Current count: @currentCount</p>
<button class="btn btn-primary" onclick="@IncrementCount">Click me</button>

@functions
{
	int currentCount = 0;

	void IncrementCount()
	{
		currentCount++;
	}
}
In this example, the onclick attribute is used to bind the IncrementCount method to the click event of the button. When the button is clicked, the IncrementCount method is called, incrementing the currentCount variable. This is a simple demonstration of event binding.

Example 2: Keyboard Event with Event Arguments
<input type="text" onkeypress="@(e => KeyPressed(e))" />
<p>Message: @pressedkeys</p>

@functions {
	string pressedkeys;

	private void KeyPressed(UIKeyboardEventArgs args)
	{
		if (args.Key == "a")
		{
			pressedkeys = "You pressed key A.";
		}
		else
		{
			pressedkeys = "You pressed a key other than A.";
		}
	}
}
In this example, the onkeypress event is used to bind the KeyPressed method to the keyboard event of the input field. The method takes a UIKeyboardEventArgs argument, allowing you to access information about the keyboard event. The displayed message is updated based on whether the user pressed the "a" key or any other key.
Output:

Example 3: Using Lambda Expression for Click Event
<button onclick="@(e => Console.WriteLine("Clicked!"))">Click</button>Here, a lambda expression is directly used in the onclick attribute to handle the click event of the button. In this case, when the button is clicked, the lambda expression prints "Clicked!" to the console. This showcases the flexibility of using lambda expressions for simple event handling.
In each example, event binding allows you to associate methods with specific events, enabling you to respond to user interactions and update the UI or perform other actions accordingly. The key is to use the appropriate event and handle it with the corresponding method, providing a dynamic and interactive user experience in your Blazor application.
User-defined events
User-defined events in Blazor are essential when developing single-page applications that require custom interactions and updates in response to specific triggers. In such scenarios, developers might need to define their own events and manually initiate UI refresh. To accomplish this, the BlazorComponent.StateHasChanged method can be utilized. One practical use case is when you want to periodically update the UI, for example, displaying the current time in a specific format and updating it along with the system time.
Let's explore an example that demonstrates the concept of user-defined events:
@page "/userdefinedevent"
@using System.Threading;

<h1>User Defined Events</h1>
<br/>
<button onclick=@StartClock>Start the clock</button>
<br/><br/> Your System Clock: @currenttime

@functions
{
	string currenttime = DateTime.Now.ToString("dd MMM yyyy hh:mm:ss");

	void StartClock()
	{
		var timer = new Timer(new TimerCallback(_ =>
		{
			currenttime = DateTime.Now.ToString("dd MMM yyyy hh:mm:ss");
			this.StateHasChanged();
		}), null, 1000, 1000);
	}
}
In this code:
@page "/userdefinedevent": Specifies the route for the userdefinedevent component.
@using System.Threading;: Imports the System.Threading namespace to use the Timer class.
<h1>User Defined Events</h1>: Displays a heading for the component.
<button onclick=@StartClock>Start the clock</button>: Renders a button that, when clicked, triggers the StartClock method.
Your System Clock: @currenttime: Displays the current time in a specified format, which will be periodically updated.
@functions: Defines the members and logic for the component.
string currenttime = DateTime.Now.ToString("dd MMM yyyy hh:mm:ss");: Initializes the currenttime variable with the current system time.
void StartClock(): Defines the StartClock method, which sets up a Timer to update the currenttime variable every second and triggers a UI refresh using StateHasChanged().
This example showcases the concept of a user-defined event where clicking the "Start the clock" button initiates a periodic update of the displayed system time. The StateHasChanged method is crucial in manually triggering a UI refresh when changes occur outside of the typical event handling.

Conclusion
In conclusion, data binding in Blazor serves as the backbone for developing web applications that are not only visually appealing but also highly responsive to user interactions. The ability to effortlessly synchronize the UI with the underlying data model simplifies the development process, making it more intuitive and efficient.


Comments