
Fix: Dark Mode stuck in Windows 11
- The Tech Platform

- Nov 12, 2022
- 4 min read
Updated: Mar 23, 2023
Here, we have 7 different ways to Fix Dark Mode stuck in Windows 11.

You know that you can Enable or Disable the Dark Mode feature in Windows 11 as per your choice. The Dark Mode feature gives your screen a cool black look and is helpful for those who don’t like too much brightness. However, some people find it annoying because it makes it harder to see their computer screens. But sometimes it can get stuck and it won’t change back to the light mode when you want it to.
Below we have some of the issues due to which Dark Mode is struck in Windows 11:
You have not activated your Windows version – If you have not activated your copy of Windows, you may face this problem as you cannot modify some settings until you enter the product key.
Virus/malware – It’s possible that you have a rogue program running on your machine that automatically changes your Windows theme to dark mode. If you don’t have an antivirus installed, we recommend installing a reliable antivirus program to secure your system.
Incompatible programs – Another possibility is that you have some incompatible applications installed. If any apps are using their own custom themes, they could be preventing Windows from switching to dark mode properly.
Recent Windows updates – Microsoft releases Windows updates from time to time that includes security fixes for vulnerabilities. But, sometimes they have issues that can interfere with the performance of your PC and make your Windows 11 stuck in dark mode.
Fix: Dark Mode stuck in Windows 11
Some of the methods are:
Disable High Contrast Theme
Disable Auto Dark Mode
Verify Group Policy Editor
Run SFC and DISM scan
Restart Windows Explorer
Check Registry Settings
Restoro PC Repair Tool
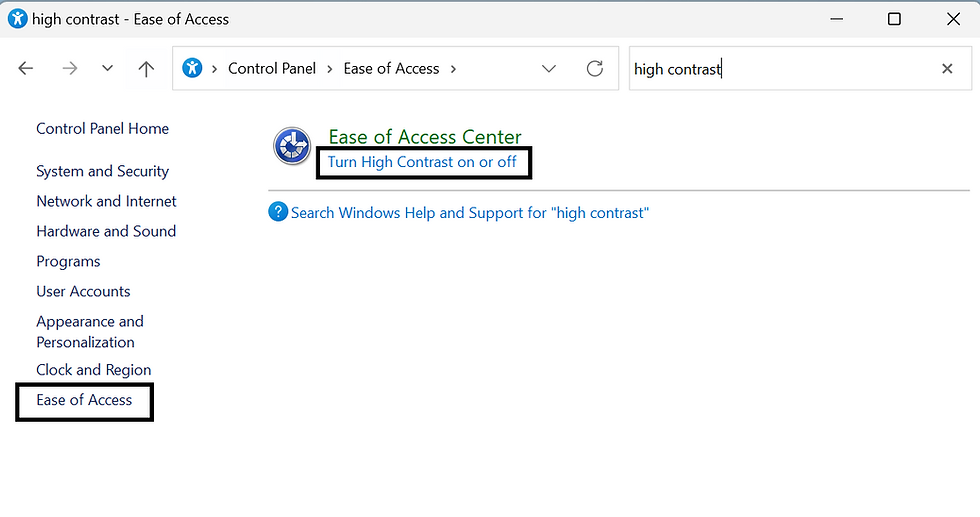
Method 1: Disable high contrast theme
STEP 1. Open Control Panel and click on Ease of Access.
STEP 2. Now, search "High Contrast".
After that click on "Turn High Contrast on or off".
STEP 3. Now, Settings App will open.

STEP 4. Go to Accessibility => Contrast themes.

STEP 5. Make sure the Contrast themes is "None". (See the above image).
STEP 5. Close the Window and restart your PC to apply the settings.
Method 2: Disable Auto Dark Mode
There are some third-party apps that allow users to switch between Dark and Light modes automatically. You can set a time, and the modes will the enabled in automation. If you have such apps enabled on your computer, you need to disable them. One of the most common apps for this purpose is Auto Dark Mode. Check your system tray and Task Manager if you or someone has installed it on your PC.
Method 3: Verify Group Policy Settings
There are some Group Policy settings that could be responsible for this issue on your computer. You need to check them one after one and set them to the factory defaults. To verify Local Group Policy Editor settings, follow these steps:
STEP 1: Press the Windows key + R. Type gpedit.msc and click OK.
STEP 2: Navigate the following path:
User Configuration => Administrative Templates => Personalization.
STEP 3: Check the status of the following settings (Enabled, Disabled or Not Configured).
Prevent changing color scheme
Prevent changing theme
Prevent changing color and appearance
Local a specific theme
Force a specific visual style file or force Windows Classic

Make all the above settings "Not Configured". Click OK followed by Apply.
STEP 4: Close the Group Policy Editor Window and restart your PC.
Method 4: Run SFC and DISM scan
To run Deployment Image Servicing and Management - DISM Scan:
STEP 1. Open Command Prompt and select "Run as administrator"
STEP 2. Copy and paste the below command:
DISM /Online /Cleanup-Image /ScanHealth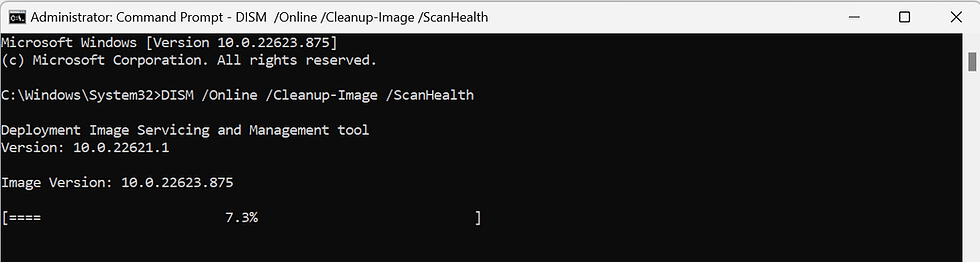
STEP 3. Wait for the process to complete.
To run System File Checker - SFC Scan:
STEP 1. Open Command Prompt and select "Run as administrator".
STEP 2. Copy and paste the below command:
sfc /scannow
STEP 3. Wait for the process to complete.
After scanning both, close the Command Prompt Windows and restart your PC.
Method 5: Restart Windows Explorer
STEP 1: Press the Windows key + X to open WinX menu.

STEP 2: Select Task Manager.
STEP 3: Find Windows Explorer and click on Restart task.

Method 6: Check Registry Settings
You can activate or deactivate the settings using Windows Registry as well. If you turned them on earlier using Registry Editor, you need to disable them using the same utility.
STEP 1: Press the Windows key + R. Type regedit.exe and click OK.
STEP 2: Navigate the following path:
HKEY_CURRENT_USER\Software\Microsoft\Windows\CurrentVersion\Themes\PersonalizeSTEP 3: Find all the Registry Keys and set the value of all the keys from 1 to 0.
To set the value, right-click on the registry key. Set the value. Click OK.

STEP 4: Close the Registry Window and restart your PC.
Method 7: Restoro PC Repair Tool
If all the above methods fail, you can download "Restoro PC Repair Tool". This software will repair common computer errors, protect you from file loss, malware, and hardware failure and optimize your PC for maximum performance. Fix PC issues and remove viruses now in 3 easy steps:
Download Restoro PC Repair Tool that comes with Patented Technologies
Click Start Scan to find Windows issues that could be causing PC problems.
Click Repair All to fix issues affecting your computer's security and performance
Sofia Sondh
The Tech Platform


Comments