
How to Create Windows Forms Application?
- The Tech Platform

- Jun 28, 2022
- 3 min read

Windows Forms is a Graphical User Interface(GUI) class library which is bundled in .Net Framework. Its main purpose is to provide an easier interface to develop the applications for desktop, tablet, PCs. It is also termed as the WinForms. The applications which are developed by using Windows Forms or WinForms are known as the Windows Forms Applications that runs on the desktop computer. WinForms can be used only to develop the Windows Forms Applications not web applications. WinForms applications can contain the different type of controls like labels, list boxes, tooltip etc.
Benefits:
It helps in developing better applications.
It brings a much better user interface.
It helps in making the look of the application more appealing.
It creates a balance between the functionality as well as the appearance of the application.
It reduces the task of merging various GUI components to the application.
It comes with rigid support for GUI components.
It helps in bringing the best out of the application developer.
It makes the task of adding GUI components very easy.
It creates an easy way of getting the GUI in place appropriate for the application.
Efficient way to provide efficiently working GUI also for older computers.
Read More: Difference Between WinForms and WPF
Create Windows Form Application
First, you'll create a C# application project. The project type comes with all the template files you'll need, before you've even added anything.
1. Open Visual Studio.
2. On the start window, select Create a new project.

3. On the Create a new project window, select the Windows Forms App (.NET Framework) template for C#.
(If you prefer, you can refine your search to quickly get to the template you want. For example, enter or type Windows Forms App in the search box. Next, select C# from the Language list, and then select Windows from the Platform list.)

4. In the Configure your new project window, type or enter HelloWorld in the Project name box. Then, select Create.

Visual Studio opens your new project.
Create the application
After you select your C# project template and name your file, Visual Studio opens a form for you. A form is a Windows user interface. We'll create a "Hello World" application by adding controls to the form, and then we'll run the app.
a. Add a button to the form
1. Select Toolbox to open the Toolbox fly-out window.

(If you don't see the Toolbox fly-out option, you can open it from the menu bar. To do so, View > Toolbox. Or, press Ctrl+Alt+X.)
2. Select the Pin icon to dock the Toolbox window.

3. Select the Button control and then drag it onto the form.

4. In the Properties window, locate Text, change the name from button1 to Click this, and then press Enter.
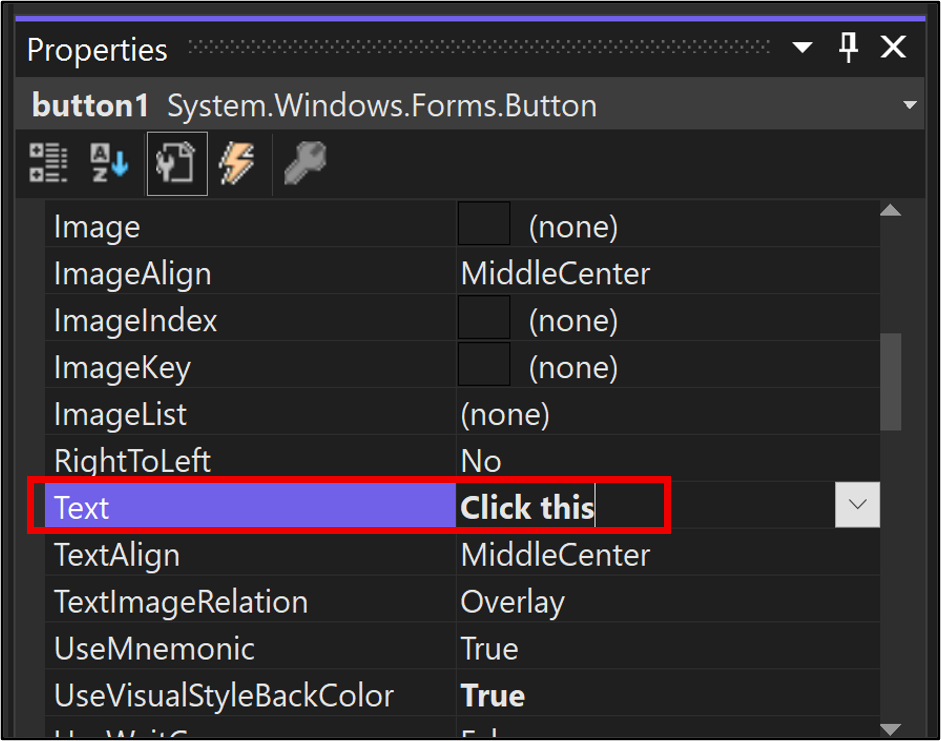
(If you don't see the Properties window, you can open it from the menu bar. To do so, select View > Properties Window. Or, press F4.)
5. In the Design section of the Properties window, change the name from button1 to btnClickThis, and then press Enter.

b. Add a label to the form
Now that we've added a button control to create an action, let's add a label control to send text to.
Select the Label control from the Toolbox window, and then drag it onto the form and drop it beneath the Click this button.
In either the Design section or the (DataBindings) section of the Properties window, change the name of label1 to lblHelloWorld, and then press Enter.
c. Add code to the form
In the Form1.cs [Design] window, double-click the Click this button to open the Form1.cs window. (Alternatively, you can expand Form1.cs in Solution Explorer, and then choose Form1.)
In the Form1.cs window, after the private void line, type or enter lblHelloWorld.Text = "Hello World!"; as shown in the following screenshot:

Run the application
1. Select the Start button to run the application.

Several things will happen. In the Visual Studio IDE, the Diagnostics Tools window will open, and an Output window will open, too. But outside of the IDE, a Form1 dialog box appears. It will include your Click this button and text that says label1.
2, Select the Click this button in the Form1 dialog box. Notice that the label1 text changes to Hello World!.

3. Close the Form1 dialog box to stop running the app.
Advantages of Windows Forms
Extensive documentation can be found on the Internet
Plenty of examples and tested thoroughly for years
Supports WPF
There are lot of 3rd party controls in the market to make the job easier
The designer in Visual Studio is still, as of writing, better for WinForms than for WPF, where you will have to do more of the work yourself with WPF
Disadvantages of Windows Forms
Designing your own look and feel in an application is a lot of work
Extra cost incurred to buy third party controls
Read More: Difference Between WinForms and WPF
Resource: Microsoft
The Tech Platform


Comments