
What is JWT?
- The Tech Platform

- Oct 30, 2020
- 6 min read
JWT means JSON Web Token
It is a standard used to create access tokens for an application. JSON Web Token (JWT) is an open standard (RFC 7519) that defines a compact and self-contained way for securely transmitting information between parties as a JSON object.
A JWT is cryptographically signed (but not encrypted, hence using HTTPS is mandatory when storing user data in the JWT), so there is a guarantee we can trust it when we receive it, as no middleman can intercept and modify it, or the data it holds, without invalidating it.
A JWT consists of 3 strings separated by periods. The 3 of them are the header, payload, and the signature. Follows is an example JWT token made of these 3 parts.
eyJ0eXAiOiJKV1QiLCJhbGciOiJIUzI1NiJ9.eyJpc3MiOiJteXdlYnNpdGUuY29tIiwiaWF0IjpudWxsLCJleHAiOjUxNDM3ODA4MDAwLCJhdWQiOiIiLCJzdWIiOiIiLCJpZCI6IjEyMzQ1OTEiLCJuYW1lIjoiTWFyeSBQb3BwaW5zIiwicm9sZSI6ImVkaXRvciJ9.LYKHdyKj6SnxYaRZH_ZhiW6yk31zaBQehYm4BgawH_o Let’s see what each of these parts contributes to the overall makeup of the token.
Header
JWT header contains metadata about the token in JSON format. Two fields present in the header are alg and typ. ’alg’ specifies the algorithm used to sign the token when generating the signature, which we will talk about in a moment. ’typ’ specifies the type of the token, which is ’JWT’. A typical token header is shown in the following example.
{
"alg": "RS256",
"typ": "JWT"
}
Here, the header states the algorithm used to sign the token is RS256.
The header is stored as the first part of the token after being encoded in base64url.
Payload
The payload of a JWT stores information about the token and any other entity in JSON format. Usually, a JWT used for authentication stores some crucial information about the user, such as the user ID and user role. Token storing user information usually looks like this.
{
"id": "1234591",
"name": "Mary Poppins",
"role": "editor"
}
These JSON fields stored in the payload are known as claims.
In addition, there are some claims that are defined by the JWT standard. It’s not necessary to include all these claims in a JWT, but including at least some of them will be beneficial in most situations. Here are a few standard claims that we can use.
iss: Defines the issuer of the token.
exp: Provides an expiration time to the token. Once this expiration time is passed, the token is no longer valid.
aud: Defines the audience of the token.
iat: Stores the time the token was issued at.
Let’s see how a payload with some standard claims looks like.
{
"id": "1234591",
"name": "Mary Poppins",
"role": "editor",
"iss": "mywebsite.com",
"exp": 3600
}
The payload of a JWT can include as many fields of information as you want, but it’s recommended to keep the size as small as possible. Also, you should not store sensitive information like user passwords in the payload since it is not encrypted. It’s simply encoded in base64url encoding.
Signature
The last part of a JWT token, the signature, is a Message Authentication Code that is used to verify the token was not modified or generated by an outsider except the authorized application servers.
Signature is generated by signing the combined JWT header and payload using an encryption algorithm and a secret stored in the server. Only someone who has the token’s header and payload and the secret can generate a sign accepted by the server. So, it is important to use a strong secret to encrypt tokens and securely store it in the server.
If we use a symmetric algorithm like HMAC SHA-256, the server issuing the JWT and the server validating the JWT should have secure access to the secret. If an asymmetric algorithm like RS256 is used, we can use a public-private key system, where a private key is used to sign the token and a public key is used to validate it.
As you have already guessed, the signature is the most crucial part of a JWT token. It keeps unauthenticated sources out of the application and keeps everything secure. When the issued JWT is sent back to the server with every request from the client-side, the server checks the signature to validate that it’s a token issued by the system itself and then proceed to serve the client request.
How is a JWT token generated?
Using Node.js you can generate the first part of the token by using this code:
const header = { "alg": "HS256", "typ": "JWT" } const encodedHeader = Buffer.from(JSON.stringify(header)).toString('base64') We set the signing algorithm to be HMAC SHA256 (JWT supports multiple algorithms), then we create a buffer from this JSON-encoded object, and we encode it using base64.
The partial result is
eyJhbGciOiJIUzI1NiIsInR5cCI6IkpXVCJ9.Next we add the payload, which we can customize with any kind of data. There are reserved keys, including iss and exp which identify the issuer and the expiration time of the token.
You can add your own data to the token by using an object:
const payload = { username: 'Flavio' } We convert this object, JSON-encoded, to a Buffer and we encode the result using base64, just like we did before:
const encodedPayload = Buffer.from(JSON.stringify(payload)).toString('base64') In this case the partial result is
eyJ1c2VybmFtZSI6IkZsYXZpbyJ9.Next, we get a signature from the header and payload content, which makes sure our content can’t be changed even if intercepted as our signature will be invalidated. To do this, we’ll use the crypto Node module:
const crypto = require('crypto') const jwtSecret = 'secretKey' const signature = crypto.createHmac('sha256', jwtSecret).update(encodedHeader + '.' + encodedPayload).digest('base64') We use the secretKey secret key and create a base64 encoded representation of the encrypted signature.
The value of the signature in our case is
MQWECYWUT7bayj8miVgsj8KdYI3ZRVS+WRRZjfZrGrw=We are almost done, we just need to concatenate the 3 parts of header, payload and signature by separating them with a dot:
const jwt = `${encodedHeader}.${encodedPayload}.${signature}` API authentication
This is probably the only sensible way to use JWT.

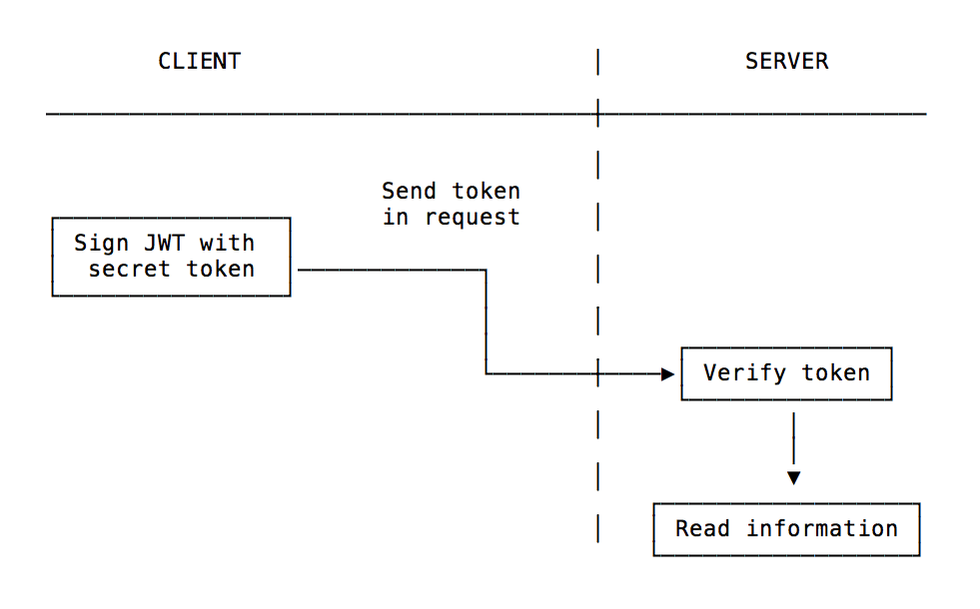
A common scenario is: you sign up for a service and download a JWT from the service dashboard. This is what you will use from now on to authenticate all your requests to the server.
Another use case, which is the opposite, is sending the JWT when you manage the API and clients connect to you, and you want your users to send subsequent requests by just passing the token.
In this case, the client needs to store the token somewhere. Where is the best place? In an HttpOnly cookie. The other methods are all prone to XSS attacks and as such they should be avoided. An HttpOnly cookie is not accessible from JavaScript, and is automatically sent to the origin server upon every request, so it perfectly suits the use case.
Expire your JWT tokens
If in some way a JWT token is stolen by a third-party, they can use the stolen token to access the application and gain the token owner’s privileges. As a solution to this problem, we can set a short expiration time for the JWTs. This way, even if an attacker steals a token, they cannot make use of it for a time long enough to make an undesirable impact.
We can set the exp claim inside the payload to give a short expiration time to the token. However, this action does not eliminate the threat of stolen tokens, just reduces the chances of it leading to a serious attack.
In real-world applications, setting a short expiration time to JWTs is not as simple as it sounds. If we created tokens that expire after ten minutes of creation, it will drastically reduce the user experience of your application’s users. How likely are the users to tolerate having to re-login every 10 minutes they spend on your application?
But there is a solution to this: refresh tokens.
Refresh tokens—what are they?
Since asking the users to log in again after every time a JWT token expires within a short time is not a good solution, developers have found a solution to this in refresh tokens.

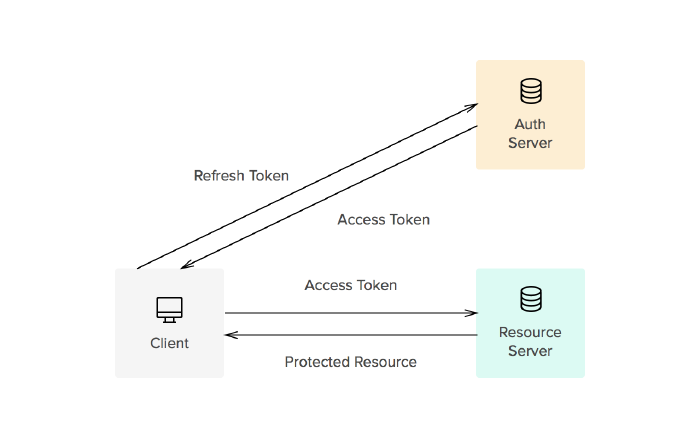
The refresh token is a JWT token with a longer expiration time. It is used to issue a new access token, which is also a JWT token but with a shorter expiration time, every time the old access token expires.
In this situation, the access token is the token that is sent back and forth between the client and the server and has a short expiration time. However, when the access token expires within a short time, instead of asking the user to log in again, the server uses the refresh token to generate a new access token. Refresh token stores data needed to create a new access token.
Since refresh token has a long expiration time and it is not being passed to the client-side in any case, we should store them in a backend database. If an attacker somehow gets access to a refresh token, it’s a serious security threat to the system and the owner of the refresh token given their long expiration time. So, refresh tokens must be stored under maximum security measures.
A user first receives a refresh token when they login to the system. Then, the token is stored in a secure database. Issuing a new refresh token every time a new access token is generated is something you can do to ensure that the security impact of stolen refresh tokens is low.
When a refresh token expires, the user has to log in to the application again and get a new refresh token.
If JWT issuing and validating are handled by separate servers, it’s important to note that issuing access tokens using refresh tokens is a task handled by the authentication server.
Click the below link to see the steps of implementing authentication with JWT in node.js
The Tech Platform


Comments