
What Is Azure Functions
- The Tech Platform

- Feb 20, 2021
- 6 min read
Azure functions is a serverless concept of cloud native design that allows a piece of code deployed and execute without any need of server infrastructure, web server, or any configurations. Azure functions can be written in multiple languages such as C#, Java, JavaScript, TypeScript, and Python.
This article explains what an azure functions is, how to create an azure functions, and how to debug, test, and deploy azure functions.
Azure functions are scalable. When demand of execution increases, more resources are allocated automatically to the service and when requests fall, all extra resources and application instances drop off automatically.

Let’s say, you have to send a birthday email to your customers. You’re an ASP.NET web developer. Instead of building a website in ASP.NET, deploy and hosting it on IIS, just for one feature, you can simply write an azure function and put your email login in the function and deploy it on azure cloud. The azure functions will direct connect to your data source, get your customers emails, and send them an email on a scheduled date and time.
Azure functions are best suited for smaller apps have events that can work independently of other websites. Some of the common azure functions are sending emails, starting backup, order processing, task scheduling such as database cleanup, sending notifications, messages, and IoT data processing.
Why use Azure Functions
Here are some of the reasons why you should use azure functions.
Azure functions are lightweight and serverless.
Azure functions are easier to write and deploy.
Azure functions are fast to execute because there is no large application, startup time, initialization, and other events fired before the code is executed.
Azure functions’ execution is triggered when an event is fired.
Azure functions are compute-on-demand and that is scalable. When demand of execution increases, more resources are allocated automatically to the service and when requests fall, all extra resources and application instances drop off automatically.
Azure functions support multiple programming languages including C#, F#, Java, JavaScript, TypeScript, and Python. You choose your choice of language.
Azure functions do not need any infrastructure and have 0 maintenance.
Azure function can be build, tested, and deployed in Azure portal using a browser.
Azure functions are easy to upgrade and doesn’t affect other parts of the website.
Azure functions use industry standard and can communicate with other APIs, databases, and libraries.
Create an Azure Functions using Visual Studio 2019
Before we go too far, let’s create a simple Azure Functions using Visual Studio 2019.
Open your Visual Studio 2019 and create a new project.
On new project template page, search for azure functions and you will see a template for Azure Functions. See below.


Select the Azure Functions template and click Next.
On the below screen, you need to give your functions application a name and selection a location where the VS project is going to reside.


You may also see from the above screen that the function is created using C# and have Azure and Cloud tags means it will be deployed and run on Azure cloud.
Click Create button.
On the next screen, we need select what kind of application it will be. Azure functions have this concept of triggers. A trigger is what causes a function to run. Each function has exactly one trigger.
Let’s take a look at this below screen that shows various triggers available in Visual Studio for an Azure functions app.


As you can see, each trigger has its own specific purpose.
For now, let us select Http Trigger that is executed whenever an HTTP request is made.
Click on Create button to create our app.
We land in Visual Studio and there is default file, Function1.cs and that is where our default function code is.

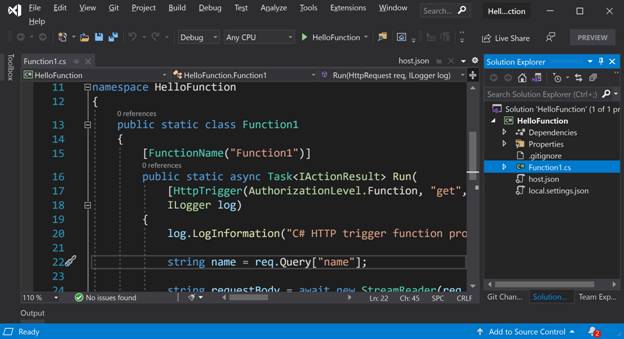
Here is the complete code of my function.
using System;
using System.IO;
using System.Threading.Tasks;
using Microsoft.AspNetCore.Mvc;
using Microsoft.Azure.WebJobs;
using Microsoft.Azure.WebJobs.Extensions.Http;
using Microsoft.AspNetCore.Http;
using Microsoft.Extensions.Logging;
using Newtonsoft.Json;
namespace HelloFunction {
 public static class Function1 {
        [FunctionName("Function1")]
 public static async Task < IActionResult > Run(
            [HttpTrigger(AuthorizationLevel.Function, "get", "post", Route = null)] HttpRequest req, ILogger log) {
            log.LogInformation("C# HTTP trigger function processed a request.");
 string name = req.Query["name"];
 string requestBody = await new StreamReader(req.Body).ReadToEndAsync();
            dynamic data = JsonConvert.DeserializeObject(requestBody);
            name = name ?? data?.name;
 string responseMessage = string.IsNullOrEmpty(name) ? "This HTTP triggered function executed successfully. Pass a name in the query string or in the request body for a personalized response." : $ "Hello, {name}. This HTTP triggered function executed successfully.";
 return new OkObjectResult(responseMessage);
        }
    }
}
That was the default code of our Azure functions.
Now, let’s build and execute it.
Visual Studio provides an Azure Storage emulator to run and test azure functions locally.
Build and Run the application using F5.
You will see the Azure Storage emulator is being started.

The next screen will be func.exe showing this message that your function is ready and can be used.

As you can see from the above screen, the Azure functions, Function 1 has GET, POST and the URL is http://localhost:7071/api/Function1. This is the URL you can use to execute the function.
Let’s type this URL in our local browser and pass a query string with a value. The output looks like the following where you can see the function takes the query string input and displays on the screen.

That is all. You just completed the Hello Azure Functions application.
Publish Azure Function to Azure
You can publish your Azure functions app direct from Visual Studio or Visual Studio Code.
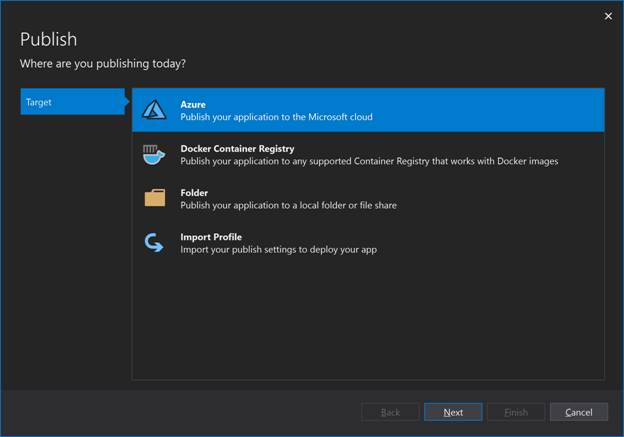
In my Visual Studio project, right click on the project name and select Publish.
It will launch the Publish screen where you may select Azure, Docker or other folders where you may wish to deploy your app.
In our case, I select Azure.

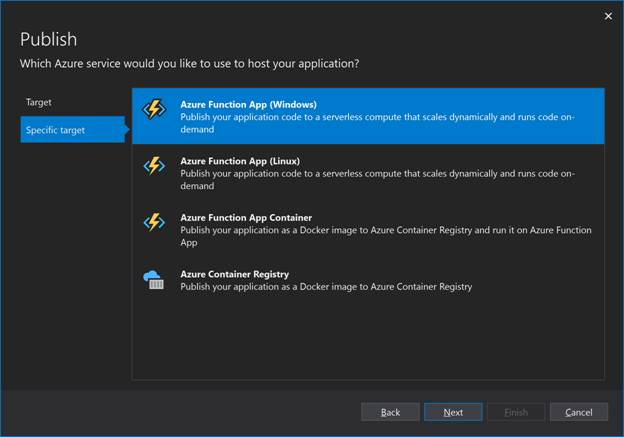
On the next screen, you will need to select Azure function app operating system, Windows, Linux, or App Container.
I select Windows.

On the next screen, you will have to provide the name of the function app, an Azure subscription, Resource group, Plan Type, Location, and Azure Storage that is required to deploy and execute an Azure functions app.


Click on Create button will create a new App Service.


This process may take a while. Wait until its done and you see the below screen.
On this below screen, you will see the Function instance. Click on Finish button.


Once finished, you will go back to the Publish page where you can see Site URL, configuration, and a User name and Password automatically assigned to the functions app. You may want to COPY the Site URL for later use.


Click on Publish button.
The publish process will start.

Once the publishing is finished, you will see Publish succeeded message.

To ensure that the function app is published, you can now copy the Site URL in a browser. My URL was this,
https://hellofunction20210205221452.azurewebsites.net/
You will see a message that your functions app is up and running.
Now, you’re ready to consume this function app.
When to use Azure Functions?
Azure functions service is a lightweight and serverless compute service that has its own use. You can’t replace a large website with Azure functions.
Here are some of the use cases of Azure functions,
Scheduled Tasks
Reminders and Notifications
Lightweight Web API
Azure functions are best suited for smaller apps have events that can work independently of other websites. Some of the common azure functions are sending emails, starting backup, order processing, task scheduling such as database cleanup, sending notifications, messages, and IoT data processing.
What are the benefits of azure functions?
Azure functions have the following benefits
Azure functions app is lightweight and requires very less resources to deploy and execute.
Azure functions app us serverless and does not require any Web server setup in cloud.
Azure functions app is compute-on-demand and doesn’t consume resources when not running.
Azure functions app charges are pay per use and you don’t pay anything if not using.
Azure functions app is event driven and executes only when event is fired.
Azure functions app is independent of other apps and does not affect or interfere with other apps.
Azure functions app is easy to write and deploy.
Azure functions app is easy to maintain and support.
Azure functions app is industry standard and developed and consumed using industry standard language and technologies.
What languages can be used for azure functions?
The languages supported to developer azure functions are C#, JavaScript, F#, Java, Powershell, Python, and TypeScript.
Where are azure functions in the portal?
Azure functions in Azure is created using Functions App. Go to your Azure Portal and search for “Functions App”. See below:

Click on Functions App will take you to the Function App page where you can use + Create link to create a new Azure functions.

What tools are used to develop azure functions?
The popular tools to develop azure functions are Visual Studio, Visual Studio Code, and CLI. You can actually use any tool or IDE that you used to write build your web applications as long as they support one of the azure function language C#, JavaScript, F#, Java, Powershell, Python, and TypeScript.
You can also use Azure portal to develop azure functions in browser without using any tool or IDE.
Source: C# Corner
The Tech Platform


Comments