
Upload Image To Database Using Laravel Tutorial With Example
- The Tech Platform

- Feb 1, 2021
- 5 min read
Updated: Mar 14, 2023
With Laravel, you can forget about having to worry about PHP’s SuperGlobal ‘Files’ variable. No more messing around with lines and lines of code to handle simple file uploads. Laravel’s workflow to upload enable file upload via a form submission is not only easy to work with but seems to work flawlessly from the start.
In this article, we will go through the steps on how to upload a file from the front end via an HTML form. Store the file within the project directory and also save the image source path in a database.
Side Note: This tutorial will work with Laravel versions 5, 6, 7, and 8. When syntax is different across versions, the different syntax will be demonstrated.
Prerequisites
This tutorial assumes you already have a Laravel environment set up which is configured with a database.
Let’s begin!
First and foremost, we are going to need to set up a new table in the database that will hold information along with an uploaded image’s source path.
Step 1 – Create the model
Let’s jump straight in and load up the console at the project’s root directory.
Tap in the following command –
php artisan make:model Product
This will create a new file in your App/ folder if you’re using Laravel 6 or 7, and App/Models if you are using Laravel 8.
Step 2 – Create the model migration
Again, back to the console and enter the following command
php artisan make:migration create_products_table
This will add the new migration file to the projects database/migrations folder.
Step 2.1
Edit the up() function to match the following –
public function up()
{
    Schema::create('products', function (Blueprint $table) {
        $table->id();
        $table->string('name');
        $table->string('file_path');
        $table->timestamps();
     });
 }
Save the file and prepare to migrate!
Step 3 – Running the migration
You’ll of guessed it already, back to the console and run the following command –
php artisan migrateAfter this is executed, you should see some type of response in the console like this –
Migrating: 2020_11_19_191505_create_product_table
Migrated: 2020_11_19_191505_create_product_table (8.49ms)
Step 4 – Configuring the model
Next, it’s time for some code, find the Product.php model file in your App/ folder if you’re using Laravel 6 or 7, and App/Models if you are using Laravel 8.
Add a fillable property to the model class to ensure when we submit data from a form, the model is configured to accept data for the specified fields.
protected $fillable = ["name", "file_path", "created_at", "updated_at"];Step 5 – Create a resourceful controller
Back to the console and create a new controller by executing the following command –
php artisan make:controller ProductController --resourceStep 6 – Configure the routes
For simpleness, we will configure a resourceful route to match the resourceful controller. Although we won’t be utilizing many of the routes, a few will be very important to upload an image and store the information in the database.
The routes that we will specifically be using are the create and store ones.
Add one of the following to your routes/web.php file depending on your version –
Route::resource('products', 'WebControllers\ProductController');
// Laravel 5,6,7
// OR
Route::resource('products', 'App\Http\Controllers\ProductController'); // Laravel 8
Step 7 – Creating the create view
Now we have all of the foundations configured for uploading an image, storing it in the database and in the file directory, we can focus on some coding. But first, let’s create the view –
Create a new folder in the resources/views folder named products
Create a new file inside the resources/views/products folder named create.blade.php
Note: If you’ve already got layouts configured, add them to this new view file, if not you can use the following code will be a simple HTML template with a form.
Step 7.1 – Add HTML & Blade syntax
Add the following code to your blade, or simply use the <form> block to add to your own layout templates.
Note: Ensure the enctype="multipart/form-data" is present otherwise the file will not be transferred correctly.
<!DOCTYPE html>
<html lang="{{ str_replace('_', '-', app()->getLocale()) }}">
<head>
     <meta charset="utf-8">
     <meta name="viewport" content="width=device-width, initial-scale=1">

     <title>Laravel</title>

     <!-- Fonts -->
     <link href="https://fonts.googleapis.com/css2?family=Nunito:wght@400;600;700&display=swap" rel="stylesheet">
     <style>
        body {
            font-family: 'Nunito';
            }
      </style>
  </head>
<body>
<!-- if validation in the controller fails, show the errors -->
@if ($errors->any())
     <div class="alert alert-danger">
          <ul>
          @foreach ($errors->all() as $error)
               <li>{{ $error }}</li>
          @endforeach
          </ul>
      </div>
@endif

<div>
<form action="{{ route('products.store') }}" method="post" enctype="multipart/form-data">
          <!-- Add CSRF Token -->
          @csrf
    <div class="form-group">
         <label>Product Name</label>
         <input type="text" class="form-control" name="name" required>
    </div>
    <div class="form-group">
         <input type="file" name="file" required>
    </div>
    <button type="submit">Submit</button>
  </form>
</div>
</body>
</html>
Step 8 – Configuring the product controller create function
Next, we need to configure the Product Controller’s create function to return the newly created create view.
Go ahead and locate the controller we created using php artisan earlier. It will reside in the App/Http/Controllers folder.
Open it up and add the following code to the create() function.
/**
     * Show the form for creating a new resource.
     *
     * @return \Illuminate\Http\Response
     */public function create(){return view('products.create');}
Step 9 – Test render the create view
Now to test that what we have done up to now with the route, controller and view actually works. Open the browser and navigate to
http://localhost/products/create
Or
http://your_url/products/create
This, for me, renders a very basic, empty page with a form, just like below –
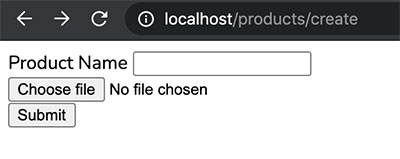
Perfect!
Step 10 – Configuring the product controller store function
Now for the big stuff, we need the store controller to handle the submission of the form from the create view. Not only this, we need it to handle files, be able to store the file locally, and in addition store the file path in the database along with the product name.
So, head back to the ProductController and find the store() function and refactor it to look like the following, taking note of the code notes placed at each stage.
public function store(Request $request)
    {
        // Validate the inputs
        $request->validate([
            'name' => 'required',
         ]);

     // ensure the request has a file before we attempt anything else.
     if ($request->hasFile('file')) {

         $request->validate([
        'image' => 'mimes:jpeg,bmp,png' // Only allow .jpg, .bmp and .png file types.
         ]);

// Save the file locally in the storage/public/ folder under a new folder named /product
         $request->file->store('product', 'public');

// Store the record, using the new file hashname which will be it's new filename identity.
         $product = new Product([
             "name" => $request->get('name'),
             "file_path" => $request->file->hashName()
         ]);
         $product->save(); // Finally, save the record.
      }
  return view('products.create');
}
Step 11 – Time to try it out
Now all the coding is done, the last thing to do is test it out, find an image you want to upload, and head over to the create view in the browser.
I’m going to upload a product named Coffee, with a picture of a bag of coffee! (How developer original)
Enter the name, and find the image you want to upload, and hit the submit button. The way the controller is currently configured, it will render back into the create view. So let’s see what it’s achieved.
The record in the database

The file in the project directory
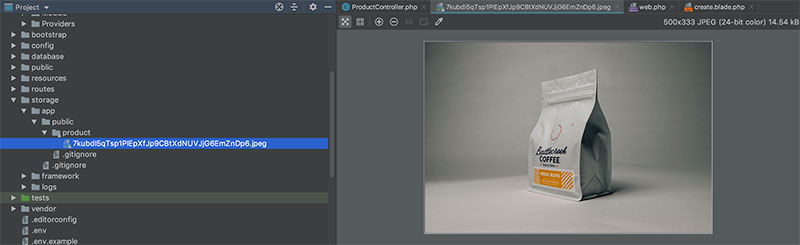
As you can see from the record saved and the file in the project directory, it has a new name, a pretty unique one too. It renames the original image name but retains everything else. In addition, the image has now been added to the app/public/product folder which keeps it recognizable for use with potentially many more types of images that could be uploaded.
And that is it!
Summary
In this article, it took 11 steps to crash-course through uploading an image in Laravel, as you can see from this tutorial, it’s mega-easy compared to uploading a file with raw PHP syntax. You don’t have to worry about a lot of things and it’s just so much more cleaner with Laravel too. I hoped this article helped you with your file uploading use-cases. Until next time!
Source: codewalk
The Tech Platform


Comments