
Unit Testing Tools: Ensuring Code Quality
- The Tech Platform

- Sep 25, 2023
- 23 min read
In the fast-moving world of making computer programs, there's a never-ending mission to create strong, error-free apps. Developers are always working hard to build software that not only does what users want but also stays reliable as it grows and changes. To help with this, there's something called "Unit Testing." It's a really important part of how we make software.

To make unit testing easier, we have some powerful tools and systems that help us. These tools don't just make tests, they also show us how much of the code has been tested, how it performs, and if it's good quality. In this article, we'll explore these tools. We'll look at what they can do, what makes them special, why they're good, and what might not be great about them.
We'll talk about a bunch of Unit Testing Tools, like JUnit for Java, Jest for JavaScript, NUnit for .NET, and PHPUnit for PHP, among others. We'll take a close look at how these tools work and how they help developers write tests quickly, find problems early, and keep the code in great shape as it's being built.
Table of Contents:
What is Unit Testing?
Unit testing is a software testing technique in which individual units or components of a software application are tested in isolation from the rest of the system. A "unit" typically refers to the smallest testable part of a program, such as a function, method, or class. During unit testing, each unit is subjected to a series of test cases to determine whether it behaves as expected and produces the correct output for various input scenarios.
Unit testing is invaluable for these reasons:
It finds and catches software defects as soon as code is written, reducing the cost of fixing issues later in development or during production.
It encourages cleaner, modular, and maintainable code, promoting good programming practices and boosting code quality.
Unit testing serve as code documentation, describing expected behavior and helping developers understand how to use and interact with the code.
Tests automatically check for regressions when code changes are made, ensuring new updates don't break existing functionality.
It pinpoints issues to specific code units, making debugging and troubleshooting more efficient.
Tests act as a safety net during code refactoring, allowing confident improvements without introducing regressions.
Unit testing can be part of CI/CD pipelines, ensuring code changes are automatically tested before deployment for stable software delivery.
Unit testing enable collaboration among developers by providing a shared understanding of code behavior and validating changes.
Fixing defects early is cost-effective compared to addressing them later in development or production.
Unit testing instill confidence that new code changes won't adversely affect existing functionality, encouraging safe and frequent updates.
Unit Testing Tools
Below is a list of unit testing tools that simplify the process of testing software components, ensuring code reliability and quality. These tools cover a range of programming languages and environments, offering diverse options to suit various development needs and preferences.
JUnit
NUnit
TestNG
PHPUnit
Mockito
Cantata
Karma
Mocha
Jest
Jasmine
1. JUnit Unit Testing Tool
JUnit is a widely-used open-source unit testing framework for the Java programming language. It provides a platform for developers to write and run tests to ensure the correctness of their Java code. JUnit has become a standard tool in the Java ecosystem for test-driven development (TDD), continuous integration, and overall software quality assurance.

Features of JUnit:
Annotations: JUnit uses annotations to mark methods as test methods. Commonly used annotations include @Test, @Before, @After, @BeforeClass, and @AfterClass. These annotations help define the test cases and set up/tear down methods.
Assertions: JUnit provides a set of assertion methods (e.g., assertEquals, assertTrue, assertNotNull) to verify expected outcomes. If an assertion fails, the test is marked as failed.
Test Runners: JUnit relies on test runners to execute test cases. The most common test runner is JUnitCore, but JUnit also supports other runners like BlockJUnit4ClassRunner for more advanced use cases.
Parameterized Tests: JUnit supports parameterized tests, which allow you to run the same test method with different sets of parameters. This is useful for testing a method with multiple inputs.
Test Suites: You can group test classes into test suites using @RunWith(Suite.class). This allows you to run multiple test classes together.
Timeouts: You can specify a maximum execution time for a test method using the @Test(timeout) annotation. If the test takes longer than the specified time, it fails.
Exception Handling: JUnit allows you to expect exceptions in your test methods using the @Test(expected) annotation or more advanced methods like @Rule or ExpectedException.
Usage of JUnit:
Setup and Teardown: Use @Before and @After methods to set up and tear down common test fixtures, such as creating database connections or initializing objects.
Test Methods: Create test methods annotated with @Test to check specific behaviors or outcomes of your code. These methods should use JUnit's assertion methods to validate results.
Test Suites: If you have multiple test classes, you can create a test suite class that uses @RunWith(Suite.class) to run them together.
Parameterized Tests: Use @RunWith(Parameterized.class) to perform parameterized testing. This is especially useful when you need to test the same logic with different inputs.
Continuous Integration: JUnit is commonly used in continuous integration (CI) pipelines to automatically run tests whenever code changes are pushed to version control systems.
Benefits of JUnit:
Standardization: JUnit is widely adopted as the standard unit testing framework for Java, ensuring consistency across Java projects and enabling developers to share and collaborate on test code.
Annotations: JUnit provides a rich set of annotations that simplify test case setup, teardown, and execution, making it easier to write and maintain tests.
Integration: JUnit seamlessly integrates with popular Java development environments and build tools, such as Eclipse, IntelliJ IDEA, and Maven, streamlining the testing process.
Test Reports: JUnit generates clear and informative test reports that help developers identify and fix issues quickly.
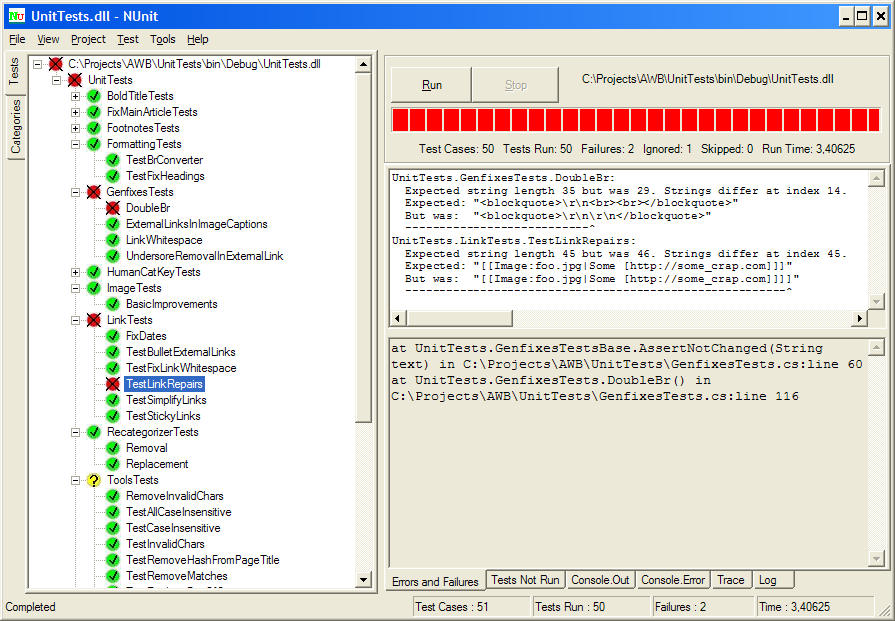
2. NUnit Unit Testing Tool
NUnit is an open-source unit testing framework designed for testing .NET applications, primarily using C# and VB.NET. It provides a platform for .NET developers to write and run unit testing to ensure the correctness and reliability of their code. NUnit is inspired by the popular Java-based JUnit framework and is widely used in the .NET development community for test-driven development (TDD), continuous integration, and general software quality assurance.
Key Features of NUnit:
Attribute-Based Tests: NUnit uses attributes to mark methods as test methods. Common attributes include [Test], [SetUp], [TearDown], [TestFixture], and [TestCase]. These attributes allow developers to define test cases and set up/tear down methods.
Assertions: NUnit provides a wide range of assertion methods (e.g., Assert.AreEqual, Assert.IsTrue, Assert.IsFalse, Assert.IsNull, Assert.IsNotNull) to validate expected outcomes and behaviors in your code.
Test Runners: NUnit relies on test runners to execute test cases. NUnit includes its own test runner, NUnit Console Runner, but it can also be integrated with various third-party runners and development environments like Visual Studio.
Parameterized Tests: NUnit supports parameterized tests using [TestCase] and [TestCaseSource] attributes, allowing you to run the same test method with multiple sets of input data.
Test Fixtures: NUnit encourages the organization of tests into test fixtures using [TestFixture]. A test fixture groups related test methods together.
SetUp and TearDown: Developers can use [SetUp] and [TearDown] methods to set up and tear down common test fixtures and resources before and after test methods are run.
Timeouts: NUnit allows you to specify a maximum execution time for a test method using the [Timeout] attribute. If a test exceeds the specified time, it fails.
Usage of NUnit:
Setting Up: Begin by including the NUnit framework in your project as a reference or via a package manager like NuGet.
Test Fixtures: Create test fixture classes using [TestFixture] and group related test methods within them.
Test Methods: Write test methods within test fixtures and mark them with [Test] attributes to specify that they are test cases.
Assertions: Use NUnit's assertion methods within test methods to validate expected outcomes and behaviors of the code under test.
Parameterized Tests: When needed, use [TestCase] or [TestCaseSource] attributes to create parameterized tests, allowing you to test multiple scenarios with a single test method.
Continuous Integration: NUnit tests are often integrated into continuous integration (CI) pipelines to automatically run tests whenever code changes are pushed to version control systems.
Benefits of NUnit:
Cross-Platform: NUnit is not limited to Java; it supports multiple platforms, including .NET, Xamarin, and Mono, making it versatile for various types of .NET-based applications.
Parameterized Tests: NUnit offers extensive support for parameterized tests, allowing developers to run the same test with multiple inputs, which reduces code duplication.
Assertions: NUnit provides a rich set of assertion methods, making it easy to express and verify expected outcomes in tests.
Parallel Execution: NUnit supports parallel test execution, which can significantly reduce test execution time for large test suites.
3. TestNG Unit Testing Tool
TestNG is a widely-used open-source testing framework primarily designed for testing Java applications, but it can also be used for other JVM-based languages. It stands for "Test Next Generation" and is often considered an evolution of JUnit and other earlier testing frameworks. TestNG provides a more powerful and flexible platform for writing and running tests, making it popular among developers and QA professionals for unit testing, integration testing, and end-to-end testing.

Key Features of TestNG:
Annotations: TestNG uses annotations to mark methods as test methods, setup methods, and teardown methods. Common annotations include @Test, @BeforeTest, @AfterTest, @BeforeClass, and @AfterClass.
Parameterized Tests: TestNG allows you to run the same test method with different sets of data using the @Parameters annotation. This is especially useful for data-driven testing.
Test Dependencies: You can specify dependencies between test methods using dependsOnMethods and dependsOnGroups attributes, ensuring that tests are executed in a specific order.
Test Groups: TestNG supports grouping of tests using the @Test(groups) annotation. This enables selective execution of tests based on the defined groups.
Parallel Execution: TestNG provides built-in support for running tests in parallel, which significantly speeds up test execution, especially for large test suites.
Test Suites: You can create test suites by specifying XML configuration files that define which classes and methods should be included in a test run. This allows for a fine-grained control of test execution.
Listeners: TestNG allows you to implement listeners to customize test execution behavior. You can create custom listeners to perform actions before or after specific test events.
Reporting: TestNG generates detailed HTML reports with information about test results, including pass/fail status, exceptions, and logs. These reports are helpful for analyzing test runs.
Usage of TestNG:
Setting Up: Begin by including the TestNG framework in your project as a dependency. You can do this through Maven, Gradle, or by downloading the TestNG JAR files.
Test Classes: Create test classes containing test methods marked with @Test annotations. These methods define the individual test cases.
Test Configuration: You can configure your tests using an XML configuration file, specifying which classes to include, exclude, or run in parallel.
Parameterized Tests: Use the @Parameters annotation to run the same test with different input values. Provide the parameter values in the XML configuration or as a data provider method.
Test Dependencies: Use the dependsOnMethods and dependsOnGroups attributes to define the execution order of your tests.
Test Groups: Group your test methods using the @Test(groups) annotation, allowing you to execute specific subsets of tests based on their groups.
Parallel Execution: Configure parallel execution in your test suite XML file to take advantage of multiple threads or processes for faster testing.
Listeners: Implement custom listeners if you need to perform actions before or after specific test events, such as test start, test success, or test failure.
Reporting: Run your tests and generate HTML reports to analyze test results and identify issues.
Benefits of TestNG:
Flexible Test Configuration: TestNG offers more flexible test configuration options than JUnit, enabling developers to define dependencies between test methods and groups, set priorities, and configure test suites.
Parallel Execution: TestNG supports parallel test execution, allowing tests to run concurrently on multiple threads or even across multiple machines, improving test suite performance.
Data-Driven Testing: TestNG provides built-in support for data-driven testing, allowing tests to be executed with various input data sets.
Test Reports: TestNG generates detailed HTML reports that include test results, statistics, and execution timelines, making it easy to analyze test outcomes.
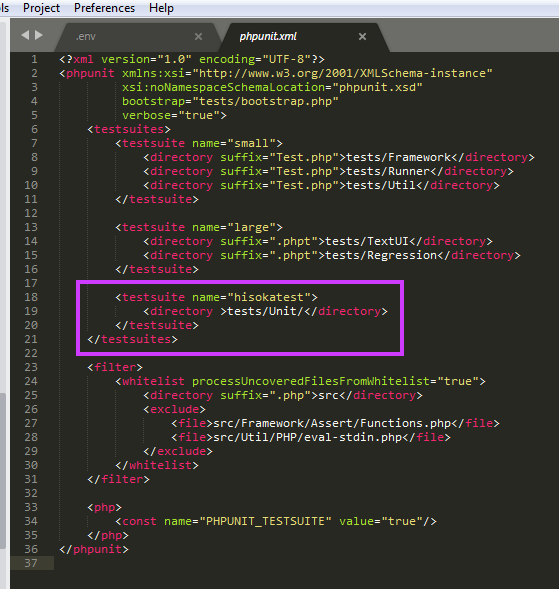
4. PHPUnit Unit Testing Tool
PHPUnit is a widely-used open-source unit testing framework specifically designed for testing PHP applications. It provides a robust and feature-rich platform for PHP developers to write and execute unit testing, ensuring the correctness and reliability of their code. PHPUnit is commonly used for test-driven development (TDD), continuous integration, and overall software quality assurance in PHP projects.
Key Features of PHPUnit:
Test Cases: PHPUnit allows developers to define test cases by creating test classes that extend the PHPUnit\Framework\TestCase class. Test cases contain individual test methods representing specific units of code to be tested.
Assertions: PHPUnit provides a wide range of assertion methods (e.g., assertEquals, assertTrue, assertFalse, assertNull, assertNotEmpty) for validating expected outcomes and behaviors in PHP code.
Setup and Teardown: PHPUnit supports the setUp and tearDown methods, which are executed before and after each test method, respectively. These methods are used for setting up common test fixtures and cleaning up resources.
Data Providers: PHPUnit allows you to use data providers to run the same test method with multiple sets of input data, making it easier to perform parameterized testing.
Mocking and Stubbing: PHPUnit includes built-in support for creating mocks and stubs of objects, enabling developers to isolate the code being tested from external dependencies.
Test Suites: Test suites in PHPUnit are created by aggregating multiple test classes or test methods into a single suite. This allows for the execution of multiple test cases at once.
Annotations: PHPUnit uses annotations like @test, @dataProvider, and @depends to specify which methods are test methods, provide data for tests, and define test dependencies.
Command-Line Test Runner: PHPUnit provides a command-line test runner for executing tests from the command line interface (CLI). This is valuable for automating test runs and integrating with continuous integration (CI) systems.
Code Coverage Analysis: PHPUnit can generate code coverage reports, showing which lines of code were executed during testing. This helps identify areas of code that are not adequately covered by tests.
Usage of PHPUnit:
Setting Up: Begin by including PHPUnit in your PHP project either through Composer or by downloading and including the PHPUnit PHAR (PHP Archive) file.
Test Classes: Create test classes containing test methods, which should extend PHPUnit\Framework\TestCase. These methods should use PHPUnit's assertion methods to validate expected outcomes and behaviors.
Data Providers: Use data providers by annotating test methods with @dataProvider. Data providers are separate methods that return arrays of test data.
Mocking and Stubbing: Use PHPUnit's mocking and stubbing features to isolate the code under test from external dependencies, such as databases or web services.
Test Suites: Create test suites to group and execute multiple test cases together. Test suites can be defined using configuration files or by aggregating test classes or methods.
Command-Line Runner: Execute tests from the command line using the phpunit command. You can specify options like the test suite to run, test output formats, and code coverage reporting.
Continuous Integration: Integrate PHPUnit tests into your CI/CD pipeline to automatically run tests whenever code changes are pushed to version control systems.
Benefits of PHPUnit:
Specifically for PHP: PHPUnit is the de facto standard for unit testing in the PHP ecosystem, providing robust testing capabilities for PHP codebases.
Mocking and Stubbing: PHPUnit has built-in support for mocking and stubbing, allowing developers to isolate units of code and simulate the behavior of external dependencies.
Code Coverage: PHPUnit offers code coverage analysis, helping developers identify untested portions of their code.
Integration: PHPUnit integrates with popular PHP development tools and frameworks like Composer and Laravel, making it a valuable choice for PHP developers.
5. Mockito Unit Testing Tool
Mockito is an open-source mocking framework for Java that is primarily used for creating mock objects in unit testing. Mock objects are placeholders for real objects or dependencies within your code, allowing you to isolate the code you want to test and control the behavior of its dependencies. Mockito simplifies the process of creating and working with mock objects, making it a valuable tool for unit testing in Java.

Key Features of Mockito:
Mock Object Creation: Mockito provides a straightforward way to create mock objects for classes and interfaces. You can use the mock() method to create a mock object.
Method Behavior Specification: You can specify the behavior of mock objects by defining what methods should return when called or what exceptions they should throw. This is done using methods like when(), thenReturn(), thenThrow(), and doThrow().
Method Invocation Verification: Mockito allows you to verify that specific methods on mock objects have been called with certain arguments. This is crucial for checking the interaction between the code under test and its dependencies.
Argument Matchers: You can use argument matchers like any(), eq(), and custom matchers to specify more flexible and dynamic behavior for method invocations.
Annotations: Mockito supports annotations like @Mock, @InjectMocks, and @Spy to simplify the creation and injection of mock objects into test classes.
Reset and Reuse: Mockito provides methods to reset and reuse mock objects during test execution. This is useful when you want to reconfigure a mock object or reuse it for different test cases.
Spying: Mockito allows you to create partial mock objects, also known as spies, which wrap around real objects. You can specify which methods should be mocked and which should be invoked on the real object.
Void Methods: Mockito supports mocking of void methods and allows you to verify if they were called with the expected arguments.
Usage of Mockito:
Setting Up: Start by including Mockito in your project as a dependency, usually through build tools like Maven or Gradle.
Creating Mock Objects: Create mock objects using the mock() method or annotations like @Mock. These mock objects serve as replacements for real dependencies.
Specifying Behavior: Use when().thenReturn() or similar methods to specify what mock methods should return when called. You can also specify behavior for void methods or methods that throw exceptions.
Method Invocation: Invoke the code under test, which will interact with the mock objects as if they were real dependencies.
Verification: Use methods like verify() to check if specific methods on the mock objects were called with the expected arguments and the desired number of times.
Reset and Reuse: If necessary, reset mock objects between test cases or reuse them with different configurations.
Annotations: Take advantage of Mockito annotations like @Mock, @InjectMocks, and @Spy to simplify the creation and injection of mock objects.
Argument Matchers: Use argument matchers to specify dynamic behavior for method invocations.
Benefits of Mockito:
Java Mocking: Mockito is a powerful mocking framework for Java that simplifies the creation and configuration of mock objects for unit testing.
Behavior Verification: Mockito focuses on behavior verification, allowing developers to verify that certain methods were called with specific arguments.
Readability: Mockito's API is designed for readability, making it easier to write and understand tests.
No Code Generation: Mockito does not require code generation, which helps maintain a cleaner codebase and reduces build and compilation times.
6. Cantata Unit Testing Tool
Cantata is a unit testing and code coverage analysis tool specifically designed for C and C++ software development. It's commonly used in embedded systems and safety-critical software development where testing and code coverage analysis are crucial to ensuring software reliability and safety. Cantata is known for its capabilities in helping developers create and execute unit testing for C and C++ code while providing insights into code coverage.

Key Features of Cantata:
Unit Testing: Cantata facilitates the creation and execution of unit testing for C and C++ code. It allows developers to define test cases and test suites to evaluate the functionality of individual components, functions, or modules.
Code Coverage Analysis: Cantata provides code coverage analysis capabilities, allowing developers to assess how thoroughly their tests exercise the codebase. It generates coverage reports indicating which lines of code have been executed during testing, highlighting areas that require further testing.
Static Analysis Integration: Some versions of Cantata offer static analysis capabilities, which can help detect potential issues in the code before testing. This can include identifying coding standards violations, potential memory leaks, or other coding errors.
IDE Integration: Cantata integrates with various integrated development environments (IDEs) commonly used for C and C++ development, such as Eclipse and Visual Studio. This integration simplifies the setup and execution of unit tests.
Test Automation: Cantata supports test automation, enabling developers to automate the execution of unit testing. Automation helps ensure that tests are consistently run and can be integrated into continuous integration (CI) pipelines.
Coverage Metrics: It provides various code coverage metrics, including line coverage, branch coverage, and statement coverage. These metrics help assess the effectiveness of the testing process.
Test Harness Generation: Cantata can automatically generate test harnesses and stubs for the code under test, simplifying the testing process and reducing the effort required to set up tests.
Usage of Cantata:
Installation: Start by installing Cantata on your development environment. The installation process may vary depending on your platform and version of Cantata.
Project Configuration: Configure Cantata to work with your C or C++ project. This typically involves specifying the project's source files and build settings.
Test Case Creation: Create test cases and test suites in Cantata to cover specific functionalities or units of code within your project.
Test Execution: Execute the tests using Cantata's test runner, either from the IDE or the command line. During execution, Cantata tracks code coverage.
Code Coverage Analysis: Review the code coverage reports generated by Cantata to identify areas of your codebase that need additional testing or further coverage.
Test Automation (Optional): Integrate Cantata into your automated testing process, if desired. This can be done by scripting the test execution or integrating Cantata with your CI/CD pipeline.
Benefits of Cantata:
Improved Code Quality: Cantata helps developers identify and rectify issues in their C and C++ code, leading to higher code quality and reliability.
Safety-Critical Software: It is particularly valuable in safety-critical software development industries, such as automotive, aerospace, and medical devices, where rigorous testing and code coverage analysis are essential.
Automated Testing: Cantata supports automation, reducing the manual effort required for testing and making it easier to maintain and run tests consistently.
Code Coverage Insights: Code coverage analysis provided by Cantata allows developers to identify untested or under-tested code paths, increasing confidence in code correctness.
IDE Integration: Seamless integration with popular IDEs streamlines the testing process and makes it more accessible to developers.
Static Analysis: Some versions of Cantata include static analysis capabilities, enhancing code quality by detecting issues early in the development process.
Test Harness Generation: Cantata's ability to generate test harnesses and stubs simplifies the testing process, especially for embedded systems with complex dependencies.
7. Karma Unit Testing Tool
Karma is an open-source JavaScript testing tool that is primarily used for running unit tests on JavaScript code in various web development projects. It is a versatile and widely adopted tool in the JavaScript ecosystem, designed to simplify the testing process by providing a framework for testing across multiple browsers and environments.
Key Features of Karma:
Cross-Browser Testing: Karma allows developers to run their unit testing across different browsers, including popular ones like Chrome, Firefox, Safari, and Internet Explorer. This helps ensure that web applications behave consistently across various environments.
Real Devices and Emulators: In addition to browsers, Karma can be configured to run tests on real devices and emulators, making it suitable for mobile web and hybrid app development.
Parallel Test Execution: Karma can execute tests in parallel across multiple browsers or devices, speeding up the testing process and providing rapid feedback to developers.
Continuous Integration (CI) Integration: Karma is well-suited for integration into CI/CD pipelines. It can generate test reports and code coverage reports that can be easily integrated with popular CI tools like Jenkins and Travis CI.
Test Framework Agnostic: Karma is not tied to a specific testing framework. It supports a wide range of JavaScript testing frameworks such as Jasmine, Mocha, QUnit, and more, allowing you to use the framework that best suits your project.
Auto-Reload: Karma can automatically refresh the browser whenever the source code or test files change. This feature enables a smooth development and testing workflow.
Code Coverage: Karma can generate code coverage reports using tools like Istanbul, showing which parts of your codebase are covered by tests and which are not. This helps identify areas that require more testing.
Customizable Configuration: Karma's configuration is highly customizable, allowing developers to specify testing frameworks, browsers, preprocessors, and other settings based on project requirements.
Plugins and Extensions: Karma supports a rich ecosystem of plugins and extensions, providing additional functionalities like test reporting, test results visualization, and custom test launchers.
Usage of Karma:
Installation: Start by installing Karma and its required plugins and frameworks using a package manager like npm (Node Package Manager).
Configuration: Create a Karma configuration file (karma.conf.js) where you specify settings such as browsers, testing frameworks, files to include, and preprocessors. You can customize this configuration to fit your project's needs.
Test Files: Write your unit testing using your preferred testing framework (e.g., Jasmine, Mocha). Organize your test files and source code appropriately.
Preprocessors: Configure preprocessors in your Karma configuration to transpile and preprocess your JavaScript code as needed. Common preprocessors include Babel and TypeScript.
Run Tests: Execute tests using the karma start command with your configuration file as an argument. Karma will launch the specified browsers and run your tests.
Continuous Integration: Integrate Karma into your CI/CD pipeline by configuring the CI environment to run Karma with the appropriate configuration file. This ensures that tests are automatically executed whenever code changes are pushed.
Code Coverage Reports: If desired, enable code coverage reports in your Karma configuration. These reports can be generated after running tests and provide insights into test coverage.
Benefits of Karma:
Cross-Browser Testing: Karma ensures that your code behaves consistently across different browsers and environments, improving the overall quality of web applications.
Parallel Execution: Parallel test execution speeds up the testing process, enabling rapid feedback during development.
CI/CD Integration: Karma seamlessly integrates with CI/CD pipelines, allowing for automated testing and continuous quality assurance.
Test Framework Flexibility: You can choose from a variety of testing frameworks, making it adaptable to different project requirements.
Code Coverage Analysis: Karma's integration with code coverage tools helps you identify areas in your codebase that need more thorough testing.
Customization: Karma's highly configurable nature allows you to tailor the testing setup to match the specific needs of your project.
Active Community: Karma has an active community, and many plugins and extensions are available to enhance its functionality.
8. Mocha Unit Testing Tool
Mocha is an open-source JavaScript testing framework that is widely used for running unit tests, integration tests, and end-to-end tests in JavaScript applications, particularly in Node.js environments. Mocha is known for its flexibility and extensive feature set, making it a popular choice among JavaScript developers for test-driven development (TDD) and behavior-driven development (BDD).

Key Features of Mocha:
Flexible Testing Framework: Mocha provides a flexible and customizable framework for writing tests. It is not tied to a specific assertion library, allowing developers to use their preferred assertion library (e.g., Chai, Should.js, expect.js) or even plain Node.js assert functions.
Multiple Test Styles: Mocha supports different test styles, including traditional TDD and BDD styles. This flexibility allows developers to choose the style that best suits their testing needs and coding style.
Asynchronous Testing: Mocha has built-in support for handling asynchronous operations, making it suitable for testing asynchronous code patterns like callbacks, promises, and async/await.
Test Suites and Test Cases: Tests in Mocha are organized into test suites (described using describe blocks) and individual test cases (defined with it blocks). This hierarchical structure makes it easy to group related tests.
Hooks: Mocha provides before, after, beforeEach, and afterEach hooks that allow developers to set up and tear down test fixtures or perform common setup and cleanup tasks before and after tests.
Parameterized Testing: Mocha supports parameterized testing through the use of test data arrays or data-driven testing libraries, allowing the same test case to be run with multiple sets of inputs.
Test Timeouts: You can set timeouts for tests using the this.timeout() method, ensuring that tests complete within a specified timeframe.
Reporters: Mocha has a variety of built-in and third-party reporters that provide different styles and formats for displaying test results, including console output, JSON, and HTML reports.
Parallel Test Execution: Mocha can run tests in parallel, leveraging multiple CPU cores for faster test execution.
Browser Support: While Mocha is often used in Node.js environments, it can also be used for testing in web browsers using tools like Karma or browserify.
Usage of Mocha:
Installation: Begin by installing Mocha as a development dependency in your Node.js project using a package manager like npm or yarn.
Test File Structure: Organize your test files and directory structure. Mocha conventionally looks for test files in a directory named test, but you can customize this.
Writing Tests: Create test files using the describe and it functions to define test suites and test cases. Write assertions using your preferred assertion library.
Asynchronous Testing: For testing asynchronous code, use callbacks, Promises, or async/await as needed. Mocha will wait for asynchronous operations to complete before proceeding to the next test or hook.
Hooks: Use before, after, beforeEach, and afterEach hooks to set up and tear down test fixtures, establish database connections, or perform other common setup and cleanup tasks.
Running Tests: Execute your tests by running the mocha command from the command line. You can specify test files, use glob patterns, or configure Mocha programmatically.
Custom Reporters: Optionally, you can choose different reporters to customize the test results output.
Parameterized Testing: Implement parameterized testing if you need to run the same test with multiple sets of input data.
Integration with Other Tools: Mocha can be integrated with other tools like Chai for assertions, Istanbul for code coverage, and tools like Karma for cross-browser testing.
Benefits of Mocha:
Versatility: Mocha's flexibility allows developers to choose their preferred testing style and assertion library, making it adaptable to different project requirements and coding styles.
Asynchronous Testing: Mocha's built-in support for asynchronous testing makes it suitable for modern JavaScript applications with asynchronous code patterns.
Test Organization: Mocha's hierarchical structure of test suites and test cases helps maintain a well-organized and readable test suite.
Hooks: Hooks provide a convenient way to set up and clean up test fixtures, reducing redundancy in test code.
Parameterized Testing: Mocha's support for parameterized testing allows for efficient testing of multiple input scenarios.
Extensive Ecosystem: Mocha has a rich ecosystem of plugins, reporters, and extensions that can enhance its functionality and integrate it with other tools.
Parallel Execution: Mocha can execute tests in parallel, significantly reducing test execution time for large test suites.
Browser Testing: Mocha can be used with tools like Karma to run tests in browsers, making it suitable for testing web applications.
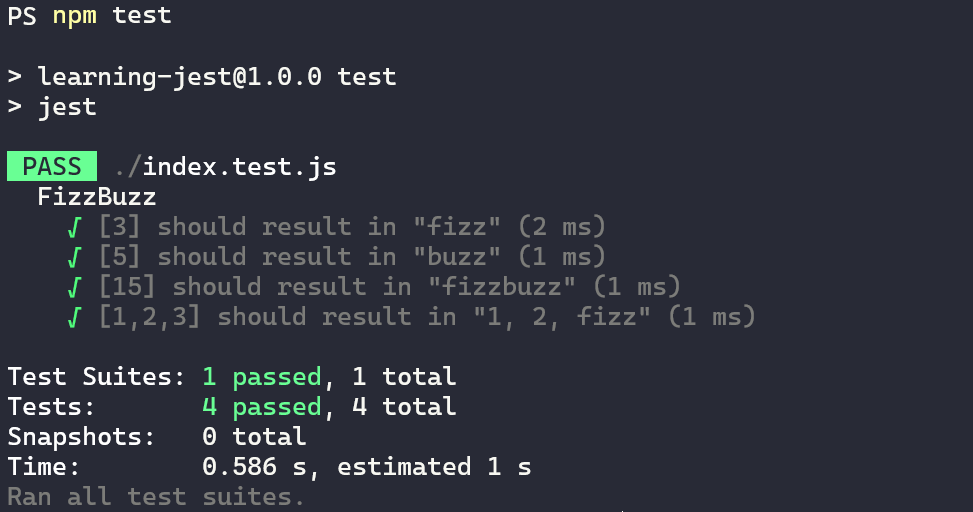
9. Jest Unit Testing Tool
Jest is an open-source JavaScript testing framework developed by Facebook. It is primarily used for testing JavaScript code, especially code written for React applications. Jest is designed to be simple to set up and use while providing powerful testing features and a robust test runner.
Key Features of Jest:
Zero Configuration: Jest comes with sensible defaults, so you can start writing tests without extensive configuration. It provides a simple and fast setup experience.
Built-in Test Runner: Jest includes a built-in test runner that executes test suites in parallel, making it efficient for running large test suites.
Assertion Library: Jest includes its own assertion library, which is easy to use and provides descriptive error messages when assertions fail. However, it also supports other assertion libraries if you prefer to use them.
Mocking: Jest simplifies mocking by providing automatic mocking of CommonJS modules and allowing developers to easily create manual mocks for modules or dependencies.
Snapshot Testing: Jest introduces the concept of snapshot testing, which allows you to capture and compare snapshots of your rendered UI components. It's particularly useful for React component testing.
Mock Functions: Jest provides built-in mock functions that help you track function calls, arguments, and return values. This is useful for testing functions that interact with external APIs or dependencies.
Async Testing: Jest handles asynchronous code, such as promises or async/await, with ease. You can use async and await directly in your test cases, making it more intuitive to write async tests.
Test Isolation: Jest ensures test isolation by running each test in a separate environment, preventing one test from affecting the state of another.
Code Coverage: Jest can generate code coverage reports, showing which parts of your codebase are covered by tests and which need more testing.
Plugins and Extensions: Jest has a rich ecosystem of plugins and extensions that enhance its functionality, including integrations with testing libraries like Enzyme for React component testing.
Usage of Jest:
Installation: Start by installing Jest as a development dependency in your JavaScript project using npm or yarn.
Test File Structure: Organize your test files alongside your source code. Jest conventionally looks for test files with a .test.js or .spec.js extension.
Writing Tests: Create test files using test() or it() functions to define test cases. Write assertions using Jest's built-in assertion library or other supported libraries.
Mocks: Use Jest's mocking capabilities to create mocks for modules or dependencies. You can create manual mocks or use automatic mocking for CommonJS modules.
Snapshot Testing: For React components, use snapshot testing to capture and compare rendered component snapshots. Jest stores snapshots in files, allowing you to detect unexpected changes.
Async Testing: Use async and await keywords to write asynchronous test cases. Jest automatically waits for promises to resolve.
Running Tests: Execute your tests by running the jest command from the command line. Jest will automatically discover and run your test files.
Code Coverage: To generate code coverage reports, add the --coverage flag when running Jest tests.
Configuration: Jest provides a configuration file (jest.config.js) where you can specify various settings, such as test environment, test file patterns, and code coverage thresholds.
Plugins and Extensions: If needed, you can install and configure Jest plugins and extensions to extend its functionality, such as integrating it with Enzyme for React testing.
Benefits of Jest:
Easy Setup: Jest's zero-configuration setup allows developers to start writing tests quickly without the need for extensive configuration.
Fast Execution: Jest's built-in test runner runs tests in parallel, making it efficient for large test suites.
Snapshot Testing: Snapshot testing simplifies UI component testing by capturing and comparing component snapshots, helping to detect visual regressions.
Community Support: Jest has a large and active community, which means you can find extensive documentation, plugins, and community-contributed solutions to common testing challenges.
Integration with React: Jest is widely used in the React community, and it integrates seamlessly with React components and libraries, making it a natural choice for React developers.
Code Coverage: Jest provides built-in code coverage reporting, helping developers identify areas of code that lack test coverage.
Mocks and Spies: Jest's built-in mocking and spying capabilities make it easier to isolate and test parts of your codebase.
Versatile: While Jest is popular for testing React applications, it can be used for testing any JavaScript code, making it versatile for a wide range of projects.
10. Jasmine Unit Testing Tool
Jasmine is an open-source JavaScript testing framework that is primarily used for writing and running unit testing for JavaScript code. It's often used in web development, particularly for testing web applications and front-end JavaScript code. Jasmine follows a behavior-driven development (BDD) approach, which encourages developers to focus on the behavior of their code and write tests that describe expected behaviors in a human-readable format.

Key Features of Jasmine:
Behavior-Driven Development (BDD): Jasmine promotes a BDD approach, encouraging developers to describe the expected behavior of their code using natural language specifications. This makes the tests more human-readable and expressive.
Declarative Syntax: Jasmine provides a declarative syntax for defining test suites, test cases, and expectations. Test suites are defined using describe blocks, test cases within suites are defined using it blocks, and expectations are defined using expect statements.
Assertions: Jasmine includes a wide range of built-in assertion matchers, such as toEqual, toBe, toBeTruthy, toContain, and many more. These matchers make it easy to express expected outcomes in your tests.
Spies: Jasmine allows you to create spies, which are functions that can intercept and track calls to other functions and methods. Spies are useful for verifying that functions were called with specific arguments or determining how many times they were called.
Mocking: While Jasmine doesn't provide built-in mocking functionality like some other testing frameworks, you can use libraries like jasmine.createSpy() to create custom mocks and spies.
Setup and Teardown: Jasmine supports the use of beforeAll, beforeEach, afterAll, and afterEach functions to set up and tear down test fixtures or perform common setup and cleanup tasks before and after tests.
Test Suites: You can organize your tests into suites, which provide a way to group related test cases together. This helps maintain a clear and organized test structure.
Custom Matchers: Jasmine allows you to define custom matchers, extending its built-in matchers to meet the specific needs of your project.
Asynchronous Testing: Jasmine supports asynchronous testing through the use of done callbacks, async and await, or by returning promises from your tests.
JUnit XML Output: Jasmine can generate JUnit-compatible XML output, which is useful for integrating Jasmine tests into continuous integration (CI) pipelines.
Usage of Jasmine:
Installation: Begin by installing Jasmine as a development dependency in your JavaScript project using a package manager like npm or yarn.
Test File Structure: Organize your test files alongside your source code. Jasmine conventionally looks for test files with a .spec.js extension.
Writing Tests: Create test files using describe blocks to define test suites and it blocks to define test cases. Write expectations using expect statements with Jasmine's assertion matchers.
Spies and Mocks: Use Jasmine's spying and mocking capabilities to intercept and track function calls, verify their behavior, and create custom mock functions.
Asynchronous Testing: Use done callbacks, async and await, or promises to handle asynchronous code in your tests.
Test Runner: Execute your tests using a Jasmine test runner, which can be run in the browser, through a command-line tool, or integrated into your build process.
Configuration: Customize Jasmine's configuration using a configuration file (jasmine.json) to specify settings such as reporters, randomization, and custom matchers.
Reports: Jasmine can generate test reports in various formats, including JUnit XML for CI integration and HTML for human-readable reports.
Benefits of Jasmine:
BDD Approach: Jasmine's BDD-style syntax and structure make it easy to write tests that focus on the expected behavior of your code, improving test readability.
Expressive Assertions: Jasmine's built-in assertion matchers provide expressive and easy-to-read expectations for your tests.
Spies and Mocks: Jasmine's spying and mocking capabilities allow you to verify interactions between functions and control their behavior during testing.
Custom Matchers: You can extend Jasmine by creating custom matchers to suit the specific requirements of your project.
Asynchronous Testing: Jasmine provides robust support for testing asynchronous code, ensuring that asynchronous tests are executed correctly.
Integration with CI: Jasmine can generate JUnit XML output, making it easy to integrate your tests into CI/CD pipelines.
Conclusion
Unit testing tools are indispensable companions in the journey of software development. They empower developers to write robust, bug-free code by catching issues early, promoting best coding practices, and providing a safety net during refactoring. Unit Testing tools integrate seamlessly into modern development workflows, ensuring software reliability, and facilitating collaboration among teams.


Comments