
"The Same Game", Part 3 of 5: Adding Menus to Control Difficulty Levels
- The Tech Platform

- Aug 28, 2020
- 8 min read
Adding Menus to Control Difficulty Levels
Welcome back! With our playable game in hand, we are now ready to polish off the game. In this article we'll focus on adding customizability to the game through menus, including adding difficulty levels. To do this, we'll update the menu that was included by the MFC Application Wizard, add new commands and set up event handlers for them. After some practice, the game with only three colors is pretty easy to solve so in this article we'll add new levels of difficulty. We can do this by simply adding more colors.
Menu Options
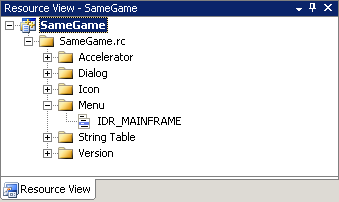
Adding a new menu option is done through the resource view. You can bring up the resource view from the View Menu in Visual Studio and then, Other Menus->Resource View or the keyboard shortcut of Ctrl+Shift+E. This will bring up a window similar to what you see below.
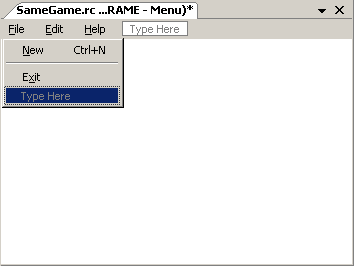
Open up the menu in the menu editor by double-clicking on the IDR_MAINFRAME option under Menu. The menu editor will allow you to add, remove and edit menu options. Take a look at all of the menu options that are already included. Most of these options aren't useful to our particular application so we'll delete a few. Click on the file menu and it will drop down the actual menu. Delete all of the options except for "New" and "Exit" as shown in the image below. Do this by clicking on the option and hitting the delete key.

Next we'll examine the Edit menu. In the very last article we'll discuss how to create an Undo/Redo stack for the game so let's add the redo option to the edit menu and delete all of the others except for undo. Once you've deleted the unwanted options, click on the "Type Here" area in the Edit menu and type in what you see in the graphic below.

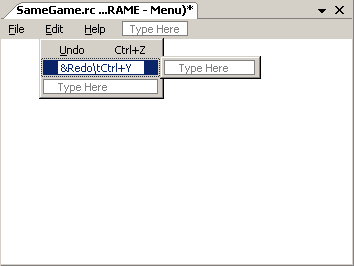
I'll explain what each part of the string "&Redo\tCtrl+Y" means. First of all the ampersand signals to the menu what the hot-key is for that menu option. The hot-key is the character immediately following the ampersand, R in this case. This will allow you to press Alt+E to open the Edit menu and then press R to select the Redo option. The \t should look familiar; it is the escape sequence for the tab character. The tab character in a menu puts a tab between the name of the menu option and the accelerator key. Look at the Undo option to see the tab in action. The accelerator key is a set of key strokes that will accomplish the same task as clicking on the menu option. We'll use the Windows standard Ctrl+Y for redo. We'll add the event handler and supporting code in a later article.
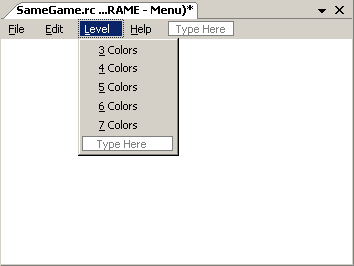
Adding a new menu is as simple as clicking on the "Type Here" at the top in the menu bar. Type in "&Level" to add the Level menu. After hitting Enter you can move the menu to the left of the Help menu by just clicking on the menu and dragging it to the left. Now let's add in the menu options. We want to allow the user to select different levels from three to seven colors. Add in the following five menu options seen below. The first one contains the text "&3 Colors" and so on.

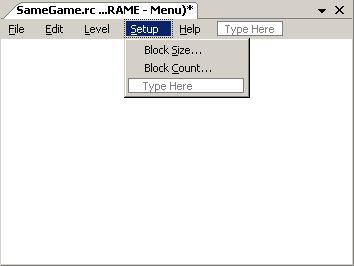
Let's go ahead and add the menu for the next article too. So add the "&Setup" menu and move it to the left of the Help menu. Then add the "Block &Size..." and "Block &Count..." options. Notice the three periods after the option name, that is a standard for menu systems to indicate that there will be another window to popup. We'll work on that in the next article.

IMPLEMENTING DIFFICULT LEVEL
Levels of Difficulty
Now we'll focus on the Level menu and the options that we added. Once we've added the menu options we can compile and run the game and see that the menus have been added but they still don't do anything.
When you click on a menu option the program fires an event indicating which menu option was selected. We just need to catch that event with an event handler. It is very similar to the event handlers that we discussed and used in the previous article. Really the only difference is where we find the events for the menu options. We start from the properties window of the CSameGameView and click on the "Events" button (lightning bolt). Once you click on that you'll see the following.

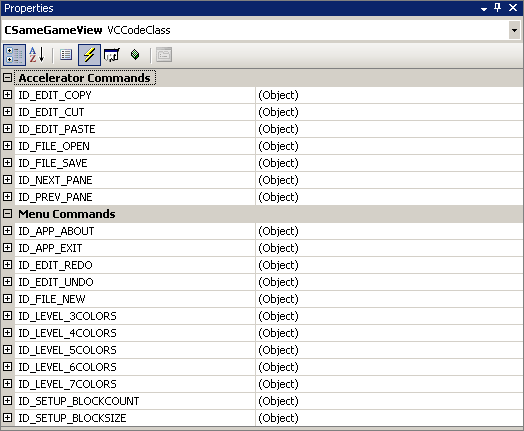
You can see in the Menu Commands section a list of all of the menu items that we entered. The entries are in the format ID_<MENU>_<OPTION> where <MENU> is the menu name and <OPTION> is the text from the menu option. Expand the plus next to the ID_LEVEL_3COLORS option and you'll see two options under it, COMMAND and UPDATE_COMMAND_UI. The COMMAND option is the event handler for the actual event of selecting the menu option. The UPDATE_COMMAND_UI is a handy little event that allows us to change the state of the menu option. By state I mean enable/disable or check/uncheck the menu option. In our menu, we are going to put a check by the level that we've selected.

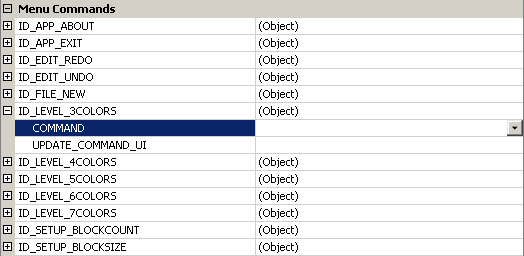
Click the down arrow in the dropdown for COMMAND and select "Add" (to get the down arrow in the first place, click anywhere on the row). We want to do this for UPDATE_COMMAND_UI also. Go ahead and do it for all of the color options (you may have to go back to the properties dialog after adding each one). Once you've done this we are ready to start adding code.
We'll start with the game board, go to the document and finish with the view. In the header file SameGameBoard.h add a new data member to keep track of the number of colors below the m_nRemaining variable.
/*  Number of colors */
int m_nColors;
We also need to add two functions to get and set the number of colors. Add them to the public section right below the DeleteBlocks function.
/*  Functions to get and set the number of colors */
int GetNumColors(void) { return m_nColors; }
void SetNumColors(int nColors)
{ m_nColors = (nColors >= 3 && nColors <= 7) ? nColors : m_nColors; }
The SetNumColors function restricts the value set to a number between three and seven, just like our menu options. Since we are adding more colors we need to update the m_arrColors array to make it larger (changes bolded).
/*  List of colors, 0 is background and 1-7 are piece colors */
static COLORREF m_arrColors[8];
Now in the source file for the game board we need to update a few of the functions and the color array. Of course we need to update the constructor to initialize the number of colors to three (changes bolded).
COLORREF CSameGameBoard::m_arrColors[8];

CSameGameBoard::CSameGameBoard(void)
: m_arrBoard(NULL),
  m_nColumns(15), m_nRows(15),
  m_nHeight(35),  m_nWidth(35),
  m_nRemaining(0), m_nColors(3)
{
  m_arrColors[0] = RGB(  0,  0,  0);
  m_arrColors[1] = RGB(255,  0,  0);
  m_arrColors[2] = RGB(255,255, 64);
  m_arrColors[3] = RGB(  0,  0,255);

  m_arrColors[4] = RGB(  0,255,  0);
  m_arrColors[5] = RGB(  0,255,255);
  m_arrColors[6] = RGB(255,  0,128);
  m_arrColors[7] = RGB(  0, 64,  0);

  //  Create and setup the board
  SetupBoard();
}
The only other change we need to make is in the SetupBoard. Previously, we hard-coded the number of colors to 3 in the setup. Now, we need to change the number three to m_nColors where we mod the random number like below (changes bolded).
void CSameGameBoard::SetupBoard(void)
{
  //  Create the board if needed
  if(m_arrBoard == NULL)
    CreateBoard();
  //  Randomly set each square to a color
  for(int row = 0; row < m_nRows; row++)
    for(int col = 0; col < m_nColumns; col++)
      m_arrBoard[row][col] = (rand() % m_nColors) + 1;
  //  Set the number of spaces remaining
  m_nRemaining = m_nRows * m_nColumns;
}
Now we will move on to the document. We need to add functions so that the view can change the number of colors. The GetNumColors function is a simple function that we can complete in the header file. Add the following lines of code in the public section of the document in SameGameDoc.h.
int GetNumColors()      { return m_board.GetNumColors(); }
void SetNumColors(int nColors);
In the source file we'll add the implementation of the SetNumColors function. Here we can't just call the SetNumColors function on the game board by itself. We need to then reset the game board to add in the new colors.
void CSameGameDoc::SetNumColors(int nColors)
{
  //  Set the number of colors first
  m_board.SetNumColors(nColors);
  //  Then reset the game board
  m_board.SetupBoard();
}
That is all that we need in the document. Of course, since we haven't changed the view, we can't yet use these functions. The view is the last thing that needs to be updated, though. By adding the event handlers you'll get the following functions inserted into the header file.
/*  Functions to change the difficulty level */
afx_msg void OnLevel3colors();
afx_msg void OnLevel4colors();
afx_msg void OnLevel5colors();
afx_msg void OnLevel6colors();
afx_msg void OnLevel7colors();
/*  Functions to update the menu options */
afx_msg void OnUpdateLevel3colors(CCmdUI *pCmdUI);
afx_msg void OnUpdateLevel4colors(CCmdUI *pCmdUI);
afx_msg void OnUpdateLevel5colors(CCmdUI *pCmdUI);
afx_msg void OnUpdateLevel6colors(CCmdUI *pCmdUI);
afx_msg void OnUpdateLevel7colors(CCmdUI *pCmdUI);
You'll notice a couple of things in these prototypes that you've never seen before. The afx_msg designation specifies that the function is an event handler. The OnUpdate functions use a pointer to a CCmdUI object. We'll talk about this but it is the way that we enable/disable, check/uncheck a menu option. In the source file you'll see some other code that has been added (changes bolded).
BEGIN_MESSAGE_MAP(CSameGameView, CView)
  ON_WM_LBUTTONDOWN()
  ON_WM_ERASEBKGND()

  ON_COMMAND(ID_LEVEL_3COLORS, &CSameGameView::OnLevel3colors)
  ON_COMMAND(ID_LEVEL_4COLORS, &CSameGameView::OnLevel4colors)
  ON_COMMAND(ID_LEVEL_5COLORS, &CSameGameView::OnLevel5colors)
  ON_COMMAND(ID_LEVEL_6COLORS, &CSameGameView::OnLevel6colors)
  ON_COMMAND(ID_LEVEL_7COLORS, &CSameGameView::OnLevel7colors)
  ON_UPDATE_COMMAND_UI(ID_LEVEL_3COLORS,
    &CSameGameView::OnUpdateLevel3colors)
  ON_UPDATE_COMMAND_UI(ID_LEVEL_4COLORS,
    &CSameGameView::OnUpdateLevel4colors)
  ON_UPDATE_COMMAND_UI(ID_LEVEL_5COLORS,
    &CSameGameView::OnUpdateLevel5colors)
  ON_UPDATE_COMMAND_UI(ID_LEVEL_6COLORS,
    &CSameGameView::OnUpdateLevel6colors)
  ON_UPDATE_COMMAND_UI(ID_LEVEL_7COLORS,
    &CSameGameView::OnUpdateLevel7colors)

END_MESSAGE_MAP()
The message map is a list of C++ macros that associate an event with an event handler. Take some time to look it over but since it is automatically generated you won't need to edit it. All of the OnLevel*colors functions are going to be all very similar to the following function.
void CSameGameView::OnLevel3colors()
{
  //  First get a pointer to the document
  CSameGameDoc* pDoc = GetDocument();
  ASSERT_VALID(pDoc);
  if(!pDoc)
    return;
  //  Set the number of colors
  pDoc->SetNumColors(3);
  //  Force the view to redraw
  Invalidate();
  UpdateWindow();
}
In all of the view functions we need to get a pointer to the document. Then we set the number of colors to the number in the name of the function, i.e. OnLevel3colors calls SetNumColors(3) and so on. Finally we need to force the view to redraw. Repeat this for all of the event handlers for the menu options. With all of these functions done, compile it and test it out. You'll see the number of colors change from three to four and so on. (You might also consider creating a helper function that does all of the work and takes the number of colors as an argument.) Then you can make code like this:
In the header SameGameView.h, you'd add this helper:
void setColorCount(int numColors);
In SameGameView.cpp, you'd add this code:
void CSameGameView::setColorCount(int numColors)
{
  //  First get a pointer to the document
  CSameGameDoc* pDoc = GetDocument();
  ASSERT_VALID(pDoc);
  if(!pDoc)
    return;
  //  Set the number of colors
  pDoc->SetNumColors(numColors);
  //  Force the view to redraw
  Invalidate();
  UpdateWindow();
}

void CSameGameView::OnLevel3colors()
{
  setColorCount(3);
}
Now back to the final set of event handlers. The ON_UPDATE_COMMAND_UI event handlers are called when the menu is pulled down by the user, one for each menu option. We'll use the SetCheck function from the CCmdUI object to set and unset the check box next to the level. We start with our boiler-plate code to get a pointer to the document and then set the check based on the number of colors in the board.
void CSameGameView::OnUpdateLevel3colors(CCmdUI *pCmdUI)
{
  //  First get a pointer to the document
  CSameGameDoc* pDoc = GetDocument();
  ASSERT_VALID(pDoc);
  if(!pDoc)
    return;
  //  Set the check if this is the right level
  pCmdUI->SetCheck(pDoc->GetNumColors() == 3);
}
Again, these functions are all the same except for the number that we are comparing the result of GetNumColors against (you can implement this by writing a helper function here as well, if you like). All five of these functions are called when the Level menu is displayed to set or unset the check mark. Now your game should look something like this.


Conclusion
In this article we've made our game a little more interesting by adding four new levels of difficulty. We learned about the menu editor and how to setup menus. We also setup the event handlers for both ON_COMMAND and ON_COMMAND_UPDATE_UI types of events for menus. In our next article we'll add new options to set the number and size of the blocks in the game board.
SOURCE: Cprogramming.com


The online casino easybet https://easybetss.co.za/ has been interesting me for a while, and I'm happy to tell you about it. Because I've worked in the field before, I'm sure I have a good understanding of the game business. There are many games to pick from, bonuses are big, and returns happen quickly. This is the best choice. I can't wait to do it again, and I think everyone who hasn't done it before should