
State Management in Angular with NgRx
- The Tech Platform

- Jul 18, 2022
- 5 min read

Angular State Management is a user interface programming technique, that is in fact, state management in Angular. It may also be referred to as Angular app state management, state management architecture of the Angular application, or even, in short, state Angular.
State management is the process of managing the states of user controls. It helps developers build large-scale applications with heavy data communications while sustaining high application performance.
What is NgRx?
NgRx is inspired by Redux and helps developers simplify the application’s state in objects by enforcing a unidirectional data flow.
How NgRx works
The NgRx state management process is a combination of five key elements:
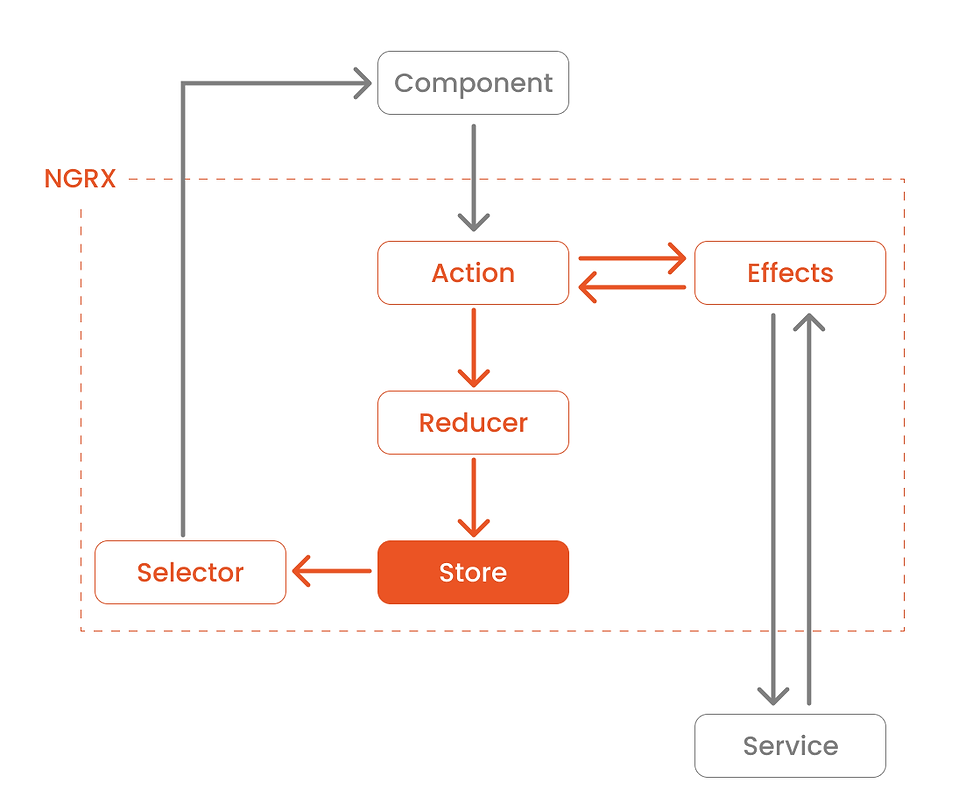
Store
You can think of this as a client-side database. The Store in NgRx acts as the application's single source of truth. It reflects the current state of the app.
Actions
Actions express unique events that happen in our application. These events range from application lifecycle events, user interactions, to network requests. Actions are how the application communicates with NgRx to tell it what to do.
Reducers
Reducers are responsible for handling transitions between states. Reducers react to the Actions dispatched and executes a pure function to update the Store. Pure functions are functions that are predictable and have no side effects. Given the same set of inputs, a pure function will always return the same set of outputs.
Selectors
Selectors are pure functions for getting slices of the state from the Store. Selectors are how our application can listen to state changes.
Effects
Effects handle the side effects of each Action. These side effects range from communicating with an external API via HTTP when a certain Action is dispatched to dispatching another Action to update another part of the State.
Although this process seems complex to implement, it is useful for data communication when the application grows.
How to use NgRx store with Angular
In this tutorial, we will be implementing a simple application to manage blog articles using NgRx store and Angular.
Step 1: Installing NgRx
NgRx can be installed using NPM, Yarn, or Angular CLI as follows:
// NPM
npm install @ngrx/store --save// Yarn
yarn add@ngrx/store// Angular CLI
ng add@ngrx/store@latest
Step 2: Creating the Store
After installation, you need to create a separate directory named /store under the src/app directory. This folder will contain all the files related to the NgRx store. The folder structure of the store directory would look like this:
-- app-- src-- app-- store
-- models-- actions
-- reducers
As a first step, you need to create an interface for articles. Let’s name the model article.model.ts.
export interface Article
{
  id: string;
  name: string;
  author: string;
  publisher: string;
}
Then, you need to create an action file to define NgRx actions. Here, we have created a file named articles.actions.ts under the actions folder and imported Actions from the NgRx store.
import { Action } from '@ngrx/store';
import { Article } from '../models/article.model';

export enum ArticleActionType
{
  ADD_ITEM = '[ARTICLE] Add ARTICLE',
}

export class AddArticleAction implements Action
{
  readonly type = ArticleActionType.ADD_ITEM;
  constructor(public payload: Article) {}
}

export type ArticleAction = AddArticleAction;
In the above action file, we defined an action as a constant using enum. Then, we implemented the AddArticleAction class from the NgRx Action class, which accepts two parameters: a type and an optional payload.
Now, we need to create a reducer to help us in state transitions. So, inside the reducers directory, create a course.reducer.ts file with the following content:
import { Article } from '../models/article.model';
import { ArticleAction, ArticleActionType } from '../actions/article.actions';

const initialState: Array<Article> = [
{
    id: '1',
    name: 'Angular State Management with NgRx',
    author: 'Chameera Dulanga',
    publisher: 'SyncFusion'},
];

export function ArticleReducer(
   state: Array<Article> = initialState,
   action: ArticleAction
) {
    switch (action.type) {
        case ArticleActionType.ADD_ITEM:
            return [...state, action.payload];
        default:
            return state;
    }
}
In the above reducer, we have created an initial state for the Article interface and a reducer function named ArticleReducer Which accepts a state and an action as input parameters. If the action type is ADD_ITEM, it will return the state and the payload. Otherwise, it will only return the state.
For the final step of store creation, we need to create another model to keep all application states in a single place. Here, we have named it state.model.ts and it will look like this:
import { Article } from '../models/article.model';

export interface State {
    readonly article: Array<Article>;
}
Step 3: Registering the NgRx store
Now, you need to register the NgRx store in the Angular application. To do this, import the reducer created in the previous step to the app.module.ts file and include it in the imports array.
import { NgModule } from '@angular/core';
import { BrowserModule } from '@angular/platform-browser';
import { AppRoutingModule } from './app-routing.module';
import { AppComponent } from './app.component';
import { FormsModule } from '@angular/forms';

import { StoreModule } from '@ngrx/store';
import { ArticleReducer } from './store/reducers/article.reducer';

@NgModule({
  declarations: [AppComponent],

  imports: [
      BrowserModule,
      AppRoutingModule,
      FormsModule,
      StoreModule.forRoot({
          course: CourseReducer,
      }),
  ],
  providers: [],
  bootstrap: [AppComponent]
})

export class AppModule { }
Step 4: Using the NgRx store
After registering the store in AppModule, you can start using it in your components. Here, we will be using AppComponent to display and add articles to the store.
import { Component, OnInit } from '@angular/core';
import { Store } from '@ngrx/store';
import { Observable } from 'rxjs';
import { CourseItem } from './store/models/courseItem.model';
import { AppState } from './store/models/app-state.model';

import { NgForm } from '@angular/forms';
import { AddItemAction } from './store/actions/course.action';

@Component({
  selector: 'app-root',
  templateUrl: './app.component.html',
  styleUrls: ['./app.component.scss'],
})

export class AppComponent implements OnInit
{
  articles$: Observable<Array<Article>>;
  constructor(private store: Store<State>) {}

  ngOnInit(): void {
    this.articles$ = this.store.select((store) => store.article);
  }

  addArticle(form: NgForm) {
    this.store.dispatch(
      new AddArticleAction(form.value)
    );

    form.reset();
  }
}
The above code shows the app.component.ts file of our example. There, we have set articles$ to a type of observable and subscribed to the store to get the articles. The addArticle() function is responsible for dispatching new articles to the store.
Now, we need to modify the app.component.html file to display and create articles.
<section>
<div class="container">
  <div class="row" style="margin-top: 5%;">
    <div class="col-md-12" style="text-align: center; margin: 5%;">
        <h2>My Articles</h2>
    </div>
    <div class="col-md-6">
      <div class="card p-4 shadow-sm">
        <form #myform="ngForm" (ngSubmit)="addArticle(myform)">
          <div class="form-group">
            <label for="name">Article Id</label>
            <input
              type="text"
              class="form-control"
              ngModelname="id"
              id="id"
              aria-describedby="identity"
              required/>
            </div>
          <div class="form-group">
            <label for="title">Title</label>
            <input
              type="text"
              class="form-control"
              ngModelname="title"
              id="title"
              aria-describedby="title"/>
          </div>
          <div class="form-group">
            <label for="author">Author</label>
              <input
                type="text"
                class="form-control"
                ngModelname="author"id="author"/>
          </div>
          <div class="form-group">
            <label for="publisher">Publisher</label>
            <input
              type="text"
              class="form-control"
              ngModelname="publisher"id="publisher"/>
          </div>
          <button type="submit" class="btn btn-primary">Submit</button>
        </form>
      </div>
    </div>
    <div class="col-md-6">
      <ul class="list-group">
        <li class="list-group-item list-group-item-primary"
                *ngFor="let article of articles$ | async">
      {{article.title}} <b>{{article.author}}</b>
        </li>
      </ul>
    </div>
  </div>
</div>
</section>
Advantages of State Management in Angular
You have a single source of truth for the data in your app.
Data flows in one direction.
Accessing the data whenever and wherever you want facilitates the speed of your application development.
You could avoid 100s of API calls if you design it well. ...
Automatically sync with local storage.
Resource: syncfusion
The Tech Platform


Comments