
Silverlight tree view control for SharePoint 2010
- Vijai Anand Ramalingam

- May 2, 2019
- 2 min read
In this article we will be seeing how to use Silverlight tree view control in SharePoint 2010.
I have created a Silverlight tree view which is used to display all the lists available in the site as shown in the following.
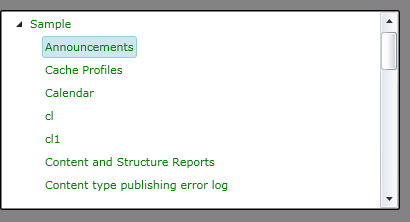
"Sample" is the name of the site. When you expand the site you could see all the lists available for the list.
Xaml:
<sdk: TreeView/>
Steps Involved:
Creating a Silverlight Application:
Open Visual Studio 2010.
Go to File => New => Project.
Select Silverlight from the Installed templates and choose the Silverlight Application template.
Enter the Name and choose the location.
Click OK.
In the New Silverlight Application wizard uncheck the "Host the Silverlight Application in a new Web site".
Click OK.
Creating the UI :
Open MainPage.xaml file and replace the code with the following one.
<UserControl x:Class="TreeviewControl.MainPage"
xmlns="http://schemas.microsoft.com/winfx/2006/xaml/presentation"
xmlns:x="http://schemas.microsoft.com/winfx/2006/xaml"
xmlns:d="http://schemas.microsoft.com/expression/blend/2008"
xmlns:mc="http://schemas.openxmlformats.org/markup-compatibility/2006" mc:Ignorable="d" d:DesignHeight="300"
d:DesignWidth="400"xmlns:sdk="http://schemas.microsoft.com/winfx/2006/xaml/presentation/sdk">
<Grid x:Name="LayoutRoot" Background="Gray">
<sdk:TreeView Height="200" HorizontalAlignment="Left" Margin="0,47,0,0"Name="treeView" VerticalAlignment="Top" Width="400" >
<sdk:TreeView.ItemTemplate>
<sdk:HierarchicalDataTemplate ItemsSource="{Binding Children}" >
<StackPanel>
<TextBlock Text="{Binding Title}" Foreground="Green" />
</StackPanel>
</sdk:HierarchicalDataTemplate>
</sdk:TreeView.ItemTemplate>
</sdk:TreeView>
</Grid>
</UserControl>
Open MainPage.xaml.cs file and replace the code with the following one.
using System;
using System.Collections.Generic;
using System.Linq;
using System.Net;
using System.Windows;
using System.Windows.Controls;
using System.Windows.Documents;
using System.Windows.Input;
using System.Windows.Media;
using System.Windows.Media.Animation;
using System.Windows.Shapes;
using Microsoft.SharePoint.Client;
namespace TreeviewControl
{
public partial class MainPage : UserControl
{
private ClientContext context;
private ListCollection listColl;
public class Site
{
public string Title { get; set; }
public List<SiteLists> Children { get; set; }
}
public class SiteLists
{
public string Title { get; set; }
}
public MainPage()
{
InitializeComponent();
context = new ClientContext(ApplicationContext.Current.Url);
context.Load(context.Web);
listColl = context.Web.Lists;
context.Load(listColl);
context.ExecuteQueryAsync(newClientRequestSucceededEventHandler(OnRequestSucceeded), null);
}
private void OnRequestSucceeded(Object sender, ClientRequestSucceededEventArgs args)
{
// This is not called on the UI thread.
Dispatcher.BeginInvoke(BindData);
}
private void BindData()
{
List<Site> siteColl = new List<Site>();
Site site= new Site { Title = context.Web.Title };
siteColl.Add(site);
site.Children = new List<SiteLists>();
foreach (List list in listColl)
{
SiteLists siteLists = new SiteLists { Title = list.Title };
site.Children.Add(siteLists);
}
this.treeView.ItemsSource = siteColl;
}
}
}
Build the solution.
Deploying in SharePoint site:
Upload the xap file in the SharePoint Site => Shared Documents.
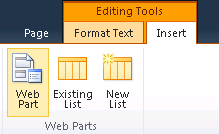
Go to Site Actions => Edit Page => Editing Tools => Insert => Web Part.
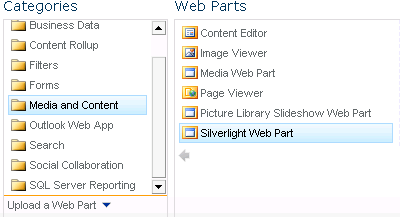
Go to Categories => Media and Content => Silverlight Web Part => Click on Add.
In the URL give the path of the xap file ~site/Sample/Shared%20Documents/TreeviewControl.xap
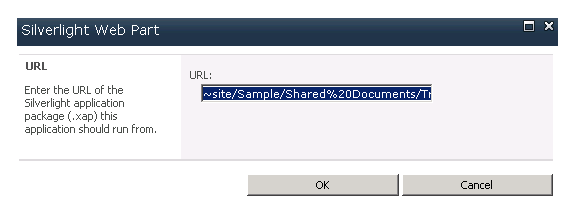
Click on Ok.


Comments