
Silverlight Tree View Control Example: Part 2
- Vijai Anand Ramalingam

- May 2, 2019
- 1 min read
In this article we will be seeing how to create Silverlight TreeView control and add the tree view items using C#.
Xaml:
<sdk:TreeView/>
Steps Involved:
Creating a Silverlight Application:
Open Visual Studio 2010.
Go to File => New => Project.
Select Silverlight from the Installed templates and choose the Silverlight Application template.
Enter the Name and choose the location.
Click OK.
In the New Silverlight Application wizard check the "Host the Silverlight Application in a new Web site".
Click OK.
Creating the UI:
Open MainPage.xaml file and replace the code with the following one.
<UserControl xmlns:sdk="http://schemas.microsoft.com/winfx/2006/xaml/presentation/sdk"
x:Class="TreeViewControl.MainPage"
xmlns="http://schemas.microsoft.com/winfx/2006/xaml/presentation"
xmlns:x="http://schemas.microsoft.com/winfx/2006/xaml"
xmlns:d="http://schemas.microsoft.com/expression/blend/2008"
xmlns:mc="http://schemas.openxmlformats.org/markup-compatibility/2006" mc:Ignorable="d" d:DesignHeight="300" d:DesignWidth="400">
<Grid x:Name="LayoutRoot" Background="Gray">
<sdk:TreeView x:Name="Menu" Height="250" Width="250">
</sdk:TreeView>
</Grid>
</UserControl>
Using C# add the tree view items:
Open MainPage.xaml.cs file and replace the code with the following code.
public partial class MainPage : UserControl
{
public MainPage()
{
InitializeComponent();
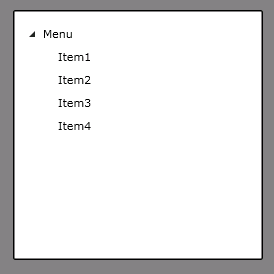
TreeViewItem item = new TreeViewItem();
item.Header = "Menu";
item.Items.Add(new TreeViewItem() { Header="Item1"});
item.Items.Add(new TreeViewItem() { Header = "Item2" });
item.Items.Add(new TreeViewItem() { Header = "Item3" });
item.Items.Add(new TreeViewItem() { Header = "Item4" });
Menu.Items.Add(item);
}
}
Hit F5.
Output:


Comments