
How to create a subsite in SharePoint?
- The Tech Platform

- Feb 21, 2023
- 3 min read
Subsites can be used in hierarchical information spaces to give particular prominence to a certain level of the hierarchy which is used as the subsite designator. This tutorial will guide you to create a subsite in SharePoint.
What is Subsite?
In SharePoint, a subsite is a site that is nested under another site, also known as a parent site. Subsites are used to organize content and permissions in a hierarchical structure.
The usage of subsites in SharePoint varies depending on the needs of the organization or team. Here are some common use cases for subsites:
Project sites: Subsites can be used to create project sites within a department or team site, providing a space for collaboration, document management, and task tracking.
Departmental sites: Subsites can be used to organize departmental sites under a company-wide intranet or portal, providing a central location for information, policies, and procedures.
Client sites: Subsites can be used to create client-specific sites for managing projects, contracts, and documents.
Regional sites: Subsites can be used to create regional sites for international organizations, providing a localized experience for employees and customers.
Create Subsite in SharePoint
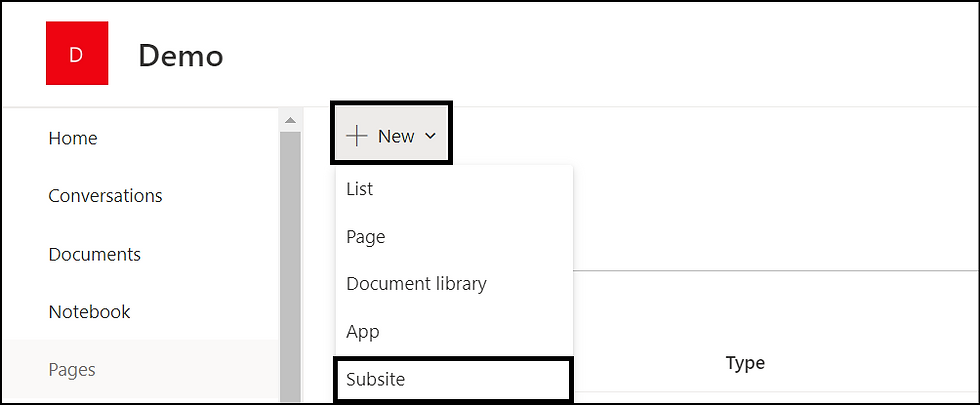
STEP 1: Open your SharePoint Site and click on the Site Contents.

STEP 2: Click on + New -> Subsite.
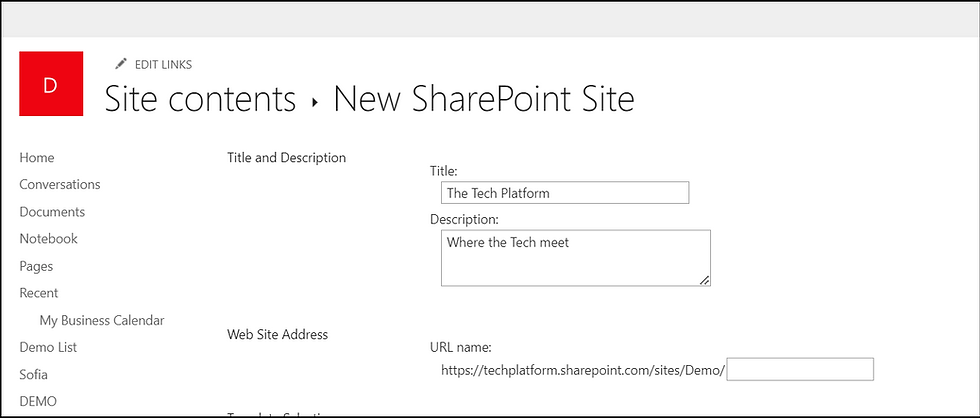
STEP 3: Enter the following details to create a subsite.
Title and Description: Enter the SharePoint subsite title and description.
Web Site Address: Enter the SharePoint subsite URL, and make sure the URL should be short and meaningful. And the subsite should not contain any special characters.
Template Selection: Select a template from the Template Selection. If you want to create a modern SharePoint site, then you can select Team site (no Office 365 group), and if you want to create a classic SharePoint site, then choose Team site (Classic experience) site template.
Permissions: The permission section is very important, choose “Use same permissions as parent site” if you want to inherit permission from the parent SharePoint site. And if you want to create a SharePoint subsite with unique permission, then select “Use unique permissions.”.
Navigation: You can also select Navigation “Display this site on the Quick Launch of the parent site?” if you want to display it in the quick launch of the parent site. Similarly, if you want to display it in the parent site's top link bar, choose Yes for Display this site on the top link bar of the parent site.
Navigation Inheritance: If you want to use the top link bar from the parent site choose Yes to "Use the top link bar from the parent site?".
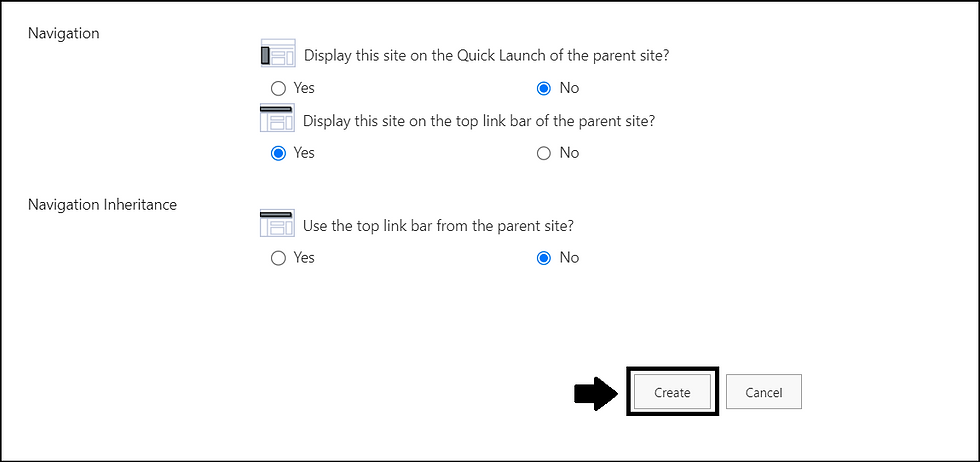
STEP 4: Click on the "Create" button to create the subsite.
Conclusion
Subsites in SharePoint allow for more granular permissions and management of content, making it easier to organize and control access to information. However, it's important to remember that subsites can also create complexity and maintenance overhead, so it's important to consider the needs of the organization and the scalability of the solution before implementing subsites.
Frequently Asked Question
Question 1: Can I apply different permissions to a SharePoint subsite than its parent site?
Answer: Yes, you can apply different permissions to a SharePoint subsite than its parent site. Subsites allow for more granular permissions and management of content, making it easier to control access to information.
Question 2: Can a subsite have its own subsites?
Answer: Yes, a subsite can have its own subsites. Subsites can be nested several levels deep, creating a hierarchical structure of sites.
Question 3: How do I navigate to a SharePoint subsite?
Answer: To navigate to a SharePoint subsite, you can click on its name in the Site Contents page of the parent site, or you can type its URL directly into your browser.


Die besten Spielautomaten mit den höchsten Bonusangeboten im Jahr 2025
Im Jahr 2025 präsentiert sich die Welt der Spielautomaten in einem aufregenden neuen Licht. Die Glücksspielindustrie hat sich in den letzten Jahren rasant entwickelt, und mit dem Aufkommen neuer Technologien, kreativer Spielkonzepte und innovativer Bonusangebote sind die Möglichkeiten für Spieler so vielfältig wie nie zuvor. Unterstützt durch die zunehmende Beliebtheit von Online-Casinos, stellen viele https://verdecasinobonus.com/at/ Betreiber sicher, dass sie wettbewerbsfähige Boni anbieten, um die Spieler zu gewinnen und zu halten. In diesem Artikel nehmen wir die besten Spielautomaten unter die Lupe, die im Jahr 2025 die höchsten Bonusangebote bieten. Wir werden auch die verschiedenen Arten von Bonusangeboten, die Vorteile für Spieler, Strategiestrategien und die neuesten Trends in der Slot-Welt untersuchen.
Every photo on https://www.spacedesigns.com.au looks like it came straight out of a design magazine.
Thank you for this information; I am genuinely Retro Bowl pleased to find your post. I would like to suggest that you consider trying this.