SharePoint Online Jobs On Azure Runbook Using PowerShell Scripts - Part One
- Nakkeeran Natarajan

- Mar 30, 2019
- 2 min read
Introduction
In this article, you will learn, how to create Azure automation account and import SharePoint online reference module. These components are required to create schedules/jobs for SharePoint online on Azure Runbook. Azure Runbook helps in automating SharePoint online PowerShell scripts on Azure by creating the schedules and jobs.
This article is a first part of an article series, which helps in creating Azure Runbook to create schedules for SharePoint online.
In this articles series, we will see, how we can run SharePoint Online PowerShell scripts schedules on Azure Runbook to get all the sites from SharePoint online portal by creating Azure Runbook jobs.
In this article, I explained the components, given below-
Creation of Azure automation account.
Importing Modules.
In the following (subsequent) articles, you will see creation of Azure Runbook and creating schedules on Runbook.
Prerequisites are given below-
SharePoint online account
Azure portal account
Microsoft Online PowerShell commands
First, we will be creating automation components, since the Runbook or schedules are available as part of Azure automation. We will import SharePoint Online cmdlets reference assemblies.
Creating Azure Automation is given below-
Login to Azure Portal.
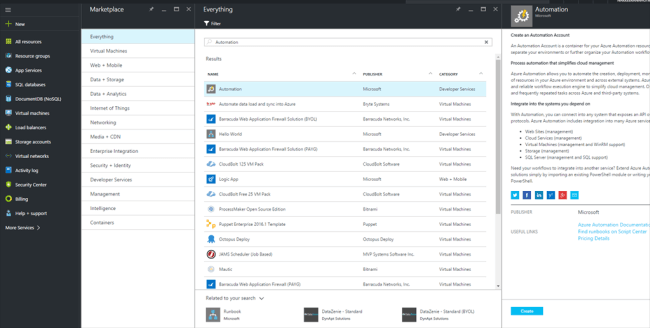
Click new and find the component "automation".
Create the account for automation. In my case, I am creating an automation with “spoautomation” name. Fill in the necessary information. In my case, I have given the existing storage (It can be new resource group as well).
Once created, go to all resources and find the automation, which was created. You can filter out the automation, using the filter items box and name.
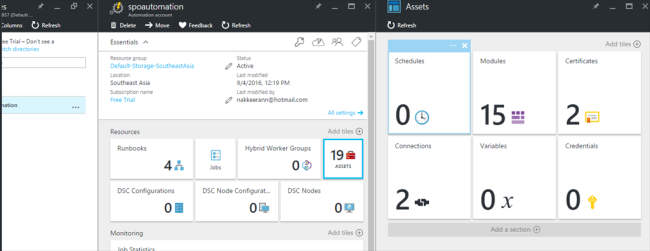
Click the automation name. You will find the components, given below, under the automation, which was created.
The automation component is created to create schedules/tasks for SharePoint online. Before creating the schedules, we need follow some prerequisites.
Creating/Importing Modules
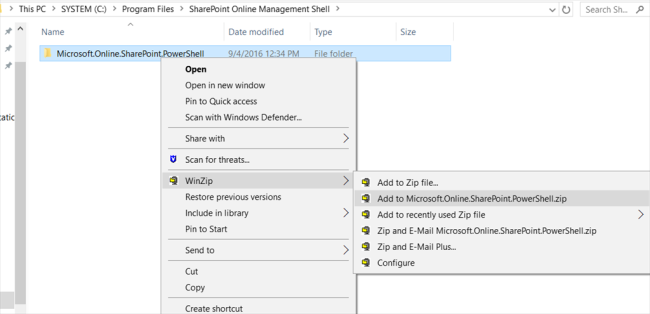
The modules contains cmdlets, which you can use in your Runbooks. These modules can be imported from the local desktops. Since we are going to see, running/scheduling jobs for SharePoint online, we will import Microsoft.Online.SharePoint.PowerShell references. Locate the reference assemblies folder on your machine, zip the folder and save it in the local machine.
Note: Microsoft.Online.SharePoint.PowerShell references assemblies were installed on my machine previously. To install the assemblies on the desktop, download the installer from Microsoft site and install it (http://www.microsoft.com/en-us/download/details.aspx?id=35588).
Go back to the Azure portal. Find and click the assets under the automation, you have created.
Click the modules. Click "add a module". Click on select a file icon, locate Microsoft.Online.SharePoint.PowerShell zip file and import it. Click OK.
Once imported, you will find the module under the modules component. If you are not able to view the imported module, click refresh under modules component.
Portal will extract the imported component. Wait for an extraction of the module to complete.
Summary
Thus, you have learn, how to create Azure Automation account and import the references module to the account.
In my next article, you will see, how to create Runbook and create the schedules to get SharePoint online portal information.


Comments