
SharePoint CRUD Operation Using Angular 6Understanding Angular 6 AndIntegration & Development
- The Tech Platform

- Mar 12, 2019
- 11 min read
Updated: Mar 13, 2019
1.0. Introduction
Angular 6 is a JavaScript framework for building web applications and apps in JavaScript, html, and TypeScript, which is a superset of JavaScript. Angular 6 allows developers to build robust applications with the user experience of a desktop application and the ease of deployment of a web application. Angular provides built-in features for animation, http service, and materials which in turn has features such as auto-complete, navigation, toolbar, menus, etc. The code is written in TypeScript, which compiles to JavaScript and displays the same in the browser.
2.0 Objectives
To Understand how single-page web application architectures are different than traditional web application architectures
Learn Angular coding and architecture best practices including project layout
To Understand and use Angular model-driven forms
How to Communicate with a backend server using Angular’s Http Client to load and save data
Learn Type Script language
Usage of new JavaScript (ES6) language features including Classes, Modules, and Functions
3.0 Target Audience and Pre Requisites
This Whitepaper is designed for programmers who want to learn the basics of Angular 6 and its programming concepts in a simple and easy manner. This Document will give you understanding on the basic CRUD functionalities of application development using Angular 6 in SharePoint platform.
To proceed with this Angular learning, you should have a basic understanding of HTML, CSS, JavaScript, TypeScript, Node(Basic) and Document Object Model (DOM).
4.0 Environment Set up
The following tools, frameworks, and modules are required to install Angular 6 and get start development.
Nodejs
NPM
Angular CLI
IDE for writing your code
4.1 Install NodeJS & NPM
Node comes with a tool called Node Package Manager or NPM, which is used for installing third-party libraries. We are going to use NPM to install Angular CLI. It is a command-line tool we use to create a new Angular project. It is also used for generating some boilerplate code during development (such as components, services, etc.) as well as building an application for deployment. We do all this in the terminal.
To install NodeJs, navigate to https://nodejs.org/en/download/ of Nodejs and install the package based on your OS. Once NodeJs is installed, NPM will also get installed along with it. To check if NPM is installed or not, type npm –v in the terminal. It should display the version of the NPM.
C:\>npm-v
5.6.0
4.2 Install Angular CLI
To install angular cli on your system, Type npm install –g @angular/cli. You will get the below installation in your terminal, once Angular CLI is installed. You can use any IDE of your choice, i.e., WebStorm, Atom, Visual Studio Code, etc. In our case we shall use Visual Studio Code. To check the installed version, type ng version in the terminal. It should display output as below


Now, you're ready to create a project using Angular CLI v6.
5.0 Generating Angular 6 Project (In our case CRUD project)
Once, the latest version of npm and node is installed, we should run following command in the terminal to generate Angular 6 project in any location of our choice.
ng new MYCRUD-APP
Doing so, our angular 6 application is generated with TypeScript 2.7 & RxJS 6. Once the project is generated, you can import it in your desired directory and get started with it. Also, you can run following commands to see angular 6 app running at localhost:4200. Following will be the final structure of our project.
5.1 Structure of Angular Projects
The CLI will automatically generate a bunch of files common to most Angular 6 projects and install the required dependencies for your project. We will mostly be working inside the src/app folder. This is the directory structure of the project

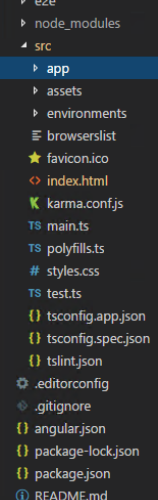
node_modules: all the third-party libraries that our project is dependent upon.
src: the actual source code of our Angular application.99.9% of the time you’ll be working with the files inside the src folder.
angular-cli.json: a configuration file for Angular CLI. We use this file to import third-party stylesheets or define additional environments (e.g. testing environment) for our application
index.html where configuration related to welcome html file
karma.conf.js: Karma is a test runner for JavaScript applications. This file contains some configuration for Karma. We rarely need to modify this file.
main.ts where all the modules are bundled.
polyfills.ts code which make your application compatible for different browsers, especially IE old versions IE8, IE9 and IE10
angular.json file generated that has all the application configuration parameters.
package.json a standard file for Node-based projects. It contains metadata about our project, such as its name, version as well as the list of its dependencies
tsconfig.json includes setting for the TypeScript compiler. Again, we hardly, if ever, need to modify this file.
tslint.json: includes the settings for TSLint which is a popular tool for linting TypeScript code. That means it checks the quality of our TypeScript code based on a few configurable parameters.
Note:
So, as you see, all these files are configuration files that work smoothly out of the box. Unless you want to customize them for your environment, you don’t ever need to modify them.
6.0 Architecture of Angular Apps
The most fundamental building block in an Angular application is a component. You can think of a component as a view component. It represents a view or part of a view (what the user sees). A component consists of three pieces.
HTML markup to render that view
State the data to display on the view
Behavior the logic behind that view. For example, what should happen when the user clicks a button.
At the root of the application, we have a component called AppComponent. This is the root of every Angular application. Our AppComponent contains 3 child components
NavBar SideBar ContentArea
The reason for such separation is because the navigation bar is logically a separate part of the view. It has its own markup, state, and behavior. We can encapsulate all that using a component called NavBarComponent. This way, when modifying or extending the navigation bar of our application, we can focus on a small component with a lightweight template.
6.1 Components in Angular 6
A component is a TypeScript class with an HTML template and an optional set of CSS styles that control a part of the screen.
A component is an independent block of a big system (web application) that communicates with the other building blocks (components) of the system using inputs and outputs.
Components are the most important concept in Angular 6. An Angular 6 application is basically a tree of components with a root component (the famous AppComponent).
When we open the src/app folder we will find the following files
app.component.css: the CSS file for the component
app.component.html: the HTML view for the component
app.component.spec.ts: the unit tests or spec file for the component
app. component.ts: the component code (data and behavior)
app. module.ts: the application main module techiediaries.com
Except for the last file which contains the declaration of the application main
(root) Module, all these files are used to create a component.
AppComponent: The root component of our application. All other components we are going to create next will be direct or un-direct children of the root component.
6.2 Advantage of Component Based Architecture
One important aspect of components is re-usability. A component can be re- used throughout the application and even in other applications. Common and repeatable code that performs a certain task can be encapsulated into a re- usable component that can be called whenever we need the functionality it provides. A component has associated view, data and behavior and may have parent and child components.
Components allow maximum re-usability, easy testing, maintenance, and separation of concerns.
6.3 Creating Angular Component
To generate a component type ng g component <componentName> in terminal.
When you use the CLI to generate components, it creates 4 files:
The HTML file is the HTML template associated with that component.
The SCSS or CSS is the associated CSS rulesets for that component (whatever is defined in the HTML file)
The spec.ts file is for testing purposes.
The .ts file is the actual component file, and it's where we will develop most of the code.
7.0 Angular 6 Service/Provider
A service is a global class that can be injected in any component. It's used to encapsulate code that can be common between multiple components in one place instead of repeating it throughout various components. With services, we can access methods and properties across other components in the entire project. The service file can be used to communicate with an API via Angular 6 HTTP Client.
To create a service, type ng g service <ServiceName> in the terminal.
Following are the files created under src\app. The first contains code for the
service and the second contains tests.
<ServiceName>.service. specs.ts
<ServiceName>.service.ts
8.0 Flow of Angular 6 Project using CLI

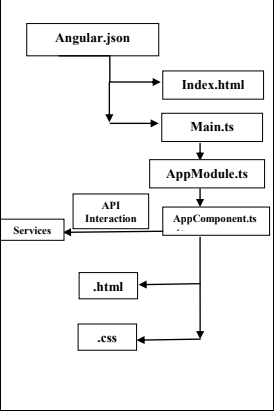
When we hit the url in browser, it first executes the index.html file
A look at the tag in the body section of the index.html file we will find <app-root> </app-root>. This is the root tag created by the Angular by default. This tag has the reference in the main.ts file.
AppModule is imported from the app of the main parent module, and the same is given to the bootstrap Module, which makes the AppModule load.
The AppComponent is the name given, i.e., the variable to store the reference of the app.component.ts and the same is given to the bootstrap
The AppComponent interacts with a service Service.ts that encapsulates all the code needed for interacting with the REST API
When the <app-crud-operation></app-crud-operation> tag is added to app.component.html file, all that is present in the .html file of the new component created will get displayed on the browser along with the parent component data.
9.0 Angular 6 CRUD Operation
Now that we have learnt the flow structure of Angular 6 let us build an Angular 6 application and perform a CRUD Operation systematically from scratch with an example. We will be generating our Angular 6 application using Angular CLI and then modify it to have an employee information project where the end-user can perform CRUD operations, i.e., Create, List, Update, and Delete with the sample REST API exposed using HttpClientModule.
Check List
Ensure NPM and node installed on local system
Ensure latest angular/cli version
9.1 Generating Angular 6 Project
9.1.1 Create Project
Once the npm and node are installed/upgraded to the latest version, we can run the following command to generate an Angular 6 project in any location of our choice.
ng new MYCRUD-APP
Doing so, our Angular 6 application is generated. Once the project is generated, you can run the following commands ng serve to see the Angular 6 app running at http://localhost:4200
9.1.2 Create an Angular 6 Service/Provider
A service is a global class that can be injected in any component. It's used to encapsulate code that can be common between multiple components in one place instead of repeating it throughout various components.
Now, let’s create a service that encapsulates all the code needed for interacting with the REST API. Using Angular CLI run the following command:
ng g service <servicename>, in our case
ng g service CrudServiceService
Two files will be generated
src/app/ CrudServiceService.service.ts
src/app/ CrudServiceService.service.spec.ts
The first contains code for the service and the second contains tests (we shall seldom use this file- spec.ts).
Open src/app/CrudServiceService.service.ts and import and inject the HttpClient class. Below is how service.ts will look like.
import { Injectable } from '@angular/core'; import { HttpClient} from '@angular/common/http'; @Injectable({
providedIn: 'root' }) export class APIService { constructor(private httpClient: HttpClient) { }}
9.1.3 Overview– CrudServiceService.service.ts
We must import and add the service name to the provider attribute in the app. module.ts file in order to consume the service like this:
import {CrudServiceService} from ‘./CrudServiceService.service’;
Now we should add some code to the CrudServiceService.service.ts file. This file contains the data that we want to consume. So in the service file, this file will hit the GET or POST request to the server and insert or fetch the data. This file get the request from Component and process the requests through calling API and return the result to the component as observable. As seen below postEmplyee function has been called from component and in this function it is calling API by using http.post verb with appropriate URL(EmpInfoUrl).
export class CrudServiceService {
constructor (private http:HttpClient, private messageService: MessageService) {}
gatemployee (EmpInfoUrl: string): observable<any>{
return this.http.get<any>(EmpInfoUrl);
}
//*Add employee*//
postEmployee (EmpInfoUrl: string, data: any): observable<any>{
return this.http.post (EmpInfoUrl, data).pipe(
tap((data:any) => console.Log ('added hero w/ id=${data.id}'))
);
}
//*Add employee*//
10.0 Create Components
Angular-cli has a command to create own component. However, the app component which is created by default will always remain the parent and the next components created will form the child components
Create the components folder inside app folder.
Run the command to create the component ng g component crud-operation
Now, if we go and check the file structure, we will get the new crud-operation folder created under the src/app folder. Refer below screenshot.
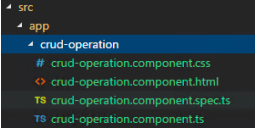
We observe a new folder is included into the project viz- crud-operation. Let us now understand these components and the changes they make to the other files. We seldom make any changes to component.spec.ts and hence will not discuss it over here.
crud-operation.component.html: This file initially will have a structure as below
<p> crud-operation works!
</p>
crud-operation. component.ts: This is the file where we will write majority of the code.
import {Component, OnInit} from '@angular/core';
@Component ({ selector: 'app-crud-operation', templateUrl: './crud-operation.component.html', styleUrls: ['./crud-operation.component.css']
}) export class CrudoperationComponent implements OnInit {
constructor() { } ngOnInit() { }}
We can also observe the below changes are added to the app.module.ts file as follows. Open src/app/app.module.ts after running all commands, we can see that all components are automatically added to the AppModule declarations array.
import {BrowserModule} from '@angular/platform-browser'; import {NgModule} from '@angular/core'; import {AppComponent} from './app.component'; import {CrudOperationComponent} from './crud-operation/crud-operation.component'; // includes the CrudOperationComponent component we created
@NgModule ({
declarations: [AppComponent, CrudOperationComponent // here it is added in declarations and will behave as a child component
], imports: [BrowserModule],
providers: [ ],
bootstrap: [AppComponent] //for bootstrap the AppComponent the main app component is given.
}) export class AppModule()
Now that we have created a new component. The same gets include in the AppModule.ts. file, when the command is run for creating a new component. AppModule.ts has a reference to the new component created.
Note: If you are creating components manually, makes sure to include it manually so they can be recognized as part of the module.
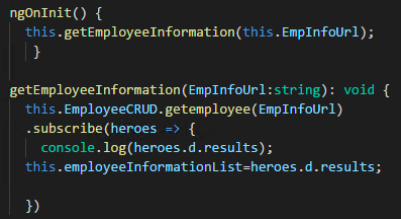
10.1 Overview– crud-operation.Component.ts
Over here as we notice we subscribe the employeeInformation. Let us now look into the component structure. As we see in ngOnInit (one of the life cycle hook of Angular) is calling getEmployeeInformation function, which in turns populates employeeInformationList variables by subscribing EmployeeCRUD service result.
Now its time to bind the result in the HTML page to display in the Sharepoint Page.
11.0 Data Binding in HTML template
The property set in the component will be displayed in the HTML template in the following way.
Open the crud-operation.component.html template file.
Delete the default text generated by the Angular CLI and replace it with a data binding to the new property.
To display the CRUD Component, you must add it to the template of the AppComponent.
Remember that app-CRUD is the element selector for the CRUDComponent.
Sp add an <app-heroes> element to the AppComponent template file, just below the title.
Once we have bind , it will display the list items as below.
EmployeeInformation
Employee ID Employee Name Employee Email Action
298437 Nitin Nath Nitin.Nath@vbre.com Delete or Edit
123456 Tarikul Islam Tarikul@cbre.com Delete or Edit
12.0 Adding Bootstrap 4 into Angular 6 application
Once the app is created successfully, install bootstrap 4(compatible version as per your solution). Run the below command in the terminal to install bootstrap.
npm install bootstrap –save
Next, open angular. json file and add bootstrap file path to the styles section.
"styles":
[ "src/styles.css",
"node_modules/bootstrap/dist/css/bootstrap.min.css"
],
That’s it. Run the app and you should see bootstrap 4 styles which you would be able to apply to the angular app.
Now that we have seen and are ready with the structure of Angular CLI, let us now look at the code structure of the entire CRUD operation. In this section we shall discuss the entire code structure necessary to build a CRUD application in SharePoint using Angular 6.
13.0 Deployment
Once the development is completed we should move the solution to the SharePoint
framework for the changes to be visible in the SharePoint page. Below are the steps to incorporate Angular 6 into SharePoint page.
NG SERVE - ng serve builds the application and starts a web server. This will compile the application upon file saves and reload the browser with the newly compiled application.
NG BUILD - The ng build command is for building the apps and deploying the build artifacts. It compiles an Angular app into an output directory named dist/ at the defined output path.
upload all files form local/dist/ to sharePoint/ siteAssets/.
Open index.html and change the source file URL to absolute SP location url. <script
e.g., <script type="text/javascript" src="runtime.js"></script> will be replaced to
<script type="text/javascript" src=”
src=".../sites/SiteName/SiteAssets/AngularSearch/runtime.js” </script>
Again Right click “index.html” in SharePoint to copy absolute URL
Edit Page, add Content Editor Web Part (CEWP)
Modify CEWP and provide URL for display
14.0 References
https://angular.io/
https://www.techiediaries.com/angular-tutorial/
https://getbootstrap.com/


Comments