
Setting Permissions Policy On Web Applications In SharePoint 2013 Central Administration
- Manpreet Singh

- Apr 12, 2019
- 4 min read
In this article, we will see how to set up permissions policy on the Web Applications in SharePoint 2013 Central Admin. This configuration will help admin users with the defined permission level.
How to configure?
Let’s open Central Admin of SharePoint on your machine. On your Windows desktop screen, click Start >> Administrative Tools >> SharePoint 2013 Central Administration.


Run it as an administrator to have the elevated privileges.
You will see the screenshot given below.


Central Admin is configured under the categories given below.
Click on Application Management.


Go to Web Applications >> Manage Web Applications.
You will see the screen given below.

Here, we can see various options to work with the Web Applications.
Let’s see them from left to right in different parts of the article.
We have four categories, where the events have been categorized.
Contribute
Manage
Security
Policy
In this article, we will see “Permission Policy” under "Policy” category.
Permission Policy
Select the Web Application and click "Permission Policy".You will see the screen below.

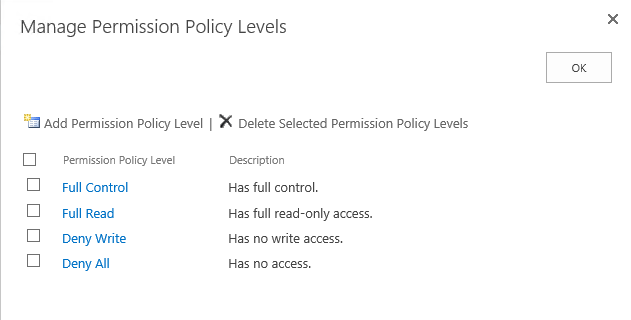
You can see the Permission Policy Lever and by default, it is given below.
Full Control
Full Read
Deny Write
Deny All
You can delete them and also create new permission policy level.
Click on Add Permission Policy Level to add a new permission policy.

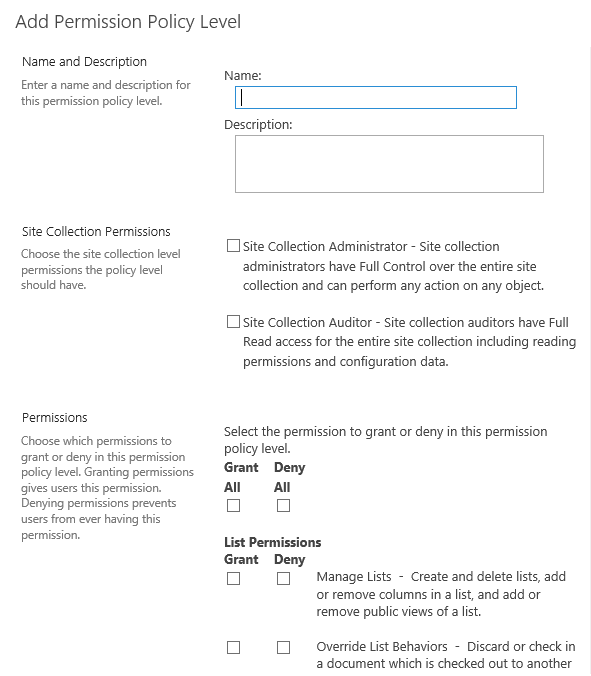
Name Provide a name to the permission policy level.
Description Provide a description.
Site Collection Permissions You can choose among the site collection administrator and auditor or both to have the permissions on the site collection.
Permissions Once done, you can configure the levels accordingly by granting or denying the permissions on the site.


Manage Lists The users can create and delete lists, add or remove columns in a list, and add or remove public views of a list.
Override List Behaviours The users can discard or check in a document, which is checked out by another user and change or override settings, which allows the users to read/edit only their own items.
Add Items The users can add items to the lists and adds documents to the document libraries.
Edit Items The users can edit the items in the lists, edit the documents in the document libraries and customize Web Part pages in the document libraries.
Delete Items The users can delete the items from a list and the documents from a document library.
View Items The users can view items in the lists and the documents in the document libraries.
Approve Items The users can approve a minor version of a list item or a document.
Open Items The users can view the source of the documents with the Server-side file handlers.
View Versions The users can view the past versions of a list item or a document.
Delete Versions The users can delete the past versions of a list item or a document.
Create Alerts The users can create alerts.
View Application Pages The users can view forms, views and Application pages and enumerate lists.


Manage Permissions The users can create and change permission levels on the Website and assign the permissions to the users and groups.
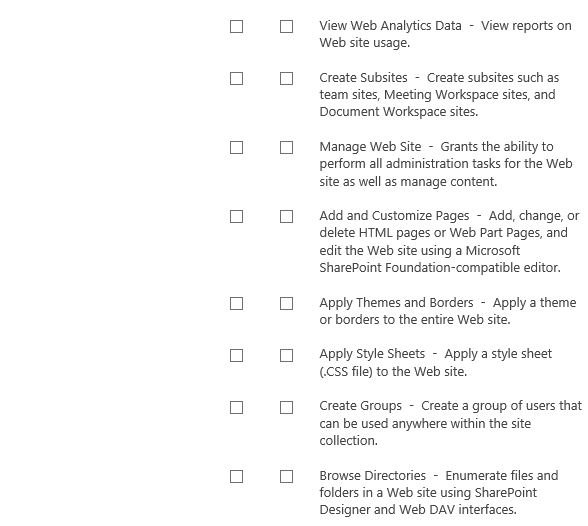
View Web Analytics Data The users can view report on Website usage.
Create Subsites The users can create subsites such as team sites, meeting Workspace sites and Document Workspace sites.
Manage Web Site The users can grant the ability to perform all administration tasks for the Web site as well as manage content.
Add and Customize Pages The users can add, change or delete HTML pages or Web PartpPages and edit the Website, using a Microsoft SharePoint Foundation-compatible editor.
Apply Themes and Borders The users can apply a theme or borders to the entire Website.
Apply Style Sheets The users can apply a style sheet (.CSS file) to the Website.
Create Groups The users can create a group of users, which can be used anywhere within the site collection.
Browse Directories The users can enumerate the files and folders in a Website, using SharePoint Designer and Web DAV interfaces.
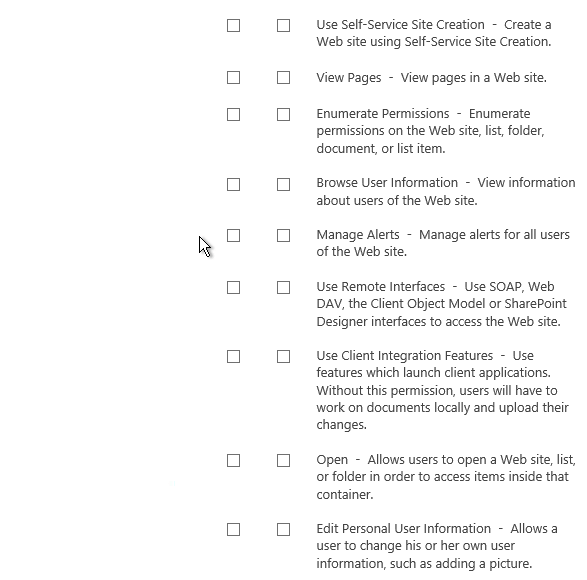
Use Self-Service Site Creation The users can create a Website, using Self-Service Site creation.
View Pages The users can view the pages in a Web site.
Enumerate Permissions The users can enumerate the permissions on the Web site, list, folder, document or list item.
Browse User Information The users can view information about the users of the Website.
Manage Alerts Users can manage alerts for all users of the Web site.
Use Remote Interfaces The users can use SOAP, Web DAV, the Client Object Model or SharePoint Designer interfaces to access the Website.
Use Client Integration Features The users can use features, which launch client Applications. Without this permission, the users will have to work on the documents locally and upload their changes.
Open The users can allow the users to open a Web site, list or folder in order to access the items inside that container.
Edit Personal User Information The users can allow a user to change his or her own user information, such as adding a picture.

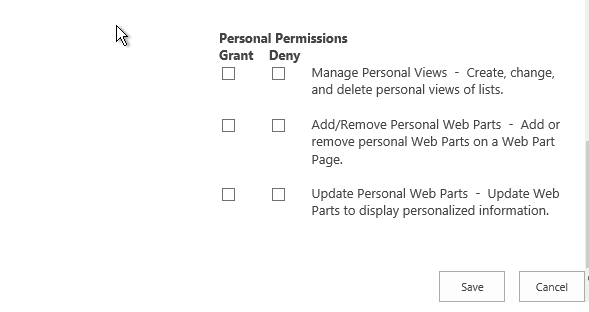
Manage Personal Views The users can create, change and delete personal views of the lists.
Add/Remove Personal Web Parts The users can add or remove personal Web Parts on a Web Part page.
Update Personal Web Parts The users can update the Web Parts to display personalized information.
Once you click OK, the configuration selected by you will be added by default in all the sites within the Web and all the Permissions Policy will be configured under the zones.
This is an important feature as the policy will be inherited by all the sites under the Web Applications.
In this article, we saw how to manage permissions policy on the Web Application. There are more features under managing the central administration, which we will see in the next article.
Until then, keep reading and keep learning.


Comments