
Serverless Azure WebJobs - Triggers to Push Data from Azure Storage into Office 365 SharePoint
- Nakkeeran Natarajan

- Feb 15, 2019
- 4 min read
Let us look how we can leverage the power of azure cloud storage, and integrate data into Office 365 SharePoint. In this article, we will use serverless WebJobs to push the data into Office 365 SharePoint online, whenever new content is added to storage systems like queues and blobs.
Scenario: Azure cloud storage system is used as centralized platform for storing/publishing the content. Office 365 SharePoint to get the content, whenever the data is available on the cloud storage.
Azure webjobs can be used for pushing the data to SharePoint systems/applications. We will be using Azure Webjob SDK framework, which has necessary triggers for queues and blobs, to trigger the content whenever it is available. We will be using OfficeDevPnp core libraries on Azure webjobs to integrate the data into Office 365 SharePoint.
This article explains trigger events for both queue and blob, present on Azure storage. But based on your requirement, you can select any of the storage.
The prerequisites required are,
Office 365 SharePoint
Azure Storage Account
Queues
Blobs
Azure App Service which has WebJobs
Microsoft Visual Studio – This is optional, and you can use any other alternative approach. But in this case, I have used visual studio to build the solution and to deploy the solution directly to cloud.
Creating WebJobs
Create a new project with the template C# console app (.net framework). .Net framework version used for this solution is 4.6.1. If you are using different framework version, then accordingly Azure webjobs SDK version might be changing.
Then from the Nuget package manager console, install the necessary references/dependencies. The references/packages required are Azure WebJobs SDK, logging and SharePoint PnP core online packages. The following commands needs to be executed from the nuget package manager console.
Install-Package Microsoft.Azure.WebJobs -Version 2.2.0 Install-Package Microsoft.Extensions.Logging -Version 2.0.1 Install-Package Microsoft.Extensions.Logging.Console -Version 2.0.1 Install-Package SharePointPnPCoreOnline
Note:
.Net framework project might conflict with the versions, if the appropriate version is not used on the project. Please ensure the versions are used as mentioned. These versions are for .net framework 4.6.1 version.
For SharePoint package, version is optional. If empty, the latest package will be downloaded and installed.
In the app.config file, the following needs to be placed.
User credentails or Azure AD client details for SharePoint online authentication
Connection strings for storage and dashboard. This can be copied from Azure storage account. Click on your storage account, and navigate to access keys. 2 connection strings will be available, and you can select any one.
The app.config file will look like,
<?xml version="1.0" encoding="utf-8"?>
<configuration>
<appSettings>
<add key="o365UserName" value = "abc@nakkeerann.onmicrosoft.com" />
<add key="o365PassKey" value="***" />
</appSettings>
<connectionStrings>
<add name="AzureWebJobsStorage" connectionString="DefaultEndpointsProtocol=https;AccountName=nakkeerann;AccountKey=*********;EndpointSuffix=core.windows.net" />
<add name="AzureWebJobsDashboard" connectionString="DefaultEndpointsProtocol=https;AccountName=nakkeerann;AccountKey=*********;EndpointSuffix=core.windows.net" />
</connectionStrings>
<startup>
<supportedRuntime version="v4.0" sku=".NETFramework,Version=v4.6.1" />
</startup> <runtime>
..............
..............
............
</runtime>
</configuration>
In the program.cs , paste the following code.
using Microsoft.Azure.WebJobs;
using Microsoft.Extensions.Logging;
using System.Configuration;
namespace spserverlesswebjobs
{
class Program
{
static void Main(string[] args)
{
var config = new JobHostConfiguration();
config.DashboardConnectionString = ConfigurationManager.AppSettings["AzureWebJobsDashboard"]; ;
// config.DashboardConnectionString = "";
var loggerFactory = new LoggerFactory();
config.LoggerFactory = loggerFactory
.AddConsole();
var host = new JobHost(config);
host.RunAndBlock();
}
}
}
In the office 365 SharePoint site, please ensure necessary lists are configured for storing the queue/blob data (as mentioned in the triggers file).
In the Azure storage, click overview.
Creating Queue Service: From services, click on queues. Create a new queue (copy the queue name, which will be used in the triggers file).
Creating Blob service: From the services, click on blobs. Create a new container, with anonymous access for blobs.
Trigger Functions:
Two functions are created here.
Processing queue messages. - This function takes queue name with the queue trigger attribute, for accessing queue events.
Once there is a new message added to the queue, this function triggers automatically with necessary inputs (I.e., message content).
Once this function triggered, the queue message will be removed from the storage account.
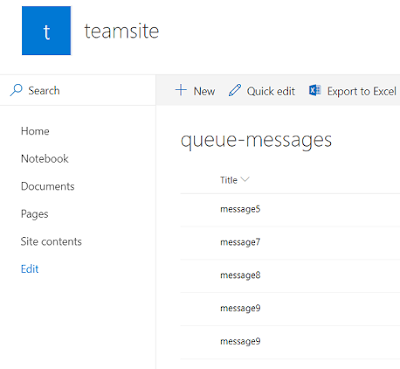
Then log the message onto Office 365 SharePoint lists.
Processing blob files. This function takes blob container name and file name along with blob trigger attribute, for accessing the blob files.
Once there is a new file added to the blob container, this function triggers automatically with necessary inputs (file stream object, and file name)
Once this function is triggered, we access the metadata/properties of file. (The file will not be removed, unlike queues)
Then log the properties onto Office 365 SharePoint lists.
In to the same console app, add a new class file (triggers.cs). This will have both trigger functions mentioned above. Paste the following code for our scenario.
using System;
using System.Configuration;
using System. IO;
using System. Security;
using Microsoft.Azure.WebJobs;
using Microsoft.Extensions.Logging;
using Microsoft.SharePoint.Client;
namespace spserverlesswebjobs
{
public class Triggers
{
public static string siteUrl = "https://nakkeerann.sharepoint.com/sites/teamsite/";
public static string o365UserName = ConfigurationManager.AppSettings["o365UserName"];
public static string o365PassKey = ConfigurationManager.AppSettings["o365PassKey"];
public static void ProcessQueueMessage([QueueTrigger("queue")] string message, ILogger logger)
{
try
{
using (ClientContext ctx = new ClientContext(siteUrl))
{
SecureString password = new SecureString();
foreach (var p in o365PassKey)
{
password.AppendChar(p);
}
ctx.Credentials = new SharePointOnlineCredentials(o365UserName, password);
List list = ctx.Web.GetListByTitle("queue-messages");
ListItemCreationInformation listItemCreationInfo = new ListItemCreationInformation();
ListItem listItem = list.AddItem(listItemCreationInfo);
listItem["Title"] = message; listItem.Update();
ctx.ExecuteQuery();
logger.LogInformation("Message successfully added to SharePoint list : " + message);
}
}
catch (Exception ex)
{
logger.LogInformation("Exception adding data to SharePoint: " + ex.Message);
}
}
public static void ProcessBlobFiles([BlobTrigger("blobjobs/{filename}")] Stream image, string filename, ILogger logger)
{
try
{
using (ClientContext ctx = new ClientContext(siteUrl))
{
var o365UserName = ConfigurationManager.AppSettings["o365UserName"];
var o365PassKey = ConfigurationManager.AppSettings["o365PassKey"];
SecureString password = new SecureString();
foreach (var p in o365PassKey)
{
password.AppendChar(p);
}
ctx.Credentials = new SharePointOnlineCredentials(o365UserName, password);
List list = ctx.Web.GetListByTitle("blob-images-metadata");
ListItemCreationInformation listItemCreationInfo = new ListItemCreationInformation();
ListItem listItem = list.AddItem(listItemCreationInfo); listItem["Title"] = filename;
listItem.Update();
ctx.ExecuteQuery();
logger.LogInformation("Image metadata added to SharePoint list: " + filename);
}
}
catch (Exception ex)
{
logger.LogInformation("Exception adding data to SharePoint: " + ex.Message);
}
}
}
}
Test / Deploy:
Test the function, by running F5.
Navigate to Azure storage.
Then click on queue service, and select the queue used in the above code.Add a message text.

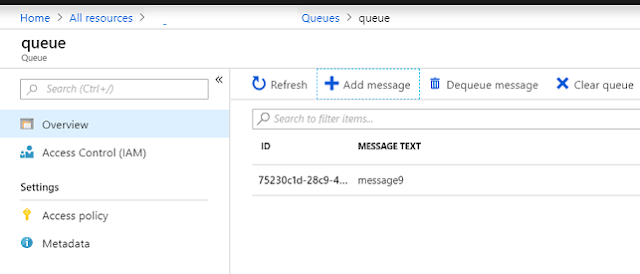
The trigger function code will be executed. Then the text will be logged in to SharePoint list.

Similarly, you can test the blob trigger scenario by uploading file. The trigger function tries to log data into the Office 365 SharePoint list (list name mentioned in the code) in the same way as explained above step.
Deploy the webjobs, by importing the profile data from Azure.


Comments