
Selenium with C#: How to start running Automated Tests
- The Tech Platform

- May 13, 2022
- 8 min read
Updated: Jan 20, 2024
Automated testing has become an integral part of modern software development practices, allowing teams to enhance the efficiency, reliability, and overall quality of their applications. Selenium, a widely used open-source testing framework, has emerged as a powerful tool for automating web browsers. This section provides a foundational understanding of Selenium and highlights its pivotal role in the realm of automated testing.

What is Selenium?
Selenium is a suite of tools designed to automate web browsers, providing a versatile platform for testing web applications across different browsers and platforms. Originally developed by ThoughtWorks, Selenium has evolved into a comprehensive testing framework supported by a vibrant community of developers.
The suite consists of several components, with Selenium WebDriver being a key player. WebDriver enables developers to interact with web browsers programmatically, allowing the automation of various testing scenarios. Selenium's capabilities extend to multiple programming languages, making it adaptable to different development environments.
Selenium's significance in automated testing lies in its ability to replicate user interactions with web applications, ensuring that functionalities work as intended across diverse browsers. It facilitates the creation of robust and reusable test scripts, reducing manual testing efforts and accelerating the software development lifecycle.
Importance of Using Selenium with C# for Automated Testing
Robust Programming Language: C# is a powerful, statically typed language that offers a robust set of features, making it an excellent choice for writing maintainable and efficient automated test scripts.
Extensive C# Ecosystem: Selenium's integration with C# allows developers to leverage the extensive libraries and frameworks available in the C# ecosystem, enhancing the overall test development experience.
Object-Oriented Programming (OOP) Support: C# provides strong support for object-oriented programming principles, enabling the creation of scalable and modular test architectures. This facilitates the development of organized and reusable code.
Code Reusability: Selenium with C# enables developers to achieve greater code reusability. Test scripts can be structured in a modular fashion, allowing the reuse of common functions and reducing redundancy in test code.
Readability and Maintainability: The combination of Selenium's capabilities and C#'s syntax results in readable and maintainable test code. This is crucial for teams working on large projects or collaborating on test automation, as it ensures clarity and ease of maintenance.
Cross-Browser Testing: Selenium with C# empowers developers to conduct cross-browser testing effectively. The combination allows for the creation of test scripts that can be executed seamlessly across different web browsers, ensuring consistent functionality.
Scalability: C# provides a scalable environment for test development. Test suites can be expanded and modified easily to accommodate changes in the application under test, making it adaptable to evolving project requirements.
Community Support: Both Selenium and C# have vibrant and active communities. Developers can benefit from community-driven resources, forums, and discussions, facilitating problem-solving and knowledge-sharing within the testing community.
Integration with Development Environments: C# seamlessly integrates with popular development environments such as Visual Studio, providing a familiar and well-supported environment for developers to work on their automated testing projects.
Comprehensive Documentation: Selenium with C# benefits from comprehensive documentation and resources, making it accessible for developers at various skill levels. This facilitates a smoother learning curve for those new to automated testing with this technology stack.
Setting up the Environment
Setting up the environment for Selenium testing with C# is a crucial initial step in ensuring a smooth and efficient automated testing process. This process involves installing the necessary development tools, configuring the Selenium WebDriver, and integrating it into your Visual Studio project.
Here's a detailed guide on how to set up the environment:
Installing Visual Studio
Configuring Selenium WebDriver
Installing Visual Studio
STEP 1: Navigate to the official Visual Studio website - Microsoft's official website.

STEP 2: Click on Free Download. After that, click on the .exe file to start the Visual Studio Installer.

STEP 3: Click on "Continue" to start the installation.

STEP 4: Visual Studio Installer downloads and prepares Visual Studio for installation.

STEP 5: Once completed, the Visual Studio installation window appears.
Choose a set of tools. To build an automation framework you can choose the Asp.net and Web development option.
Then, click on Install to proceed.

STEP 6: Installation begins.

STEP 7: After that, the Restart pop-up window will appear. Click on "Restart".
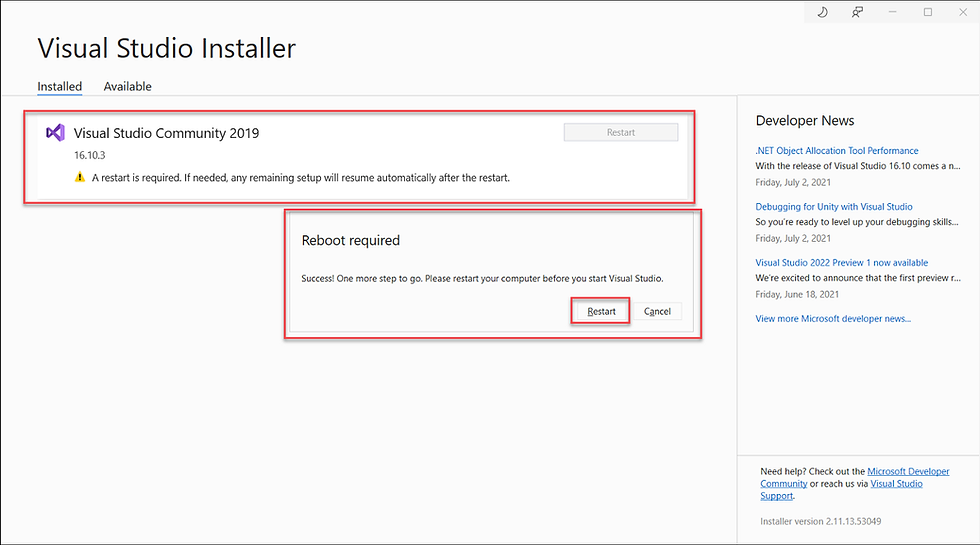
STEP 8: The Visual Studio setup pop-up will appear. Click on "Not now, Maybe later".


STEP 9: Choose a theme for Visual Studio, and click on "Start Visual Studio".

STEP 10: Once the step is completed, the below window will appear.

Configuring Selenium WebDriver
Selenium WebDriver stands as a pivotal component in the domain of automated testing, especially when it comes to interacting with web browsers. Its role is indispensable in providing developers and testers with a programmatic interface that allows for the controlled manipulation of browser behavior and the seamless execution of automated tests on web applications.
Significance of WebDriver:
Vital Component for Browser Interaction:
Selenium WebDriver serves as a crucial tool for automating interactions with web browsers.
It allows developers to emulate user actions on web applications, enabling the automated testing of various scenarios.
Programmatic Interface:
WebDriver provides a programmatic interface that allows developers to control and manipulate browser behavior through code.
This interface facilitates the creation of automated test scripts that simulate user interactions with web elements such as buttons, text fields, and dropdowns.
Execution of Automated Tests:
One of the primary roles of Selenium WebDriver is to execute automated tests seamlessly.
By interfacing with web browsers, WebDriver enables the systematic and repeatable execution of test scenarios, ensuring the reliability and consistency of web applications.
Downloading and Setting Up Selenium WebDriver for C#:
To effectively utilize Selenium WebDriver for C# automation, a proper setup is necessary. The following steps guide you through the process:
STEP 1: Navigate to the official Selenium website at https://www.selenium.dev/. Head to the "Downloads" section to access the latest Selenium WebDriver for C#.
STEP 2: Download the most recent version of Selenium WebDriver for C# from the official website.
STEP 3: After downloading, extract the contents of the downloaded files to a location on your machine. This step ensures that you have the necessary WebDriver binaries available for integration with your C# project.
Configuring WebDriver with Visual Studio Project:
Setting up Selenium WebDriver within your Visual Studio project involves several steps to seamlessly integrate it into your testing environment:
STEP 1: Open your existing Visual Studio project or create a new one dedicated to Selenium testing.
STEP 2: Right-click on your project in the Solution Explorer and select "Manage NuGet Packages."
STEP 3: In the NuGet Package Manager, search for "Selenium.WebDriver" and install the package. This ensures that your project includes the necessary Selenium libraries for C#.
STEP 4: Download and install the appropriate WebDriver executable for the specific browser you intend to automate (e.g., ChromeDriver, GeckoDriver).
STEP 5: Within your project, create a new class specifically dedicated to Selenium tests.
STEP 6: In the newly created class, configure the WebDriver instance, specifying the path to the WebDriver executable. This step establishes the connection between your Selenium tests and the chosen web browser.
STEP 7: Confirm that the WebDriver executable is either located in the project directory or that its path is correctly set in your code. This ensures that your tests can access and utilize the WebDriver for browser automation.
Create Selenium C# automation framework .NET Core 5.0
Building a Selenium C# automation framework using .NET Core 5.0 and Visual Studio provides a powerful foundation for testing web applications. Follow these step-by-step instructions to set up your project.
STEP 1: Open Visual Studio from the Windows Start Menu.
STEP 2: Click on Create New Project.

STEP 3: Search for "NUnit" in the template search bar. Choose "C# NUnit Test Project (.NET core)" .
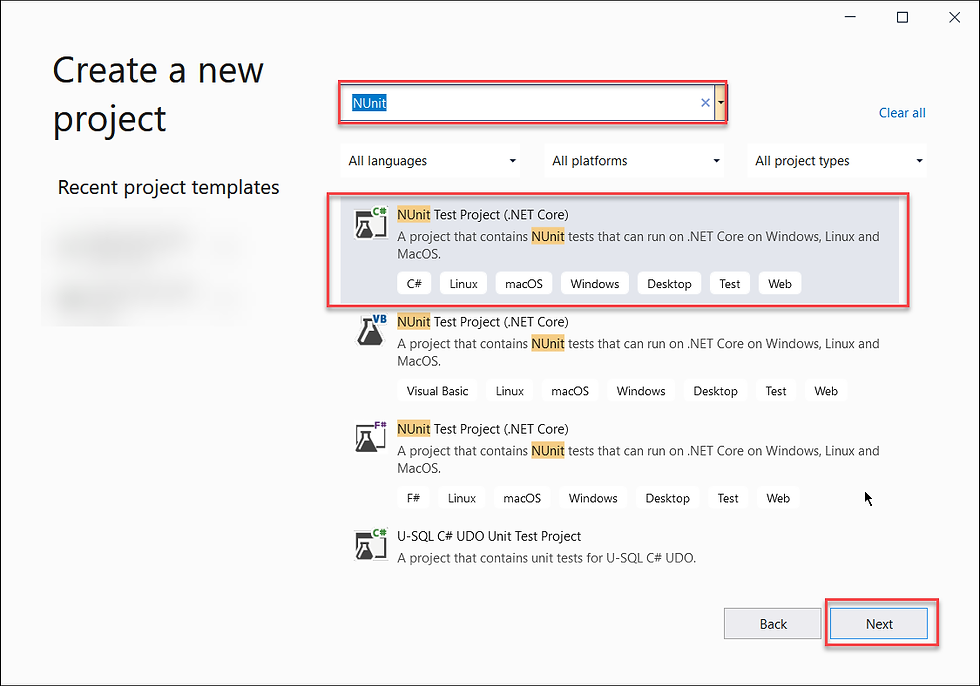
Note: Although Selenium C# projects can be created with MSTest libraries, NUnit is widely used and recommended for compatibility.
STEP 4: Enter the required details in the Configuration Section:
Project Name: Any desired name (e.g., SeleniumCsharp)
Location: Specify the desired folder location (e.g., C:/MyFolder)
Solution Name: Any name for the solution (e.g., SeleniumCsharp)
Click "Next."

STEP 5: In the "Additional Information" section, choose "Target Framework: .NET 5.0 (Current)." Click "Create."

STEP 6: After clicking "Create," a default .cs file with the extension will be generated.
The default framework includes dependencies for NUnit and NUnit Test Adapter, along with a file named UnitTest1.cs.

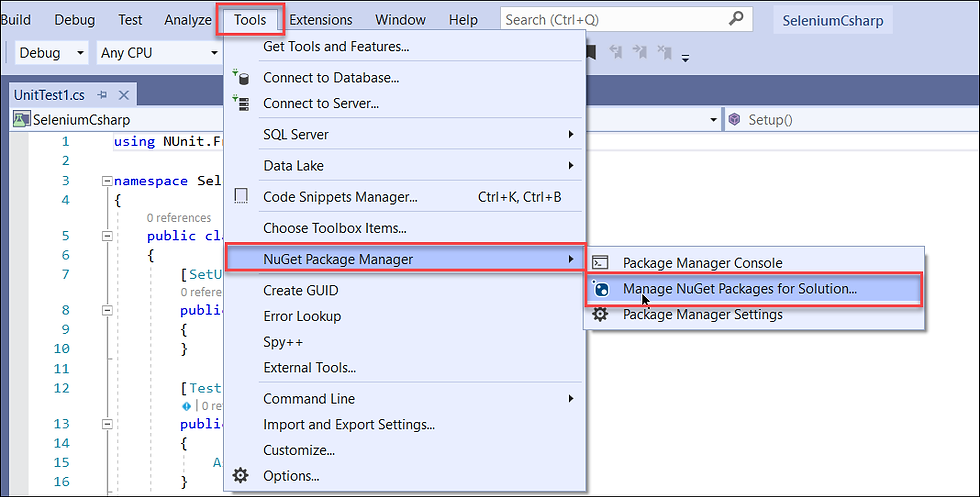
STEP 7: To run Selenium tests using C# and NUnit, add Selenium dependencies:
Click on the "Tools" Menu.
Click on "NuGet Package Manager."
Choose "Manage NuGet Package for Solution."
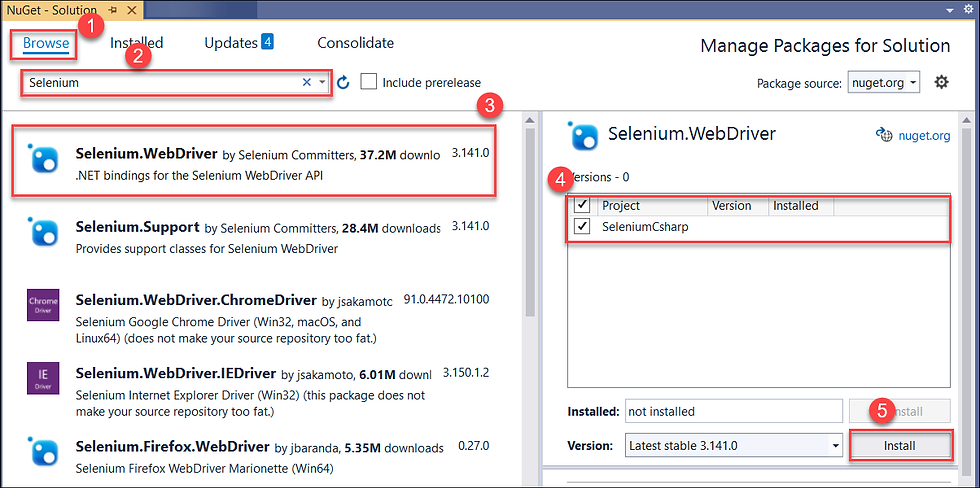
STEP 8: In the NuGet Package Manager:
Click on "Browse."
In the search box, type "Selenium."
Choose "Selenium.Webdriver" by Selenium.
On the right window, select the checkbox displaying the Project Name.
Click "Install."
Accept the License Agreement if prompted.

Wait for the installation to finish.

STEP 9: In the NuGet Package Manager:
Type "Selenium Support" in the search box.
Click on "Selenium Support" from the search results.
Choose the Project Name.
Click "Install."

Wait for the installation to finish.
STEP 10: Once Selenium WebDriver and Selenium Support NuGet packages are installed, verify that the dependencies are added to the project.
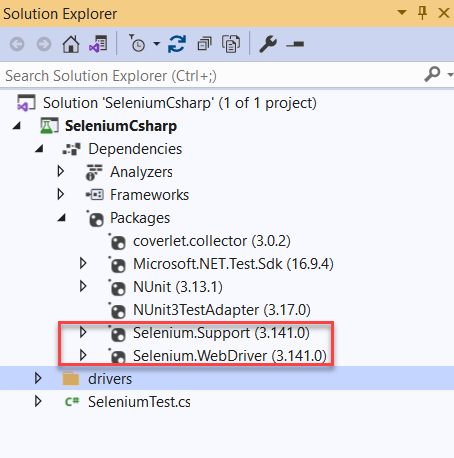
To execute tests, obtain the desired browser driver (e.g., Chromedriver for Chrome, GeckoDriver for Firefox).
Add Chromedriver to Selenium C#
To enable Selenium to interact with the Chrome browser in your C# project, you need to add Chromedriver. Follow these steps to seamlessly integrate Chromedriver into your Selenium C# project using Visual Studio.
STEP 1: Open your Visual Studio project. In the Solution Explorer, right-click on the Project (e.g., SeleniumCsharp).
STEP 2: Click "Add => New Folder".

STEP 3: Name the new folder "drivers".

STEP 4: Navigate to the Chromium webpage.

Click on the version of Chromedriver you wish to download (e.g., ChromeDriver <XX.XX.XXX>).
A new webpage will open, prompting you to select the target Operating System (Windows, in this case).
Choose the appropriate version for your Windows environment.

STEP 5: Click on the download link, and Chromedriver will be downloaded as a Zip file.

STEP 6: Once the download is complete, the driver folder will open in Windows File Explorer.
Locate the downloaded ChromeDriver zip file.
STEP 7: Right-click on the ChromeDriver zip file. Click on "Extract All" from the context menu.

Specify the folder location for extraction.
After extraction, check that the "drivers" folder now contains chromedriver.exe.

This integration allows your Selenium tests to communicate with the Chrome browser seamlessly. Ensure that the chromedriver.exe file is included in the "drivers" folder to enable proper execution of your automated tests.
Add GeckoDriver to Selenium C#
STEP 1: Visit the Mozilla GitHub repository for GeckoDriver.
STEP 2: Click on "Releases" under Downloads.

STEP 3: In the Releases page, scroll down to the "Assets" section.
STEP 4: Choose the appropriate GeckoDriver version for your operating system (e.g., Windows).

STEP 5: Click on the download link, and the zip file containing geckodriver.exe will be downloaded.
STEP 6: After the completion of Step 2, locate the downloaded zip file. Extract the contents of the zip file, specifically the geckodriver.exe. Place the geckodriver.exe in the "drivers" folder created earlier.

After completing this step, the "drivers" folder should now contain both chromedriver.exe and geckodriver.exe.
Writing the First Selenium Test using C# and NUnit in Visual Studio
To begin writing your first Selenium tests using C# and NUnit in Visual Studio, follow these steps:
Step 1: Rename Default Test File
In your existing project, locate the file named UnitTest1.cs created by default.
Rename it to SeleniumTest.cs for improved readability.
Step 2: Open SeleniumTest.cs and Write Tests
Double-click on the newly renamed SeleniumTest.cs file to open it in Visual Studio.
Write the following three tests inside the Tests class:
// Inside SeleniumTest.cs

using NUnit.Framework;
using OpenQA.Selenium;
using OpenQA.Selenium.Chrome;
using OpenQA.Selenium.Firefox;
using System;
using System.Collections.ObjectModel;
using System.IO;

namespace SeleniumCsharp
{
    public class Tests
    {
        IWebDriver driver;

        [OneTimeSetUp]
        public void Setup()
        {
            // Code to dynamically get the drivers folder path.
            // You can also specify the chromedriver.exe path directly, for example: C:/MyProject/Project/drivers

            string path = Directory.GetParent(Environment.CurrentDirectory).Parent.Parent.FullName;

            // Creates the ChromeDriver object, executes tests on Google Chrome

            driver = new ChromeDriver(path + @"\drivers\");

            // If you want to execute tests on Firefox, uncomment the below code

            // Specify the correct location of geckodriver.exe folder path, for example: C:/Project/drivers

            // driver= new FirefoxDriver(path + @"\drivers\");
        }

        [Test]
        public void VerifyLogo()
        {
            driver.Navigate().GoToUrl("https://www.browserstack.com/");
            Assert.IsTrue(driver.FindElement(By.Id("logo")).Displayed);
        }

        [Test]
        public void VerifyMenuItemCount()
        {
            ReadOnlyCollection<IWebElement> menuItem = driver.FindElements(By.XPath("//ul[contains(@class,'horizontal-list product-menu')]/li"));
            Assert.AreEqual(menuItem.Count, 4);
        }

        [Test]
        public void VerifyPricingPage()
        {
            driver.Navigate().GoToUrl("https://browserstack.com/pricing");
            IWebElement contactUsPageHeader = driver.FindElement(By.TagName("h1"));
            Assert.IsTrue(contactUsPageHeader.Text.Contains("Replace your device lab and VMs with any of these plans"));
        }

        [OneTimeTearDown]
        public void TearDown()
        {
            driver.Quit();
        }
    }
}
Step 3: Run the Tests
Execute the tests by clicking on the "Run All Tests" button in Visual Studio.
Observe the test results, which will be marked as passed or failed.

Step 4: Execute Tests on Firefox (Optional)
In the Setup method, comment out the ChromeDriver code and uncomment the FirefoxDriver code.
Specify the correct path to geckodriver.exe if not using the dynamic path.
// For Firefox
// driver = new FirefoxDriver(path + @"\drivers\");

// For dynamic path
driver = new FirefoxDriver(@'C:/MyProject/Project/driver');
Now, you have successfully written and executed your first Selenium tests using C# and NUnit in Visual Studio. Remember that Selenium WebDriver tests must be executed on real devices and browsers for accurate results.
Conclusion
This guide has equipped readers with the fundamentals of automated testing using Selenium with C#. From setting up the environment to executing tests, the article covers crucial steps for building a robust automation framework.
By understanding how to handle web elements and incorporating continuous integration tools, readers are prepared to navigate the dynamic landscape of automated testing, fostering collaboration and ensuring the creation of high-quality software.


Comments