NoSQL: Building Your First Application & Connecting To MongoDB
- The Tech Platform

- Nov 27, 2020
- 6 min read
And this is the reason why I decided to write a little dictionary of terms that you will hear often during this series of tutorial about MongoDB. It will not only help you to better understand the technology and what is the purpose behind it but also talk like a true professional coder when expressing yourself on this field. So let’s start diving into these terms and then later, at the end of the article, you will have a fully ready first MongoDB program!
First: The Purpose
MongoDB is a database, and so its main purpose is to help us store persistent data from our applications. Examples of this data might include:
A list of phone numbers for a telephone app
A list of students in a university with their information
A list of airplane tickets available for a specific route
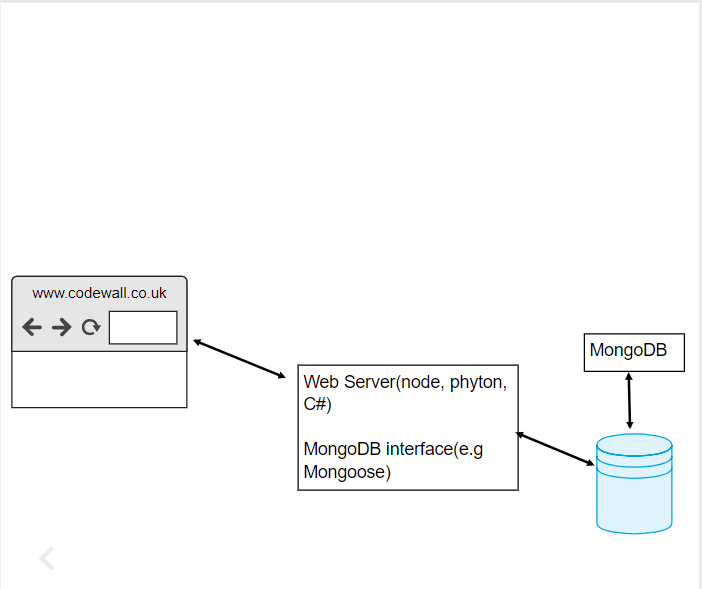
Traditionally, every database is put separated from other components of our applications such as the web server. So we will have a structure like this:
And here we introduce the first terms of our MongoDB professional dictionary:
Dictionary 1
The browser: the software application we use to access information on the internet, and in our case, to go through our web app.
The Web Server: server software which has the main purpose of serving web pages to clients. Notice that there are about a dozen types of web servers that work pretty well with MongoDB, examples include NodeJS, C#, and Phyton.
The database: our system to manage data storing and operations with those data.
The Web Server is generally put between the browser and the database, in this way we can establish rules to filter data. Rules for accessibility, operations allowed etc.
Notice how there is one more component mentioned inside the picture above, the interface that we will use to interact with MongoDB. In our case, I have mentioned Mongoose (since it’s what we are going to use) so here we go with the second set of terms:
Dictionary 2
ODM(Object Data modeling): used to translate between our objects in code and the document representation of the data.
Mongoose: an ODM library for MongoDB and NodeJS that we are going to make use of in order to make things easier when writing code. Also, Mongoose is an industry standard tool, learning it will help you become an up-to-date developer with the latest trends. Check their site for more information here.
A Basic Structure
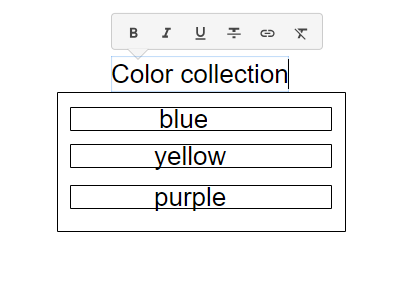
Let’s try to give a little overview of what data inside our database might look like, and let’s introduce some new useful terminology with it:
If we analyze the diagram that I just proposed to you we can define the following terms:
Dictionary 3
Collection: Collections are a grouping of MongoDB documents. They can be considered analogous to tables in relational databases.
Documents: a record in a MongoDB collection and also the basic unit of data inside of the MongoDB world. They are represented in BSON format and the data inside of them will follow the Key/value structure.
Logically speaking, we can say that:
We will tend to create one collection for each type of resource that we want to express inside our application( the color collection in our case ).
All the documents in a collection will have a similar or related purpose
Even if MongoDB is very flexible in its structure, is always a good idea to think about what we are going to do before writing even the first line of code. In this way, we will be able to determine what collections we will need inside our app, what type of information they will store and how they might be related to other collections.
Core operations
Similarly to what happens in SQL-Relational databases, the most important part about learning a new database technology is to learn CRUD operations. CRUD is an acronym for:
Create: For creating data inside our database
Read: For reading data from our database
Update: For updating data inside our database
Destroy: For destroying data inside our database
Our first Application…from scratch
Ok so to make a little recap, we have gone deeper in understanding the purpose behind a database like MongoDB and we have seen where it fits in the web application world. So now we are fully ready to start writing code by creating a simple application that will teach you its fundamentals. And of course, we will all do this from scratch. This way you will be able to understand and have a complete overview of the process involved in creating an application using MongoDB.
Let’s go
Go to your desktop or another location that you prefer and create a folder
This folder will contain our Mongo apps, you can name it as you want(I’ll simply call it: mongo)
Once you have created it, open it
Create another folder inside of it called students ( it will be our first app)
Npm init
To follow along with the next steps, remember to move into the students’ folder via the terminal. Once you are done, type in:
You should see a list of questions that the terminal is asking you, press enter until the end to leave them as default settings. This command is helping us to configure the package.json file, this file is used to record dependencies that will be required for this project that we are going to build.
Package installation
Let’s now download some of the packages that we will use during our process, let’s do this using NPM again:
This command will install all the packages that we will use during the building process. Since you probably won’t recognize some of these packages’ names don’t worry, it’s time for another dictionary of terms:
Dictionary 4
Nodemon: utility that will monitor for any changes inside our app and, in that case, restart our server automatically. We will start using it later to save a lot of time during development.
Mocha: is a package used for testing that we will take advantage of throughout all the building process of our app. It will make possible for us to test if our queries went well if data is present inside our collections and other conditions that we will establish. It’s for sure the best and most popular framework for doing this kind of operations with MongoDB, so still, you will be an up-to-standards coder with the latest trends under your belt.
Open your text editor
Open the student folder we created using your favorite text editor, my choice is Visual studio code but you can use whatever best suits your needs.
Create a new folder inside your project called src
Create another folder called test
Inside the test folder, create a js file called test_config, this file will contain all the configurations needed for testing our project.
Wait a minute…
Why do we need to create a config file, what will we put inside of it? If these were just some of the questions that came into your mind when you created the testing_config file, well let me give you a quick explanation of why we need it:
Along with our program, we will run tests to see if everything went well using Mocha, but first, we need to ensure that the connection with our database was correctly established. In fact, nothing happens randomly in the world of Mongo. And so our database won’t know that we want to establish a connection with it until we say it explicitly. We will do this using the test_config file, and after that, if the connection process went well, we will run our tests.
Not another “Hello World”
Tired of writing hello world programs every time you try to learn something new? Don’t worry! this time with the configuration file we will be completely different. Little downside: the file will be quite more complex but that is not a problem since I’m here to guide you through all the steps.
Type inside test_config this code:
Or copy and paste the code below –
const mongoose = require('mongoose'); // requiring our package
mongoose.connect('mongodb://localhost/student_tests'); // establishing the connection
mongoose.connection
.once('open', () => console.log('Connection established')).on('error', (error) => {
    console.log('Warning : ' + error);
    });
One step at the time
Let’s analyze the program step by step:
Requiring the package
As mentioned before, nothing happens randomly in the world of Mongo. To use our mongoose interface in fact, we will need to first require it. This instruction will allow us to use the package inside the test_config file and to define our first rule:
Before using any package inside our files, we first need to require them using the: require() function.
The connection itself
In this instruction, we are explicitly telling mongoose to establish a connection with an instance of a local database. By default, this function won’t look for a database on our local machine, so the string ‘mongodb://localhost/student_tests’ will tell Mongo:
Hey Mongo, there is a database instance on my local machine, the name is student_tests. Can you please connect to it? Keep in mind that if the database name isn’t recognized than Mongo will create one automatically for us.
Checking if the connection was successful
Ok so here we are trying to connect with our database instance using the connection command of Mongoose. Since connecting to a database will take time, we use the .once() and .on() functions to deal with that. These functions will watch for Mongoose to emit a very specific type of event, ‘open’ in case our connection was correctly established, and ‘error’ in case our connection failed. In both cases, we will log a message to the console to inform the user of the response of the operation.
Executing the program
Here we are with the final and easiest part:
start up your server(this will vary depending on whether you are on Windows or on a Mac)
move inside the students’ folder using the terminal
now type in :
You should now see a message printing: “connection established” to the console.
Conclusion
Congratulations, you now learned how to set up, configure and write a very simple MongoDB application from the ground-up. In the next lessons, we will explore other useful features on Mongo and learn a ton of new stuff!
Source: codewalk


Comments