
Moving Files from SharePoint to Azure Blob
- The Tech Platform

- Dec 24, 2020
- 3 min read

In this article, I will explain the process to transfer the files (csv, excel etc.) from SharePoint online to Azure Blob storage. We would need an Azure logic app, a Storage account(Blob) and a SharePoint online account as pre-requisites.
Generally, the use case is whenever the file is being uploaded to the SharePoint online the expectation is to move the files immediately to the Azure Blob storage. Since, SharePoint is an external entity whereas the Azure Blob storage is a service provided by Azure cloud, I’m using Azure Logic Apps to transfer the files securely over the internet using http connector in logic app.
In 2 simple steps you can configure a Logic App to transfer files to Blob:
Step 1:
The very first connector in a Logic app should always be trigger as there can be no action performed until the trigger executes. So, we need to choose a connector, that would work as a trigger. In this case, I’m using “When a file is created” SharePoint trigger, because it meets our use case of trigger to happen only when a file is uploaded to the SharePoint.

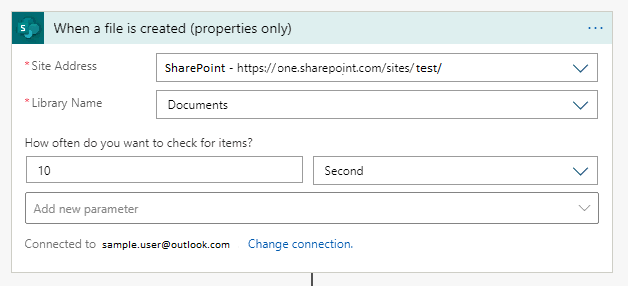
SharePoint Trigger in Azure Logic App
In the above image, I have initially connected to SharePoint online account using “sample.user@outlook.com”, when the trigger launches for first time. Once you get connected, it will list down all the Site Address you will have access to.
Make sure you have sufficient permissions to access the SharePoint, in some cases the Site Add could be private and may not be accessible. It is preferable to have SharePoint Sites account. Do not forget to provide the library name in which the files would be expected and the frequency to look for a file.
Step 2:
Now, once the trigger is setup, the next step is to use the HTTP connector, for transferring the files to Azure Blob Storage.

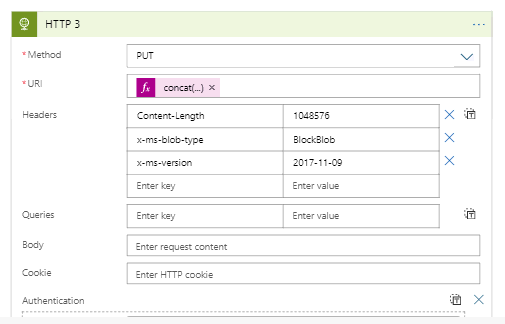
HTTP connector in Azure Logic App
Here, there are several configuration settings that has to be put into place to make sure there is no error while moving the files to Blob.
Method — There are several methods available (get, post, Patch, Delete etc.), but we would prefer PUT in this case, as we want to put files into Blob.
URI — The URI is the another important configuration, in this we have to specify the directory path of the location where we want our files to be transferred. For e.g. in this case I have a blob account named, “myblobstorage” and the container name “test-container”.
So my URI would be “https://myblobstorage.blob.windows.core.net/test-container/”
If there is a need to perform some dynamic operations to frame a path an attached example can be useful for same.

Example for creating Dynamic path
Headers — The headers are equally important to be configured as it gives logic app the basic parameters for a file to look for.
Here, we set up the first parameter as:
Content-Length — 1048576 (this is the default length setup for a file content) x-ms-blob-type — BlockBlob (this signifies the type of blob the logic app to search) x-ms-version — 2017–11–09 (this request header should include this property)
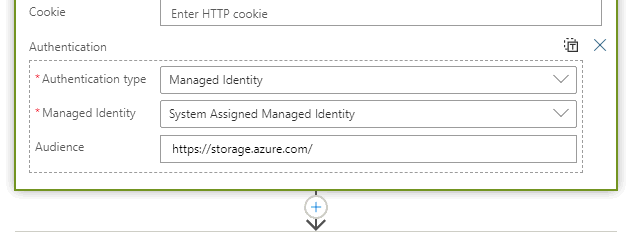
Authentication part in HTTP connector
Authentication — This is most important parameter as it would actually allow the logic app to connect to blob and acts as a bridge between SharePoint and Azure Blob Storage.
In my case, I have used the Managed Identity based authentication, which is the most recommended and secured way to have connectivity between various azure resources. Before using Managed Identity based access, make sure that you have proper MSI(Managed Identity) based connectivity setup between the Azure logic app and Azure Blob Storage account.
So this is all the setup you require to transfer the files from the SharePoint sites to the Azure Blob storage. I hope this article was very helpful, please do let me know with your comments. Sorry I was little occupied with other things so coming up late with this article. But, I will do share my learnings with you all, whenever I am ready with my upcoming articles.
Source: Medium.com
The Tech Platform


Comments