
How to Merge Documents Using Microsoft Power Automate
- The Tech Platform

- Jun 2, 2022
- 4 min read

SharePoint Document and Mail Merge is the simple, fast and clean way to merge SharePoint list data into predefined Word, Excel and PowerPoint document templates with No Code!
A Static Merge
To start off, we will build a workflow that is static in nature. By that we mean it would be manually started, scan a folder of PDFs, merge them, and just email the result. While this isn’t a realistic process, the goal here is to demonstrate an example Power Automate and PDF Services flow.
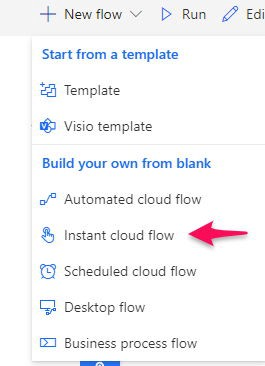
1. Begin by creating a new flow and selecting “Instant cloud flow”:
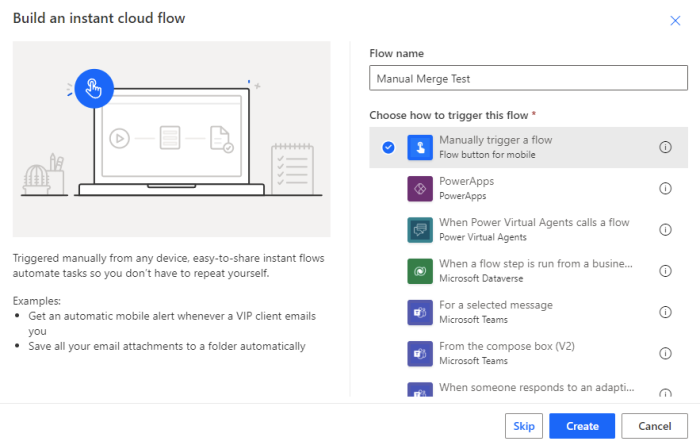
2. In the next screen, give the workflow a name and select the manual trigger:
3. For a test, use a folder in a SharePoint account that will only contain PDFs. The next step is tells Power Automate to read that folder. Click on “New Step”, and select the “List folder” action from the SharePoint application. After adding it, select the site and folder.

4. To merge a list of PDFs, we need to make that list. To do that, use a variable to store the files found in SharePoint. Click on “New step” again and select “Initialize variable”. Name the variable files and select the "Array" type.

5. Now that we have an array, the next step is to loop over the list of files we got previously and get the contents. For each, we’re also going to need to append them to our array. Once again, add a step, and select “Apply to each”. When prompted to select the output from previous steps, select “body” from the “List folder” step. Now we need to build up that loop.
6. Inside of that “Apply to each”, select “Add an action”, and then “Get file content” from the SharePoint app. The site is the same as previously selected, but for “File identifier”, select the “Id” value from the set of items currently being looped over.

7. After getting the file content, the next step is to append it to the array. Ensuring you are still in “Apply to each”, hit “Add an action” and select “Append to array variable”. For Name, Power Automate should suggest files as your only array variable in the flow. For the value, select "File Content" from the "Get file content" step. Here's the completed loop action:

8. Ok! We’re finally ready to do the merge. Select “New step”, and then select the “Merge PDF” step. We need to provide a name for the merged PDF and as this is just a “test” workflow, go with the appropriately named merged.pdf. When editing the Merge PDF action, it defaults to asking you to select the first file with the option to add more manually. This is not what we want as the list of files is dynamic. On the right side, click the little box that has the tooltip, "Switch to input entire array":

In that view, select files from your variables:

Note that if you see “[“ or “]”, be sure to remove that, and any white space before and after the “files” marker.
9. As a final step, and to check the result, add a step that will email you the result. Hit “New step” again and select “Send email with options”. Entered your email address in the “To” portion and use a “Subject” of “Testing PDF Merge”. Click “Show advanced options”. In the advanced settings note the two fields for an attachment — “Attachments Name — 1” and “Attachments Content — 1”.
For the name, select “PDF File Name” from Merge PDFs. For the content, select “PDF File Content”.

Run the flow again and you will end up with the merged PDF in email!
Dynamic Merging
In the next example, let’s create a flow that’s a bit more realistic. This flow will monitor a SharePoint folder for PDF files, and when one is found, it will merge it with a boilerplate legal document and then copy it to a destination folder. There will be three SharePoint resources involved:
The folder that will be monitored (input)
The PDF with the boilerplate legal documents (legal.pdf)
An output folder (output) to store results.
1. As before, begin by creating a new flow, but this time it will be an automated flow. For the trigger, select “When a file is created in a folder” from SharePoint:

2. In the trigger, select a site and a folder to monitor.

3. Add a new step, and as before, select SharePoint “Get file content” step. The site will be the same as before, but for the file identifier, select x-ms-file-id from the trigger.

4. Next, add another step using “Get file content”, except this time select the legal PDF document.

5. At this point we’ve got two files from SharePoint — the newly updated one and the legal document. Next, add a “Merge PDFs” step again. For the name, use the x-ms-file-name-encoded value from the original trigger, and this time we can specify the content for both the first and second items to merge.
Now it’s important that the order is correct. For this demo, assume the legal text should go in front of the rest of the PDF. For your flow, you may want the opposite. Just keep in mind that the action is going to do what you tell it to do. For our flow, “Get file content 2” got the legal PDF. “Get file content” got the new PDF. Select the second one first and the first one second. Hopefully, that isn’t too confusing, but if you end up with a result that’s the reverse of what you want, that’s where you will want to check your work.

6. The final step is copying the result back up to SharePoint. Add a new step, and select “Create file” from the SharePoint section. After selecting the site and output folder, the file name and file content can both come from the Merge PDFs action:

7. And that’s it. Test the flow, drop a PDF in the input folder, and you’ll see your flow execute and save the merged result at the end.
Source: Medium - Raymond Camden
The Tech Platform


Comments