
Integrating Silverlight in SharePoint 2010
- Vijai Anand Ramalingam

- Feb 23, 2019
- 3 min read
Introduction:
The purpose of this article is to provide step by step information about how to implement the Silverlight application in SharePoint 2010 as a webpart.
Step involved is explained below.
Requirements:
A local installation of either SharePoint Foundation 2010 or SharePoint Server 2010,
Silverlight 3.0 and
Visual Studio 2010.
Create Silverlight Application:
To publish a Silverlight application on a SharePoint site, open Visual Studio 2010.
Go to File->New->Project.
Select Silverlight Application under Installed Templates and enter a name for the Application as SLAnimation.
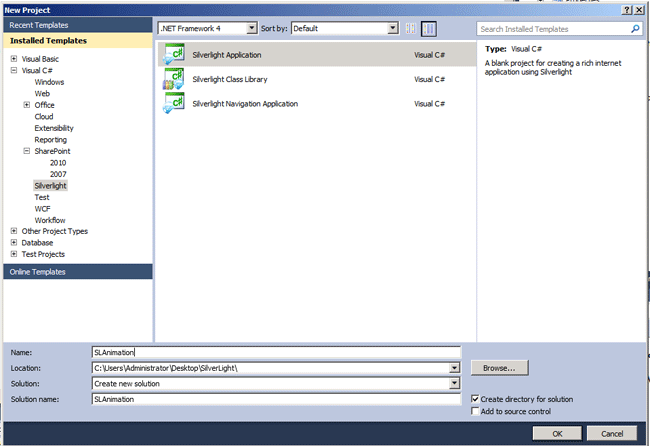
Click OK.
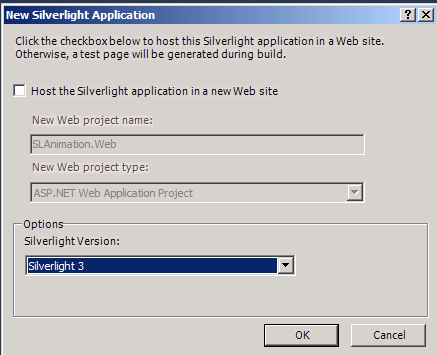
Uncheck the checkbox in the prompt that asks if you wish to create a web application to host the Silverlight application. As SharePoint itself acts as the host, hosting Silverlight on a separate application is not necessary.
Open MainPage.xaml and do the customizations. I have created a rectangle inside the Grid which will move to and fro horizontally. See the code in the below table.
UserControl x:Class="SLAnimation.MainPage" xmlns="http://schemas.microsoft.com/winfx/2006/xaml/presentation" xmlns:x="http://schemas.microsoft.com/winfx/2006/xaml" xmlns:d="http://schemas.microsoft.com/expression/blend/2008" xmlns:mc="http://schemas.openxmlformats.org/markup-compatibility/2006" mc:Ignorable="d" d:DesignHeight="300" d:DesignWidth="400"> <Grid x:Name="LayoutRoot" Background="White" Loaded="LayoutRoot_Loaded"> <Grid.Resources> <Storyboard x:Name="myStoryBoard"> <DoubleAnimation Storyboard.TargetName="myTranslateTransform" Storyboard.TargetProperty="X" To="100" AutoReverse="True" RepeatBehavior="Forever" Duration="0:0:1"> </DoubleAnimation> </Storyboard> </Grid.Resources> <Rectangle Height="50" Width="50" Margin="12,34,338,216" Fill="Black"> <Rectangle.RenderTransform> <TranslateTransform x:Name="myTranslateTransform"> </TranslateTransform> </Rectangle.RenderTransform> </Rectangle> </Grid> </UserControl>
In the code behind MainPage.xaml.cs.
using System; using System.Collections.Generic; using System.Linq; using System. Net; using System. Windows; using System.Windows.Controls; using System.Windows.Documents; using System.Windows.Input; using System. Windows. Media; using System.Windows.Media.Animation; using System.Windows.Shapes; namespace SLAnimation { public partial class MainPage : UserControl { public MainPage() { InitializeComponent(); } private void LayoutRoot_Loaded(object sender, RoutedEventArgs e) { myStoryBoard.Begin(); } } }
Save the project and close it.
Create SharePoint Project:
Restart Visual Studio as an Administrator.
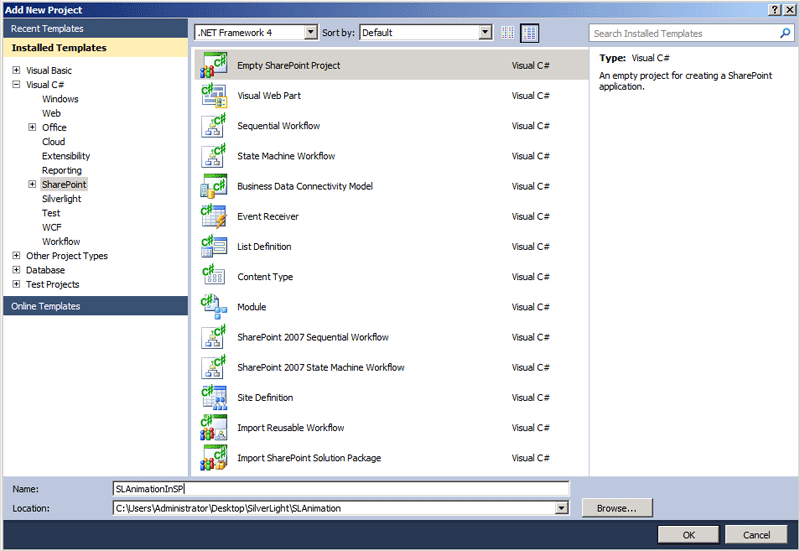
Right click the solution and select Add -> New Project.
Then select SharePoint -> 2010 as the project type.
In the Add New Project dialog, select Empty SharePoint Project.
Enter the name as SLAnimationInSP and then click OK.
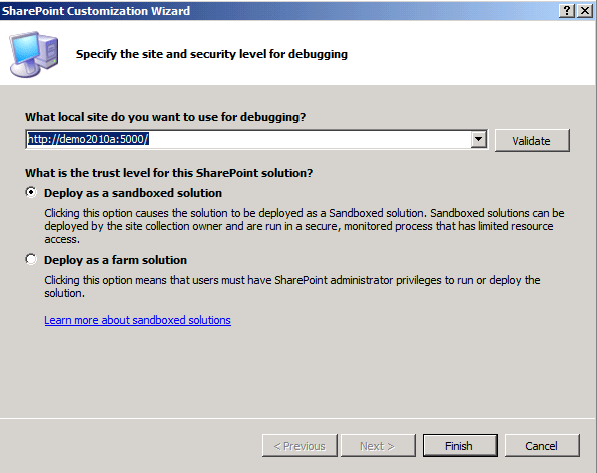
In the SharePoint customization wizard dialog, enter the URL to which you want to deploy the solution, leave the sandboxed solution checked and then click OK.
In the Solution Explorer, right click the SharePoint project and select Add -> New Item.
In the Add New Item dialog, select Module and name it as SLAnimationInSPModule.

Click Add.
Next, right click the new Module and select Properties.
The Properties window will be displayed. Click Project Output References and then click the ellipse button (…).
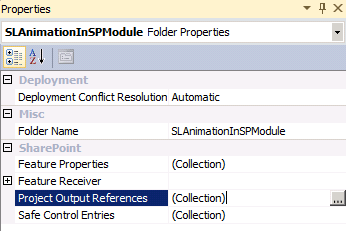
The Project Output References dialog will be displayed.

Next, click Add, expand the deployment location property to change the Project Name to SLAnimation and the Deployment Type to Element File.
Now expand the module that was created in the SharePoint project and delete the Sample.txt file.
Edit the Elements.xml file to include the xap file that is generated by the Silverlight application.
Create Document Library:
There are a number of places we can deploy our Silverlight XAP file to SharePoint.
There are a number of places we can deploy our Silverlight XAP file to SharePoint.
The web's ClientBin folder is sometimes used, but we can't use the WSP file or our tools to deploy it there.
Another deployment location option is the SharePoint hive.
The decision of where to place the file depends on the scope of your application.
The most common and easily controlled location is a Document Library.
Uploading your XAP files to this list makes it easy to control permissions to the application and keeps them all in one location that's easy to find and update.
Right-click the SLAnimationInSP node in Solution Explorer and then select Add -> New Item.
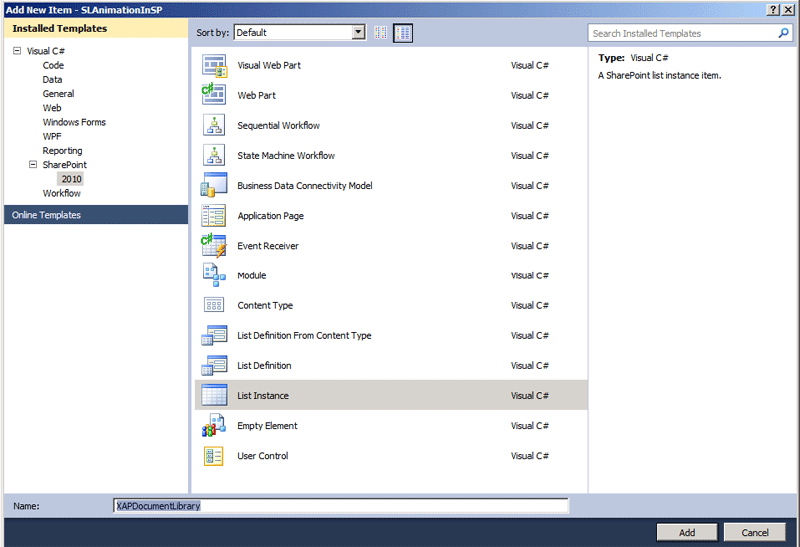
Select the SharePoint -> 2010 List Instance project item template, name it "XAPDocumentLibrary".
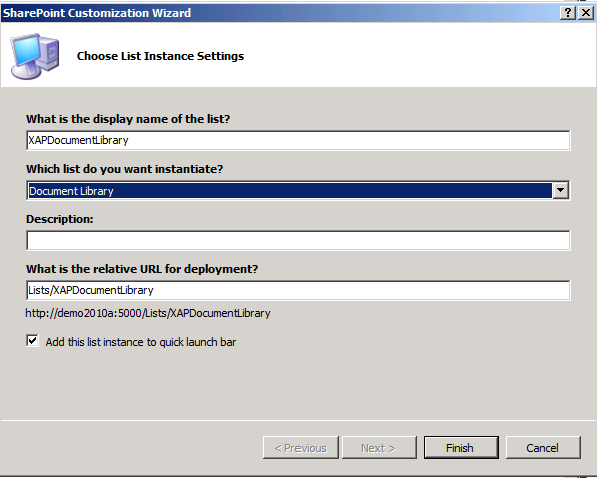
In the wizard, change the name to "XAPDocumentLibrary", choose "Document Library" as the type of list, and the relative URL for this list to "Lists/ XAPDocumentLibrary" and then click Finish.
This project item will automatically be packaged and deployed with the module we created earlier.
Now that we have a list to host the XAP file, we need to tell SharePoint where to deploy it.
Expand the SLAnimationInSPModule node in Solution Explorer and open the Elements.xml file.
Add the File node to the Modules parent node using the following.
<? xml version="1.0" encoding="utf-8"?> <Elements xmlns="http://schemas.microsoft.com/sharepoint/"> <Module Name="SLAnimationInSPModule"> <File Path="Module\SLAnimation.xap" Url="Lists\XAPDocumentLibrary/SLAnimation.xap" /> </Module> </Elements>
Deployment:
The application is now ready for deployment.
Right click the SharePoint project and select Set as Startup Project.
Then hit F5 key on your keyboard to build and deploy to your local SharePoint site.
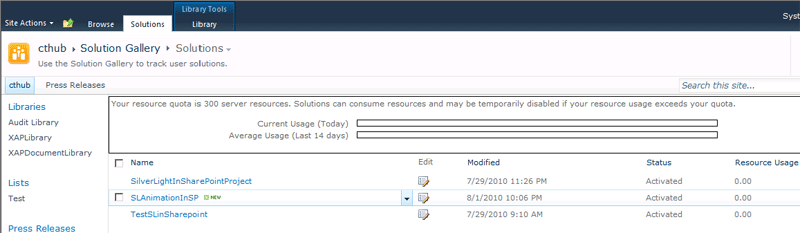
Go to Site Actions->Site Settings->Gallery->Solutions.
You can see the Sandbox Solution installed.
Go to home page and click the Insert tab in the Editing Tools.
Select the Media and Content category in the left column and then Silverlight Web Part.
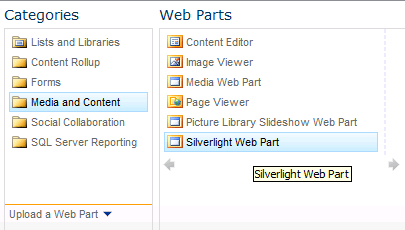
Finally, click Add.
The Silverlight Web Part dialog will be displayed.
Enter the location of the XAP file in the URL text box (~site/Lists/XAPDocumentLibrary/SLAnimation.xap) and click OK.

Finally, click Save and your Silverlight application is integrated into your SharePoint site.
Conclusion:
Finally the Silverlight application is integrated with SharePoint 2010 as a webpart.


Comments