
Installing Blazor
- The Tech Platform

- Apr 6, 2021
- 3 min read
Updated: Jan 5, 2024
Blazor, developed by Microsoft, is an open-source framework that enables developers to build interactive web applications using C# and .NET instead of relying solely on JavaScript. It allows for both server-side and client-side development, offering a versatile solution for modern web applications.
In this guide, we will walk through the process of installing Blazor, exploring its capabilities and deployment models.
System Requirements:
Blazor has specific system requirements to guarantee optimal performance. Ensure that your system fulfills the following criteria:
Operating System: Blazor is compatible with various operating systems, including Windows, macOS, and Linux. Ensure your system is running a supported version.
.NET SDK: Install the latest version of the .NET SDK, which is necessary for developing and running Blazor applications.
Hardware Requirements: Check for hardware requirements such as processor speed, RAM, and available storage space to ensure smooth execution of Blazor applications.
Web Browser: Make sure you have a modern web browser installed for testing and debugging Blazor applications. Commonly used browsers like Google Chrome, Mozilla Firefox, or Microsoft Edge are recommended.
To ensure compatibility and access to Blazor's features, use the following supported Visual Studio version:
Visual Studio 2019: Blazor is well-supported on Visual Studio 2019, offering a robust development environment with features tailored for Blazor projects.
Installing Blazor
Blazor can be installed using three primary methods:
Method 1: Installing Blazor through the Visual Studio Manage Extensions
The following steps illustrate how to install the extensions for Syncfusion Blazor from Visual Studio Manage Extensions.
STEP 1: Open the Visual Studio 2019.
STEP 2: Open Manage Extensions by navigating the menu, Extension ->Manage Extensions.
STEP 3: Select the Online tab on the left and type “Syncfusion Blazor” in the search box.

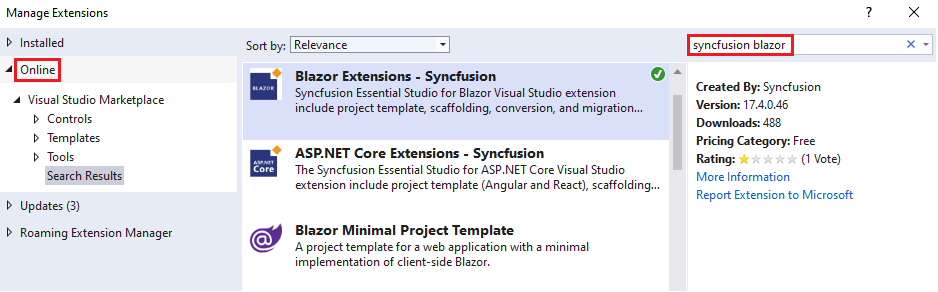
STEP 4: In the “Blazor Project Templates-Syncfusion” extensions, click the Download button.
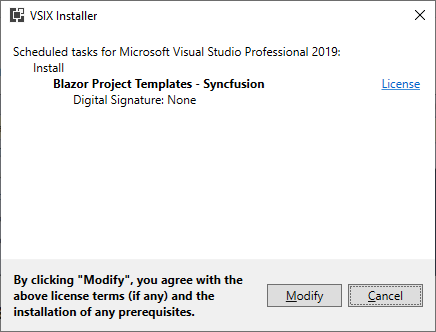
STEP 5: Once the extensions have been downloaded, close all Visual Studio instances to start the installation process. You will see the following VSIX installation prompt.


STEP 6: Click the Modify button.
STEP 7: After the installation is complete, open Visual Studio 2019.
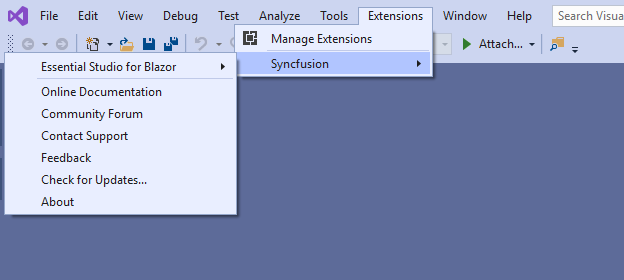
STEP 8: Now, under the menu Extensions, you can use the Syncfusion extensions from the Visual Studio application.


Read: Blazor Hosting Models
Method 2: Installing Blazor from the Visual Studio Marketplace
The following steps illustrate how to download and install the Syncfusion Blazor extension from the Visual Studio Marketplace.
STEP 1: Download the Syncfusion Blazor Extensions from the Visual Studio Marketplace.
STEP 2: Close all Visual Studio instances running, if any.
STEP 3: Double-click to install the downloaded VSIX file. You will see the VSIX installation prompts for the Visual Studio 2019 version. If Visual Studio 2019 is not installed, it will not be possible to install the extension.

STEP 4: Click the Install button.
STEP 5: After the installation is complete, open Visual Studio 2019. You can now use Syncfusion extensions from Visual Studio under the Extensions menu.

Method 3: Install Blazor Via CLI
Blazor is a framework from Microsoft that allows you to develop interactive web UIs using C# instead of JavaScript. It comes in two flavors: Blazor Server and Blazor WebAssembly.
Blazor Server runs on the server, with UI updates, event handling, and JavaScript calls being handled over a SignalR connection.
Blazor WebAssembly is a single-page app framework for building interactive client-side web apps with .NET.
Using the Command Line Interface (CLI) to install Blazor provides a quick and straightforward method for setting up your development environment. It’s especially useful for cross-platform development or when you’re not using Visual Studio.
Here are the steps to install Blazor via Command Line Interface (CLI):
For a Blazor Server-side application:
STEP 1: Open a command prompt where you want your project to be located.
STEP 2: Run the following command to create a new Blazor Server application:
dotnet new blazorserver -o BlazorServerAppSTEP 3: Navigate to the newly created Blazor Server App:
cd BlazorServerAppSTEP 4: Run the application:
dotnet runFor a Blazor WebAssembly (client-side) application:
STEP 1: Open a command prompt where you want your project to be located.
STEP 2: Run the following command to create new Blazor WebAssembly application:
dotnet new blazorwasm -o BlazorWebAssemblyAppSTEP 3: Navigate to the Blazor WebAssembly App:
cd BlazorWebAssemblyAppSTEP 4: Run the application:
dotnet runConclusion
By following these step-by-step instructions, you can easily install Syncfusion Blazor extensions in Visual Studio, enhancing your development experience and unlocking powerful features for Blazor projects. Whether through the Manage Extensions window or the Visual Studio Marketplace, Syncfusion makes it convenient to integrate their tools into your development environment.


Comments