
Ingest data from Event Hub into Azure Data Explorer
- The Tech Platform

- Sep 12, 2020
- 4 min read
Azure Data Explorer is a fast and highly scalable data exploration service for log and telemetry data. Azure Data Explorer offers ingestion (data loading) from Event Hubs, IoT Hubs, and blobs written to blob containers.
Azure Data Explorer offers ingestion (data loading) from Event Hubs, a big data streaming platform and event ingestion service. Event Hubs can process millions of events per second in near real-time. In this article, you create an event hub, connect to it from Azure Data Explorer and see data flow through the system.
For general information about ingesting into Azure Data Explorer from Event Hub, see Connect to Event Hub.
Prerequisites
If you don't have an Azure subscription, create a free Azure account before you begin.
A test cluster and database.
A sample app that generates data and sends it to an event hub. Download the sample app to your system.
Visual Studio 2019 to run the sample app.
Sign in to the Azure portal
Sign in to the Azure portal.
Create an event hub
In this article, you generate sample data and send it to an event hub. The first step is to create an event hub. You do this by using an Azure Resource Manager template in the Azure portal.
To create an event hub, use the following button to start the deployment. Right-click and select Open in new window, so you can follow the rest of the steps in this article. The Deploy to Azure button takes you to the Azure portal to fill out a deployment form.

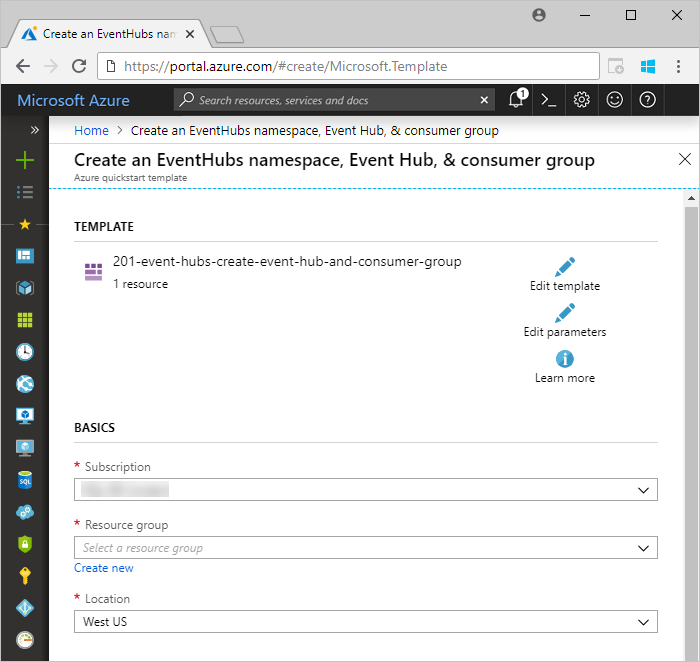
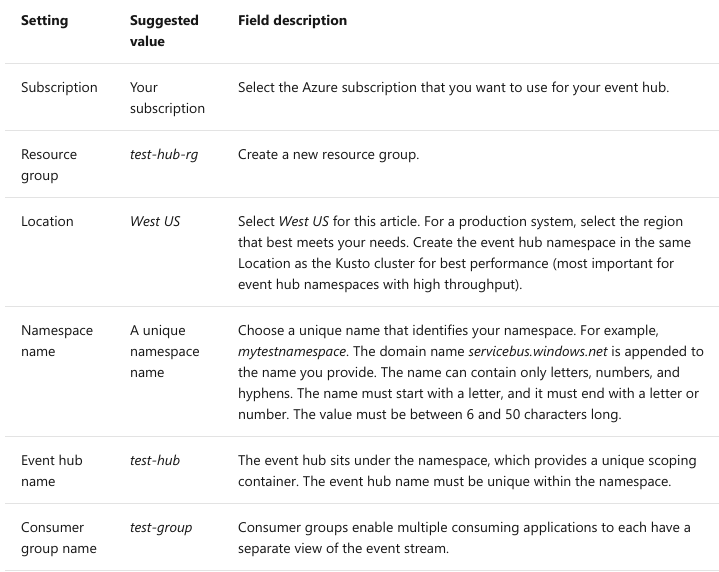
Select the subscription where you want to create the event hub, and create a resource group named test-hub-rg.


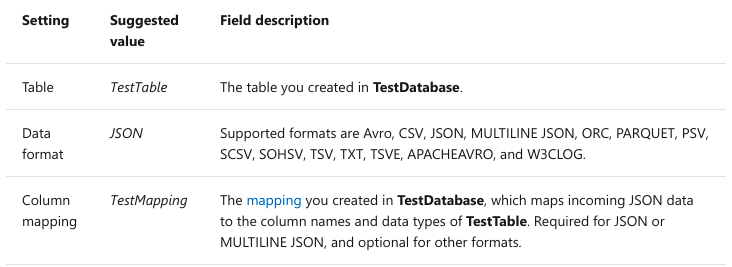
Fill out the form with the following information.

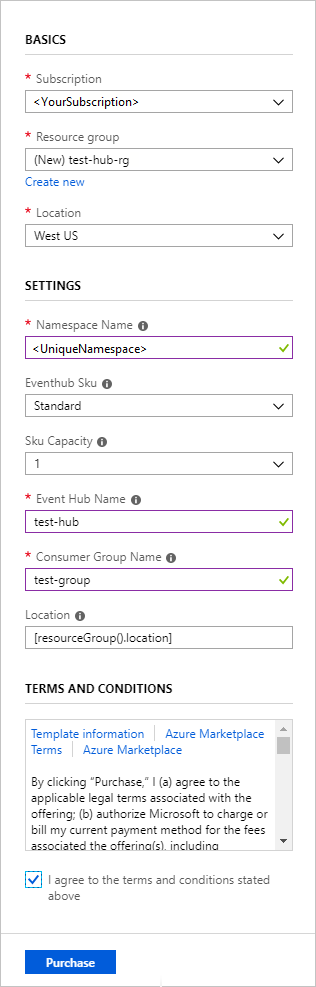
Use defaults for any settings not listed in the following table.

Select Purchase, which acknowledges that you're creating resources in your subscription.
Select Notifications on the toolbar to monitor the provisioning process. It might take several minutes for the deployment to succeed, but you can move on to the next step now.

Create a target table in Azure Data Explorer
Now you create a table in Azure Data Explorer, to which Event Hubs will send data. You create the table in the cluster and database provisioned in Prerequisites.
In the Azure portal, navigate to your cluster then select Query.


Copy the following command into the window and select Run to create the table (TestTable) which will receive the ingested data.
.create table TestTable (TimeStamp: datetime, Name: string, Metric: int, Source:string) 

Copy the following command into the window and select Run to map the incoming JSON data to the column names and data types of the table (TestTable).
.create table TestTable ingestion json mapping 'TestMapping' '[{"column":"TimeStamp", "Properties": {"Path": "$.timeStamp"}},{"column":"Name", "Properties": {"Path":"$.name"}} ,{"column":"Metric", "Properties": {"Path":"$.metric"}}, {"column":"Source", "Properties": {"Path":"$.source"}}]' Connect to the event hub
Now you connect to the event hub from Azure Data Explorer. When this connection is in place, data that flows into the event hub streams to the test table you created earlier in this article.
Select Notifications on the toolbar to verify that the event hub deployment was successful.
Under the cluster you created, select Databases then TestDatabase.


Select Data ingestion and Add data connection. Then fill out the form with the following information. Select Create when you are finished.


Data Source:

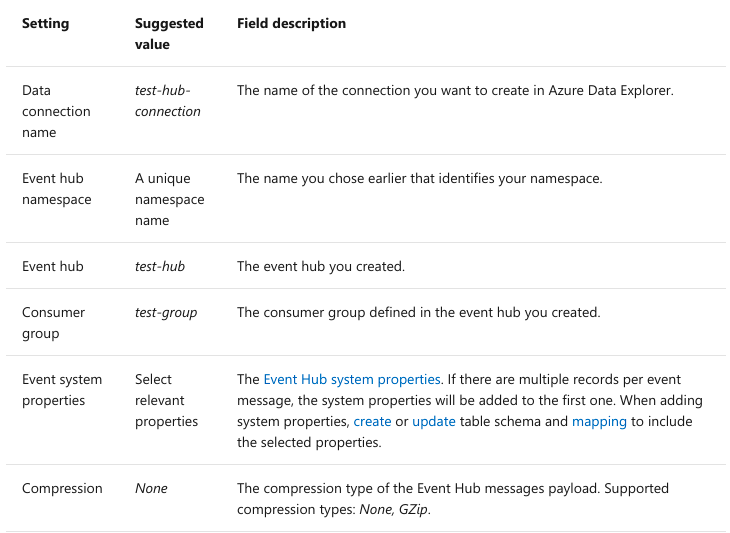
Target table: There are two options for routing the ingested data: static and dynamic. For this article, you use static routing, where you specify the table name, data format, and mapping. Therefore, leave My data includes routing info unselected.

Note
Select My data includes routing info to use dynamic routing, where your data includes the necessary routing information as seen in the sample app comments. If both static and dynamic properties are set, the dynamic properties override the static ones.
Only events enqueued after you create the data connection are ingested.
You can also set the compression type via dynamic properties as seen in the sample app.
Avro, ORC and PARQUET formats as well as event system properties aren't supported on GZip compression payload.
Event system properties mapping
Note
System properties are supported for single-record events.
For csv mapping, properties are added at the beginning of the record. For json mapping, properties are added according to the name that appears in the drop-down list.
If you selected Event system properties in the Data Source section of the table, you must include system properties in the table schema and mapping.
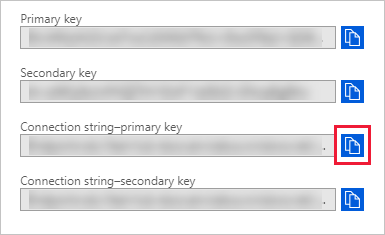
Copy the connection string
When you run the sample app listed in Prerequisites, you need the connection string for the event hub namespace.
Under the event hub namespace you created, select Shared access policies, then RootManageSharedAccessKey.

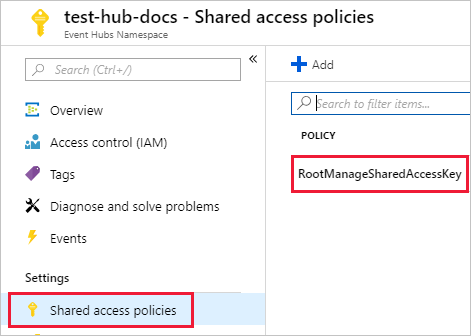
Copy Connection string - primary key. You paste it in the next section.
Generate sample data
Use the sample app you downloaded to generate data.
Open the sample app solution in Visual Studio.
In the program.cs file, update the eventHubName constant to the name of your Event Hub and update the connectionString constant to the connection string you copied from the Event Hub namespace.
const string eventHubName = "test-hub";
// Copy the connection string ("Connection string-primary key") from your Event Hub namespace.
const string connectionString = @"<YourConnectionString>";
Build and run the app. The app sends messages to the event hub, and it prints out status every ten seconds.
After the app has sent a few messages, move on to the next step: reviewing the flow of data into your event hub and test table.
Review the data flow
With the app generating data, you can now see the flow of that data from the event hub to the table in your cluster.
In the Azure portal, under your event hub, you see the spike in activity while the app is running.

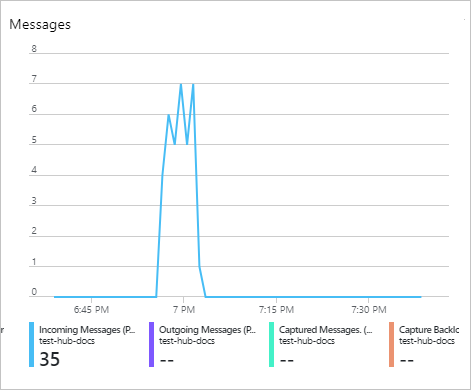
To check how many messages have made it to the database so far, run the following query in your test database.
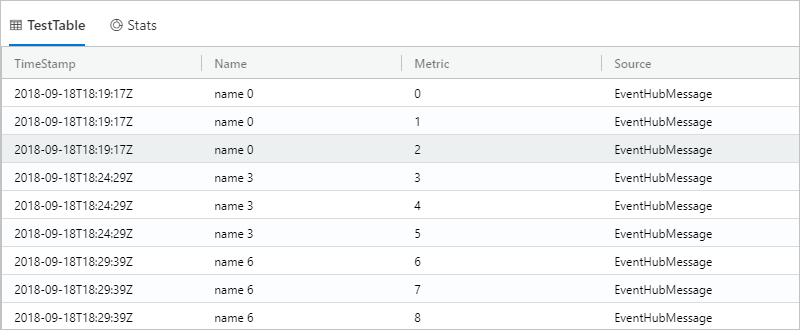
TestTable | count To see the content of the messages, run the following query:
TestTable The result set should look like the following:

Note
Azure Data Explorer has an aggregation (batching) policy for data ingestion, designed to optimize the ingestion process. The policy is configured to 5 minutes or 500 MB of data, by default, so you may experience a latency. See batching policy for aggregation options.
Event Hub ingestion includes Event Hub response time of 10 seconds or 1 MB.
Configure your table to support streaming and remove the lag in response time. See streaming policy.
Clean up resources
If you don't plan to use your event hub again, clean up test-hub-rg, to avoid incurring costs.
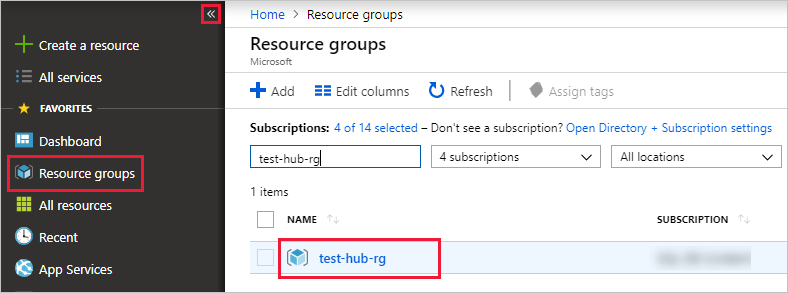
In the Azure portal, select Resource groups on the far left, and then select the resource group you created. If the left menu is collapsed, select to expand it.

Under test-resource-group, select Delete resource group.
In the new window, type the name of the resource group to delete (test-hub-rg), and then select Delete.
Source: Microsoft


Comments