
How to Setup Laravel With Angular (or Any Javascript Framework)
- The Tech Platform

- Dec 2, 2020
- 5 min read
Updated: Mar 14, 2023
This method will allow you to add any (and multiple) frontend javascript frameworks to Laravel. For the purposes of this article and tutorial, we will focus on Angular, however, other frameworks such as React or Vue.js can be used (simultaneously) in a similar fashion.
Do you wish to serve the frontend in the same repository as your Laravel project? Do you have an existing Laravel project with an API and now you want to incorporate a different frontend? Have you settled on Laravel as your backend-of-choice to deliver a RESTful API but want to experiment with multiple javascript frameworks? If you answered yes to any of the following, then this method is for you.
Most projects that separate the backend from the frontend will live in different repositories. If you don’t want either project to live on different (sub)domains or wish to keep them in the same repository, then you can use this method. You can always separate the two projects in the future into different repositories. It’s unobtrusive to existing projects and you can easily revert all changes.
Overview
we’re using the javascript framework (Angular in this case) to publish the distribution or build files and assets to Laravel’s public folder
when we build the files we’ll automatically copy the index.html file to a Laravel blade
we’ll create a route in the routes/web.php file and a controller in order to serve the app
this method is non-intrusive and allows you to implement it into an existing Laravel project without unintended consequences while making it revertible
the codebase for this article can be viewed on Github: https://github.com/hotsaucejake/laravel-angular
you can watch a YouTube version of this tutorial in action
Getting Started
For the purposes of this article, we’ll start a new Laravel project, but if you have an existing project you can skip ahead. I already downloaded the Laravel installer via Composer so I can simply use the laravel command:
laravel new laravel-angularNote: at the time of writing, the current Laravel is at version 8.x. I updated the Laravel installer via Composer, however, it resulted in a 522 Origin Connection Time-out when I ran the above command. The solution is to first, remove the installer via composer and then install it again.
composer global remove laravel/installer
composer global require laravel/installer
If you had problems like me, you can now run the laravel new laravel-angular command.
Install Angular


Create a “frontend” folder inside the Laravel “resources” folder
If you have an Angular project already, or a template you want to use, you can place it in this separate folder. Otherwise, we’re going to create a new Angular project here.
As you can see in the screenshot, I created a resources/frontend folder which is where we’re going to place the angular project folder. Again, this is where you can place multiple frameworks if you want to try out different solutions for your project. In the screenshot, you’ll see a Vue.js and React project to demonstrate this possibility.
If you’re in a terminal in this project, you can
cd resources/frontendand run the ng command from there to generate a new Angular application. In this case, I am going to simply call it angular. If you’re unfamiliar, you can use Angular’s setup guide in order to deploy a new project.
cd resources/frontend
npm install -g @angular/cli
ng new angular
Edit angular.json
There are a few things that need to be changed in the angular.json file in order for it to serve our Laravel application properly. This will help when you’re serving the Angular project locally and when you build the distribution files and assets for production.
For production: we need to publish the distribution files and assets to Laravel’s public/ folder. In an attempt to keep everything separated and organized to future-proof your app, we can publish the files to the public/assets/angular folder. For routing, Angular will need to know where these files are located relative to its location, so we will need to add a deployUrl option to the production configuration as well.
In the angular.json file you’ll need to find the project.architect.build.configurations.production section and you’ll add an outputPath and deployUrl option:
"outputPath": "../../../public/assets/angular",
"deployUrl": "/assets/angular/",

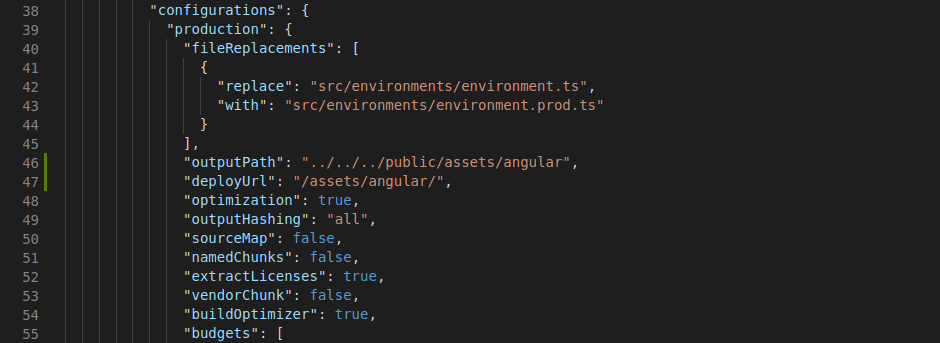
add an outputPath and deployUrl option
For dev: and local deployment we need to add a separate configuration. Just like production we’ll create a project.architect.build.configurations.dev section. This section will have outputPath and baseHref options.
"dev": {
    "outputPath": "dist/assets/angular",
    "baseHref": "/assets/angular/"
}
add a dev configuration with outputPath and baseHref options
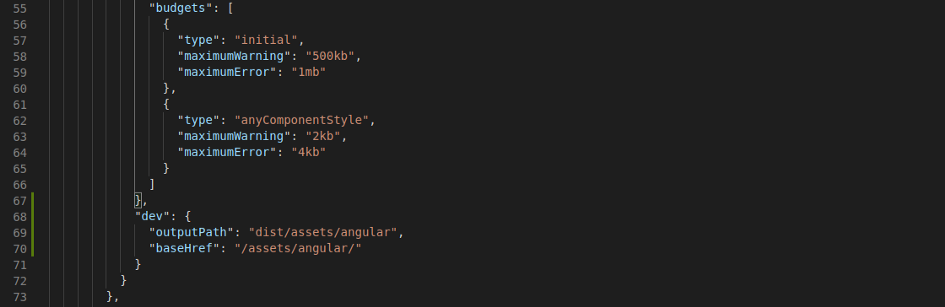
Also, we’ll need to had a browserTarget option for the dev configuration in the project.architect.serve.configuration section.
"dev": {
    "browserTarget": "angular:build:dev"
}
add a browserTarget option for the the dev configuration
Edit package.json
For this, we only need to change 1 line and add an additional line. In the scripts section we are going to edit the start option which will build and serve our project locally. Change this to:
"start": "ng serve --configuration=dev -o",This will serve the Angular application with the dev configuration we created above in the angular.json file. The -o option is optional and based on my preferences to automatically open it in your browser once it’s built.
Now we’re going to add a build:prod option for when we’re ready to build the distribution files and place them in Laravel’s public/ folder. Remember, we changed the outputPath option in angular.json to place them there. Add this line:
"build:prod": "ng build --prod && cp ../../../public/assets/angular/index.html ../../views/angular.blade.php",
edit the start script and create a build:prod script
As you can see, we’re copying the contents of Angular’s index.html file and placing it in a Laravel blade. Let’s go ahead and make this view now.
Create Laravel View for Angular
In the resources/views folder create an angular.blade.php file. Again, you can name this to whatever you like, but for simplicity and understandability this name is used for reference. It’s OK if this file is blank, because the build:prod script above copies the contents of Angular’s index.html file into this one. The two names must match.
Create AngularController
Now we need to create a controller to return the view we just created. You can name this controller whatever you like, FrontendController for instance, if that makes more sense to you, but I’m going to call this controller AngularController.
php artisan make:controller AngularControllerInside the AngularController class, create an index function that returns the angular view.
<?phpnamespace App\Http\Controllers;use Illuminate\Http\Request;class AngularController extends Controller
{
    public function index()
    {
        return view('angular');
    }
}
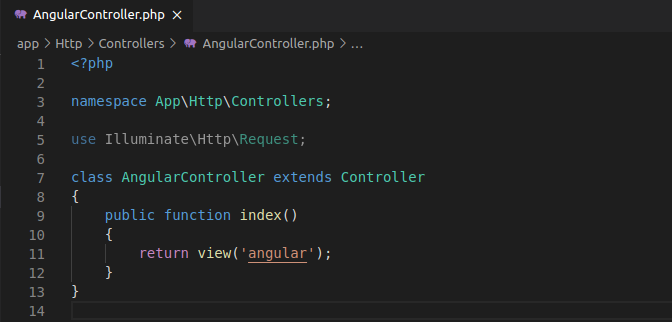
AngularController.php
Create web route
One of the biggest issues is solving for routing. How do we use Angular’s routing for our application while still using Laravel’s API endpoints we created for our project?
Easy.
We allow any endpoint to pass through to the Angular app except when it begins with /api. In your routes/web.php file add the line,
Route::any('/{any}', [AngularController::class, 'index'])->where('any', '^(?!api).*$');
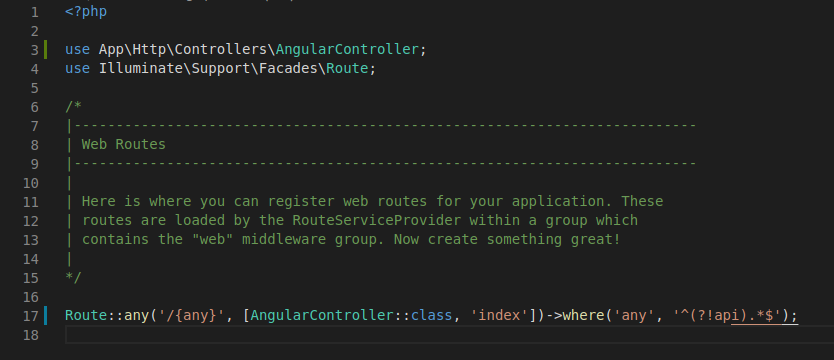
routes/web.php
Running and building the project
Now that all of the pieces are together, how do we run this thing and make sure that it works?
I personally like to use Laravel Valet to run my projects locally. If Linux is your preferred development method, there’s a Laravel Valet for Linux version too.
Developing Angular locally: if you’re in a terminal you can cd into the angular project folder and run:
cd resources/frontend/angular
npm start
For building the project for production: if you’re in a terminal you can cd into the angular project folder and run:
cd resources/frontend/angular
npm run build:prod
That command will build the files, place them in the public/assets/angular directory and copy the contents of index.html into the resources/views/angular.blade.php file.
Did you add this method to an existing project and now you want to revert it?
No problem.
Since we separated everything out, it’s easily reversible or non-intrusive with existing projects. The biggest change is removing the line in the routes/web.php file and your app should behave as intended once again. From there you can remove the AngularController.php file we created along with the resources/frontend/* directory we created. If you have any published assets, you can remove them from the public/assets/angular folder that was created.
Source: Medium.com


Comments