
How To integrate Dependency Injection In Azure Functions
- The Tech Platform

- Jan 22, 2021
- 5 min read
Updated: Jun 30, 2023
In this article, we will explore the process of integrating Dependency Injection (DI) into Azure Functions. We'll start by understanding the concept of Dependency Injection and its benefits in software design. Then, we'll dive into creating a simple Http trigger Azure function and a corresponding CustomerService. Finally, we'll demonstrate how to inject the service object into the function using DI.
What is the Dependency Injection pattern?
Dependency Injection is a software design pattern that promotes loose coupling between classes and their dependencies. It achieves this by making classes independent of the concrete implementations of their dependencies. By utilizing Dependency Injection, classes can be easily tested, maintained, and modified without significant changes to their dependencies.
Adding Dependency Injection in Azure Functions:
Similar to ASP.NET Core, Azure Functions also support Dependency Injection. By following a few steps, we can seamlessly integrate DI into our Azure Functions project.
Prerequisites
Before we begin, make sure you have the following:
Visual Studio 19 with Azure Development workload
Azure account (If you don't have an Azure subscription, create a free trial account)
Basic knowledge of C#
1. Create a simple HTTP trigger Azure function
In this section, we will create a new Azure Functions project and then proceed to create our first function with an HTTP trigger. This function will serve as a starting point for integrating Dependency Injection in Azure Functions. Follow the steps to do so:
STEP 1: Open Visual Studio and Go to File => New => Project.
In the Search box, enter "Azure Functions" and select the Azure function template. Click Next.


STEP 2: Now, provide a name for your function project and choose the desired location. Click Next.


STEP 3: When the project is created, select the desired folder within the project where you want to add the function.
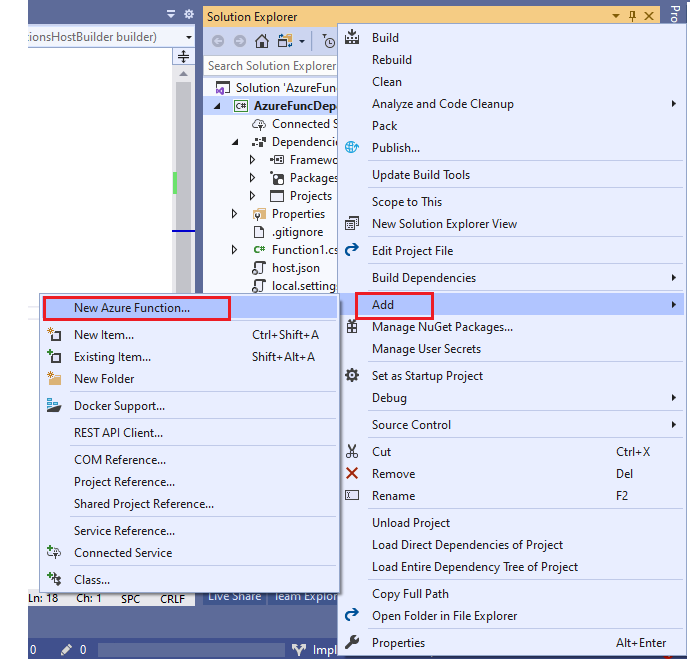
Now, right-click on the folder and choose Add => New Azure Function.

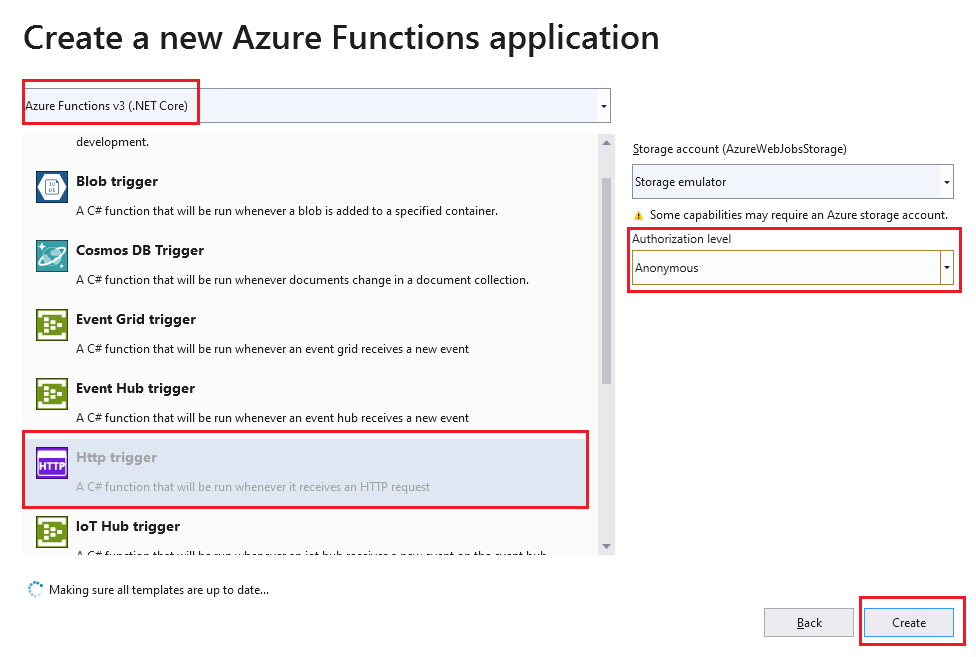
STEP 4: In the Add Azure Function, select the HTTP trigger template and set the Authorization level as Anonymous to follow unrestricted access to the function.
STEP 5: Click on Create to generate the function.
STEP 6: Once the function is created, Visual Studio will open the Function1.cs file automatically. Inside the file, you will find the generated code for the HTTP trigger function.
This code handles the incoming HTTP requests and provides a response based on the logic defined within the function.
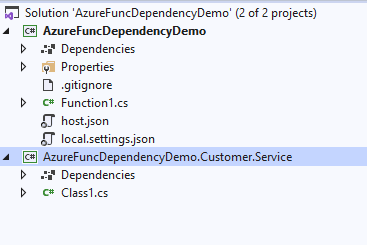
2. Create a Simple CustomerService which returns mock Customer Data
To create a simple CustomerService that returns mock customer data, follow these steps:
STEP 1: Right-click on the solution in Visual Studio and select "Add" -> "New Project".
STEP 2: Choose ".NET Standard Class Library" and click "Next".
STEP 3: Provide a name for the project and click "Create".
Now, let's create the necessary classes and interfaces:
STEP 1: Create a class called "Customer" with the following properties:
public class Customer
{
    public string Name { get; set; }
    public int Id { get; set; }
    public string Country { get; set; }
}
STEP 2: Create an interface called "ICustomerService.cs" in the "AzureFuncDependencyDemo.Customer.Service" namespace with the following code:
using System.Collections.Generic;

namespace AzureFuncDependencyDemo.Customer.Service
{
 public interface ICustomerService
    {
        List<Customer> GetCustomersData();
    }
}
STEP 3: Finally, create a class named "CustomerService" that implements the "ICustomerService" interface. This class will have a method called "GetCustomersData" which returns a list of customers:
using System.Collections.Generic;

namespace AzureFuncDependencyDemo.Customer.Service
{
 public class CustomerService : ICustomerService
    {
 public List<Customer> GetCustomersData()
        {
            var customersData = new List<Customer>();
            customersData.Add(new Customer()
            {
                Id = 101,
                Name = "Customer1",
                Country = "India"
            });

            customersData.Add(new Customer()
            {
                Id = 102,
                Name = "Customer2",
                Country = "USA"
            });
 return customersData;
        }
    }
}
By following these steps, you have created a simple CustomerService class that returns mock customer data. This service will be used later in the Azure function to demonstrate dependency injection.
3. Inject CustomerService into the Azure function to get customer data
To inject the CustomerService dependency into the Azure function to retrieve customer data, follow these steps:
STEP 1: Install the required NuGet package into the Azure function project. Make sure to include the necessary package reference in the project file.


STEP 2: Create a new class called "Startup.cs" at the root of the project. This class will be used to configure the function app at startup.
using AzureFuncDependencyDemo;
using AzureFuncDependencyDemo.Customer.Service;
using Microsoft.Azure.Functions.Extensions.DependencyInjection;
using Microsoft.Extensions.DependencyInjection;

[assembly: FunctionsStartup(typeof(Startup))]

namespace AzureFuncDependencyDemo
{
 public class Startup : FunctionsStartup
    {
 public override void Configure(IFunctionsHostBuilder builder)
        {
            builder.Services.AddTransient<ICustomerService, CustomerService>();
        }
    }
}
In the above code, we import the required namespaces, including the namespace for the AzureFuncDependencyDemo project and the Customer.Service namespace where the CustomerService class is located.
The [assembly: FunctionsStartup(typeof(Startup))] attribute is used to register the assembly and specify the name of the startup class.
Inside the Startup class, we override the Configure method from FunctionsStartup and use the builder parameter to register the ICustomerService dependency with the CustomerService implementation using the AddTransient method. This ensures that a new instance of the CustomerService is created for each function execution.
To inject the dependency and retrieve customer data in the Azure function, add the following code:
using System.Threading.Tasks;
using AzureFuncDependencyDemo.Customer.Service;
using Microsoft.AspNetCore.Http;
using Microsoft.AspNetCore.Mvc;
using Microsoft.Azure.WebJobs;
using Microsoft.Azure.WebJobs.Extensions.Http;

namespace AzureFuncDependencyDemo
{

 public class Function1
    {
 private readonly ICustomerService customerService;

 public Function1(ICustomerService _customerService)
        {
            customerService = _customerService;
        }

        [FunctionName("Function1")]
 public  async Task<IActionResult> Run(
            [HttpTrigger(AuthorizationLevel.Anonymous, "get", Route = null)] HttpRequest req)
        {
            var customersData = await customerService.GetCustomersDataAsync();

 return new OkObjectResult(customersData);
        }
    }
}
In the above code, we import the necessary namespaces, including the Customer.Service namespace where the ICustomerService interface is located.
The Function1 class is the Azure function class that will be executed when the corresponding HTTP trigger is invoked.
We use constructor injection to inject the ICustomerService dependency into the Function1 class.
The Run method is the entry point of the function. It uses the injected customerService instance to retrieve customer data by calling the GetCustomersDataAsync method.

Finally, the function returns the retrieved customer data as an OkObjectResult.
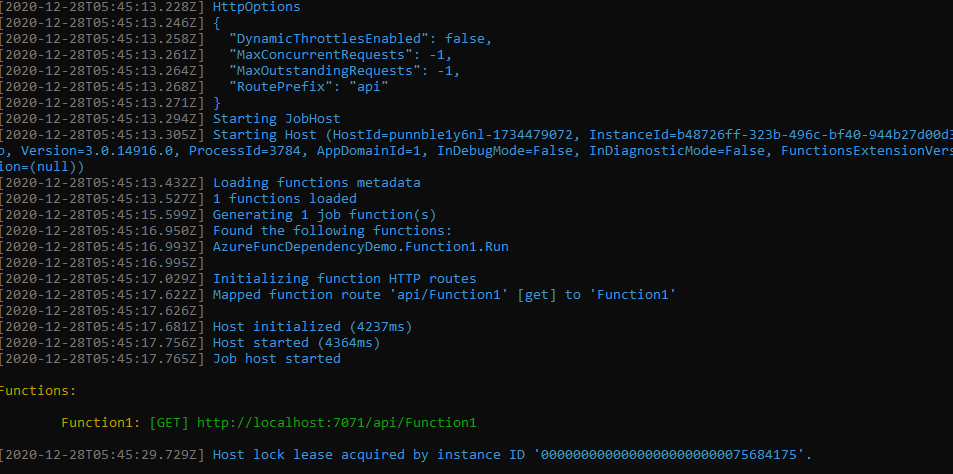
To run the function app, simply build and run the project. It will start the Azure Function CLI and run the function. The function will be accessible at the URL http://localhost:7071/api/Function1.

You have successfully injected the dependency and retrieved customer data in the Azure function using dependency injection.
Integrating HttpClient and Dependency Injection in Azure Functions to Fetch User Data
To inject the HttpClient dependency and fetch user data from an API in the Azure function, follow these steps:
STEP 1: Add the System.Net.Http namespace to import the necessary classes.

STEP 2: Open the Startup.cs class and add the following line of code to inject the HttpClient dependency:
using AzureFuncDependencyDemo.Customer.Service;
using Microsoft.Azure.Functions.Extensions.DependencyInjection;
using Microsoft.Extensions.DependencyInjection;

[assembly: FunctionsStartup(typeof(AzureFuncDependencyDemo.Startup))]

namespace AzureFuncDependencyDemo
{
 public class Startup : FunctionsStartup
    {
 public override void Configure(IFunctionsHostBuilder builder)
        {
            builder.Services.AddHttpClient();
            builder.Services.AddTransient<ICustomerService, CustomerService>();
        }
    }
}
STEP 3: Create another Azure function by right-clicking on the solution, selecting "Add," and then "New Azure Function."
After that, name the function "GetUsers" and click on the "Add" button.

STEP 4: Select the function trigger type as HttpTrigger and the authorization level as "Anonymous."


STEP 5: Add the following code to fetch user data using the HttpClient:
using System.Net.Http;
using System.Threading.Tasks;
using Microsoft.AspNetCore.Http;
using Microsoft.AspNetCore.Mvc;
using Microsoft.Azure.WebJobs;
using Microsoft.Azure.WebJobs.Extensions.Http;
using Microsoft.Extensions.Logging;

namespace AzureFuncDependencyDemo
{
 public class GetUsers
    {
 private readonly HttpClient _httpClient;
 public GetUsers(HttpClient  httpClient)
        {
            _httpClient = httpClient;
        }

        [FunctionName("GetUsers")]
 public async Task<IActionResult> Run(
            [HttpTrigger(AuthorizationLevel.Anonymous, "get", Route = null)] HttpRequest req,
            ILogger log)
        {
            log.LogInformation("C# HTTP trigger function processed a request.");

            var responseMessage = await _httpClient.GetAsync("http://jsonplaceholder.typicode.com/users");
            var usersData = responseMessage.Content.ReadAsStringAsync().Result;
 return new OkObjectResult(usersData);
        }
    }
}
In the above code, we inject the HttpClient dependency using constructor injection. Then, we use the GetAsync method of HttpClient to fetch data from the "http://jsonplaceholder.typicode.com/users" API.
Finally, the fetched data is returned as an OkObjectResult.
Now you can run the application and observe the output. The Azure function will use the injected HttpClient dependency to fetch user data from the API.
Conclusion
This article covered the process of integrating Dependency Injection into Azure Functions. We created a new Azure function and a simple mock CustomerService using Visual Studio. We then demonstrated how to inject the CustomerService dependency into the Azure function app and how to further inject it into the function itself.
By implementing Dependency Injection, we achieved loose coupling and made our code more maintainable and testable. We also highlighted the importance of Inversion of Control (IoC) and how it helps in making classes independent of their dependencies.


Comments