How to install Vim plugins
- The Tech Platform

- Sep 15, 2020
- 4 min read
Whether you install them manually or with a package manager, plugins can help you create the perfect Vim for your workflow.
While Vim is fast and efficient, by default, it is but a mere text editor. At least, that's what it would be without plugins, which build upon Vim and add extra features to make it so much more than just a window for typing text. With the right mix of plugins, you can take control of your life and forge your own unique Vim experience. You can customize your theme, and you can add syntax highlighting, code linting, version trackers, and much much more.
How to install Vim plugins
Vim is extensible through plugins, but for a long time, there was no official method for installing them. As of the Vim 8.x series, however, there's a structure around how plugins are intended to be installed and loaded. You may encounter old instructions online or in project README files, but as long as you're running Vim 8 or greater, you should install according to Vim's official plugin install method or with a Vim package manager. You can use a package manager regardless of what version you run (including releases older than 8.x), which makes the install process easier than maintaining updates yourself. Both the manual and automated methods are worth knowing, so keep reading to learn about both.
Install plugins manually (Vim 8 and above)
A Vim package is a directory containing one or more plugins. By default, your Vim settings are contained in ~/.vim, so that's where Vim looks for plugins when you launch it. (The examples below use the generic name vendor to indicate that the plugins are obtained from an entity that is not you.)
When you start Vim, it first processes your .vimrc file, and then it scans all directories in ~/.vim for plugins contained in pack/*/start.
By default, your ~/.vim directory (if you even have one) has no such file structure, so set that up with:
$ mkdir -p ~/.vim/pack/vendor/startNow you can place Vim plugins in ~/.vim/pack/vendor/start, and they'll automatically load when you launch Vim.
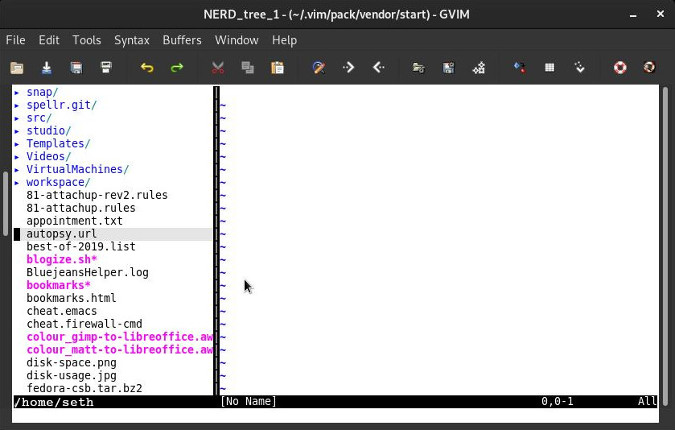
For example, try installing NERDTree, a text-based file manager for Vim. First, use Git to clone a snapshot of the NERDTree repository:
$ git clone --depth 1 \
  https://github.com/preservim/nerdtree.git \
  ~/.vim/pack/vendor/start/nerdtree
Launch Vim or gvim, and type this command:
:NERDTreeA file tree will open along the left side of your Vim window.
If you don't want a plugin to load automatically every time you launch Vim, you can create an opt directory within your ~/.vim/pack/vendor directory:
$ mkdir ~/.vim/pack/vendor/optAny plugins installed into opt are available to Vim but not loaded into memory until you add them to a session with the packadd command, e.g., for an imaginary plugin called foo:
:packadd fooOfficially, Vim recommends that each plugin project gets its own directory within ~/.vim/pack. For example, if you were to install the NERDTree plugin and the imaginary foo plugin, you would create this structure:
$ mkdir -p ~/.vim/pack/NERDTree/start/
$ git clone --depth 1 \
  https://github.com/preservim/nerdtree.git \
  ~/.vim/pack/NERDTree/start/NERDTree
$ mkdir -p ~/.vim/pack/foo/start/
$ git clone --depth 1 \
  https://notabug.org/foo/foo.git \
  ~/.vim/pack/foo/start/foo
Whether that's convenient is up to you.
Using a Vim package manager (any Vim version)
Since Vim series 8, package managers have become less useful, but some users still prefer them because of their ability to auto-update several plugins. There are several package managers to choose from, and they're each different, but vim-plug has some great features and the best documentation of them all, which makes it easy to start with and to explore in depth later.
Installing plugins with vim-plug
Install vim-plug so that it auto-loads at launch with:
$ curl -fLo ~/.vim/autoload/plug.vim --create-dirs \
  https://raw.githubusercontent.com/junegunn/vim-plug/master/plug.vim
Create a ~/.vimrc file (if you don't have one already), and enter this text:
Each time you want to install a plugin, you must enter the name and location of the plugin between the plug#begin() and plug#end lines. (The NERDTree file manager is used above as an example.) If the plugin you want isn't hosted on GitHub, then you can provide the full URL instead of just the GitHub username and project ID. You can even "install" local plugins outside of your ~/.vim directory.
Finally, start Vim and prompt vim-plug to install the plugins listed in ~/.vimrc:
:PlugInstallWait for the plugins to be downloaded.
Update plugins with vim-plug
Editing ~/.vimrc and issuing a command to do the installation probably doesn't seem like much of a savings over the manual install process, but the real benefit to vim-plug is in updates. To update all installed plugins, issue this Vim command:
:PlugUpdateIf you don't want to update all plugins, you can update any subset by adding the plugin's name:
:PlugUpdate NERDTreeRestore plugins
Another vim-plug benefit is its export and recovery function. As any Vim user knows, the way Vim works is often unique to each user—in part because of plugins. Once you get the right blend of plugins installed and configured, the last thing you want is to lose track of them.
Vim-plug has this command to generate a script for restoring all current plugins:
:PlugSnapshot ~/vim-plug.listThere are many other functions for vim-plug, so refer to its project page for the full documentation.
Create the perfect Vim
When you spend all day in a program, you want every little detail to serve you the best it possibly can. Get to know Vim and its many plugins until you build the perfect application for what you do.
Source: Opensource.com


Comments