
How to Deploy Machine Learning Models?
- The Tech Platform

- Jan 4, 2022
- 8 min read
Updated: Apr 29, 2023
Machine learning models have become an integral part of many businesses and industries. With the increasing amount of data available, it has become easier to build accurate models that can help in making better decisions. However, building a Machine Learning model is only half the battle. Deploying it in a way that is easy to use and accessible to stakeholders is equally important. In this article, we will be discussing how to build and deploy a Machine Learning model.
What is Streamlit?
Streamlit is a powerful Python library that makes it easy to build web applications for machine learning and data science. With Streamlit, you can quickly build a web app that allows stakeholders to interact with your Machine Learning model in real-time, without having to write any HTML, CSS, or JavaScript.
Before we dive into the details, make sure you have Python 3.6 or higher installed on your machine, along with the PyCharm IDE. Let's get started!
How to Deploy a Machine Learning Model?
Consider the below diagram. The diagram shows how deploying a Machine learning model works.

STEP 1: A machine learning model is built and trained using historical data. Once the model is built, it is tested to ensure its accuracy and performance on a sample dataset. After testing, the production-ready code is created using the model to make predictions on new data.
STEP 2: The next step is to containerize the code. Containerization allows the code to run in any environment, making it easy to deploy and scale. It isolates the code from the host system, ensuring that any changes made to the host system do not affect the code. Once the code is containerized, it can be deployed on a cloud platform or on-premise servers.
STEP 3: After deployment, an API-driven front-end app is built to access predictions. This app allows users to input data and receive predictions from the model. The API handles the input and output of data and connects the front-end app to the model. The front-end app can be a web or mobile app, providing a user-friendly interface for accessing predictions.
STEP 4: Finally, automated and serverless data processing and model training are used to update the model regularly. This process involves automatically collecting and processing new data, retraining the model, and deploying the new version of the model. The API-driven front-end app is updated to use the latest version of the model, ensuring that users receive the most accurate predictions.
Example:
Now, we will provide you with the proper example with code on how to build and deploy a Machine learning model using Python and Streamlit.
There are three main Python files required to build the application:
model.py
prediction.py
main.py
1. model.py: This file is used to build and train a Machine Learning model using a given dataset. In this file, you import the dataset, preprocess it, and split it into training and testing sets. Then, you define the model architecture, train it on the training data, and save the trained model as a file. This saved model can be used later for prediction purposes.
2. prediction.py: This file is used to load the saved machine learning model and use it for making predictions on new data. In this file, you load the saved model, preprocess the input data in the same way as the training data, and use the loaded model to make predictions on this preprocessed data. You can also save any additional data processing steps as a separate file, such as label encoding or feature scaling.
3. main.py: This file is used to build the user interface and deploy the application. In this file, you use a web application framework like Streamlit or Flask to create a user-friendly interface for the end-users to interact with the machine learning model. You can use this interface to take input data from the user, preprocess it, and use the saved machine learning model to make predictions on the preprocessed data. Finally, the output can be displayed to the user on the interface itself.
Using these Python files to build machine learning models allows for a clear separation of concerns between data processing, model building, and deployment. This makes it easier to maintain the code and improve the application over time. It also makes it easier to collaborate with other developers, as each file has a specific purpose and can be modified independently.
Here are steps to follow in order to build and deploy the Machine learning model:
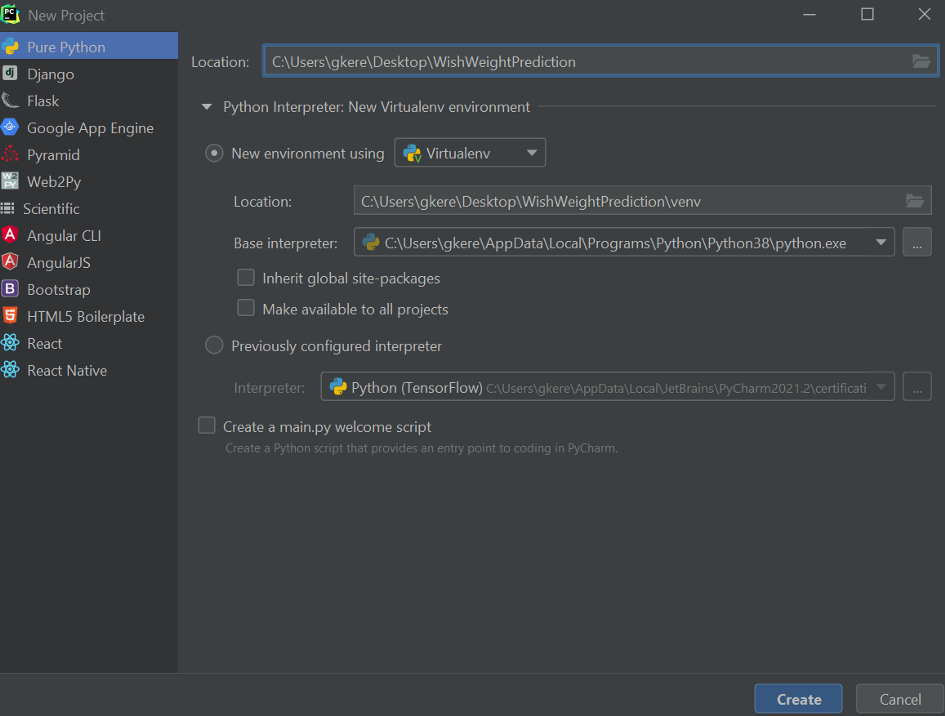
Step 1: Create a new virtual environment using Pycharm IDE
Create a new virtual environment for your project using Pycharm IDE. This will help you keep your dependencies and packages separate from other projects and avoid conflicts between different versions of libraries.
Step 2: Install the necessary libraries
In the requirements.txt file, list all the necessary libraries required for the project. You can download the file and install the libraries using pip:
pip install -r /path/to/requirements.txtAlternatively, you can install each library individually using pip.
Step 3: Build the best Machine Learning model and Save it
In the model.py file, build your machine learning model and save it as a JSON file (e.g., best_model.json). For example, if you are using XGBoost, you can save the model using:
best_xgboost_model.save_model("best_model.json")Step 4: Test the loaded model.
In the prediction.py file, load the saved Machine Learning model and test it. You can also save the label-encoder classes as a classes.npy file using:
np.save('classes.npy', label_encoder.classes_)Step 5: Create main.py file
In the main.py file, you will create the web app using the Streamlit library.
Step 5.1 Import libraries and dataset
First, import the necessary libraries and datasets. For example:
import streamlit as st
import pandas as pd
from sklearn.preprocessing import  LabelEncoder
import xgboost as xgb
import numpy as np

st.header("Fish Weight Prediction App")
st.text_input("Enter your Name: ", key="name")
data = pd.read_csv("fish.csv")
streamlit is a popular Python library for building web apps for machine learning and data science projects.
pandas is a Python library used for data manipulation and analysis.
LabelEncoder is a function from sklearn.preprocessing that is used to convert categorical data into numerical data.
xgboost is a popular machine learning library used for building predictive models.
numpy is a Python library used for numerical computing.
In the code above, we first import these necessary libraries, set the app header and prompt the user to enter their name. Then, we read the dataset using pandas and store it in the variable data.
Step 5.2: Load saved label encoder classes
Load the saved label encoder classes using:
encoder = LabelEncoder()
encoder.classes_ = np.load('classes.npy',allow_pickle=True)
We created a LabelEncoder object and set its classes_ attribute to the saved classes from the classes.npy file. This step is necessary because during the training of the model, we encoded the categorical data using LabelEncoder, and now during prediction, we need to use the same encoding that was used during training.
Step 5.3: Load saved the best model
# load model
best_xgboost_model = xgb.XGBRegressor()
best_xgboost_model.load_model("best_model.json")
We create an XGBRegressor object and load the saved best model from the best_model.json file. This step is necessary because during training, we saved the best model using the save_model() function, and now during prediction, we need to load the saved model.
Step 5.4: Show dataframe on the web
If the checkbox is checked, the data dataframe is displayed on the web page.
if st.checkbox('Show dataframe'):
    data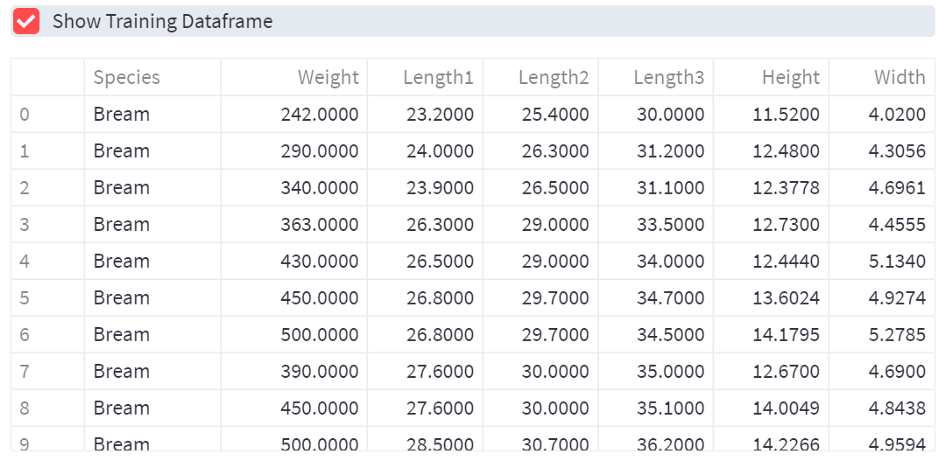
Step 5.5: Select Fish Species
Next, we provide the user with a selection of the fish species. We use the np.unique() method to get distinct values of all the fish species present in the dataset. We then use the st.radio() method to display the options as radio buttons, allowing the user to select one option.
st.subheader("Please select relevant features of your fish!")
left_column, right_column = st.columns(2)
with left_column:
    inp_species = st.radio(
        'Name of the fish:',
        np.unique(data['Species']))
We set a subheader, create two columns using st.columns(2), and place a radio button to select the name of the fish in the left column.
Step 5.6: Select each value of features using a slider window
Now we use the st.slider() method to create sliders for the remaining features, such as vertical length, diagonal length, height, etc. We use the max() method to get the maximum value of each feature from the dataset.
input_Length1 = st.slider('Vertical length(cm)', 0.0, max(data["Length1"]), 1.0)
input_Length2 = st.slider('Diagonal length(cm)', 0.0, max(data["Length2"]), 1.0)
input_Length3 = st.slider('Cross length(cm)', 0.0, max(data["Length3"]), 1.0)
input_Height = st.slider('Height(cm)', 0.0, max(data["Height"]), 1.0)
input_Width = st.slider('Diagonal width(cm)', 0.0, max(data["Width"]), 1.0)
Step 5.7: Make prediction button
Finally, we create a "Make Prediction" button that triggers the prediction process when clicked. When the user clicks the button, the species input is transformed from text into a relevant number, then all the input features are concatenated with a specific shape, and the model prediction is made.
if st.button('Make Prediction'):
    input_species = encoder.transform(np.expand_dims(inp_species, -1))
    inputs = np.expand_dims(
        [int(input_species), input_Length1, input_Length2, input_Length3, input_Height, input_Width], 0)
    prediction = best_xgboost_model.predict(inputs)
    print("final pred", np.squeeze(prediction, -1))
    st.write(f"Your fish weight is: {np.squeeze(prediction, -1)} Gram")
Step 6: Upload the local project to GitHub
Once the application is ready, we can use Git to upload our local project to a remote repository on GitHub. Alternatively, we can simply drag and drop the folder to an empty repository on GitHub. This step is important to share the application with others and to be able to deploy it on cloud services.
Step 7: Create an account on Streamlit
Finally, we create an account on Streamlit and connect our GitHub repository by clicking "From existing repo". This step is essential to be able to deploy the application on Streamlit Sharing and share it with others.

Best Practice to Deploy Machine Learning Models:
Deploying machine learning models is a crucial step in the machine learning lifecycle, as it allows the models to serve predictions to real users or applications. However, deploying machine learning models is not a trivial task, as it involves many challenges and considerations. Here are some best practices to deploy machine learning models in production:
Best Practice 1: Choose the right deployment method:
There are different ways to deploy machine learning models, such as using cloud services, containers, web applications, mobile devices, etc. Each method has its own advantages and disadvantages, such as cost, performance, security, and maintenance. You need to choose the method that best suits your use case and requirements.
Best Practice 2: Use a robust deployment approach:
Follow a systematic and reliable process to deploy your machine learning models, such as using continuous integration and continuous delivery (CI/CD) pipelines, automated testing, version control, logging, etc. This will help you ensure the quality and consistency of your deployments and reduce errors and downtime.
Best Practice 3: Monitor and evaluate your model’s performance:
Keep track of how your model is performing in production and measure its accuracy, reliability, and efficiency. You also need to compare your model with other models or baselines and identify its strengths and weaknesses. You can use metrics such as accuracy, precision, recall, F1-score, latency, throughput, etc. to evaluate your model’s performance.
Best Practice 4: Collect feedback and data from your model’s performance:
Gather feedback and data from your model’s predictions and outcomes and use it to improve your model. You also need to update your model regularly with new data or algorithms to keep it relevant and accurate. You can use tools such as Amazon SageMaker’s pipelines feature to automate the retraining and deployment of your model.
Best Practice 5: Communicate and collaborate with stakeholders:
Communicate and collaborate with the stakeholders involved in the deployment process, such as data scientists, software engineers, DevOps engineers, business analysts, etc. You need to align your goals and expectations with them and share your insights and challenges. You also need to document your deployment process and results for future reference.
Conclusion:
By following these 7 simple steps, we have built and deployed a Machine Learning model using Python and Streamlit. The final product is an interactive web application that allows users to predict the weight of a fish based on various features.


Comments