
How to create tabs in Power apps
- The Tech Platform

- Mar 13, 2019
- 2 min read
Before start this I am considering you know how to customize your form in PowerApp with multiple screen.
Now once you will have the below status we can start the steps that will need to make tabular structure in your form.
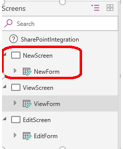
In this document we are going to show 3 tabs but same methodology can be used for multiple tabs also. Here we will show that for New screen and same you can replicate to View Screen and Edit Screen.
First add three buttons in your screen and name them accordingly. We can add one and after make the style you can right click on that and do copy paste to keep the styling same for the three buttons
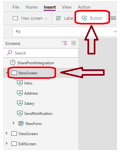
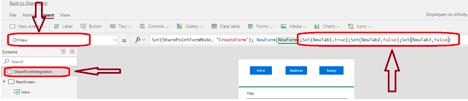
Now you have to declare some variable which Will help the button to act like tabs. To do that left navigation select “SharePointIntegration” and from the global navigation select “OnNew” and in the “OnNew” function set three Boolean variables for the three tabs. As we want first tab always will be available when the form will load we are making “NewTab1” value as “true” and rest of the variable as “false”.
Note:- For the edit screen and the View screen you need to set the variable in “OnEdit” and “OnView” function.
Value:- Set(NewTab1, true);Set(NewTab2, false);Set(NewTab3, false)
Now for each button's “OnSelect” event you need to set the corresponding variable value “true” and rest “false”.


Now you need to select each data card(fields) that you want to make visible for the respected tabs. So to do that select the field (data card) from the left navigation and select the visible property of the data card from the top navigation and set the variable that you are making true on the click of corresponding tab.
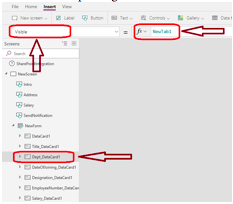
Repeat the steps for all the fields with respected tab variable. (ex. NewTab1, NewTab2, NewTab3).
You can give a line to separate the tabs from the form.
To make the tab active and non-active set the fill property of the button like below.
Code: - If(NewTab2,RGBA(255, 210, 0, 0.89),RGBA(230, 230, 230, 1))
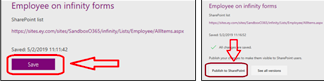
After all these set up is ready we need to save and publish our form to reflect to the list form. And to do so follow the below steps.
a. Click “File” from top navigation.
b. Click “Save”. “Publish to SharePoint” button will be visible.
c. Click “Publish to SharePoint”
Now go to your list do a “Ctrl+f5” to load the current changes to you page and open the new form.


Comments