
How to Create PayPal Payment Form in WordPress?
- The Tech Platform

- Apr 13, 2022
- 7 min read

PayPal is one of the easiest payment methods that accept online payments from customers from more than 200 countries worldwide. It also allows you to accept payment in 25 different currencies. All you need is a WordPress form builder plugin that accepts PayPal payment.
Once you create a PayPal payment form on your WordPress website, you can accept payments from your customers. Sounds complicated? Don’t worry; following our tutorial, it’s easy to create the PayPal payment form in WordPress.
So, let’s start by choosing the best WordPress form builder plugin that integrates PayPal payment.
Choose the Best WordPress PayPal Plugin – Everest Forms
WordPress is the top choice for CMS (Content Management System), which offers thousands of WordPress themes and plugins. But choosing a single product from a pool of thousands is not an easy task.
With our reasonable amount of experience in exploring and developing WordPress and its products for several years, we’ve come across many useful, user-friendly, and fully functional plugins. One such plugin is Everest Forms, a popular form builder plugin.
If you’re willing to create any form in WordPress like a contact form, multi-step form, or donation form, Everest Forms is the one you won’t regret using. It’s for all, from beginners to experts, to create almost every kind of form. Some of its features like drag and drop builder, unlimited form fields, and integration with many tools and payments gateways are genuinely impressive.
It also allows you to customize the form without requiring any coding. Besides, it has spam protection features like Captcha, Math Captcha, Smart Google, and Honeypot to reduce spam submission through your forms.
Hence, it’s also one of the best WordPress PayPal plugins to create payment forms on the WordPress site. You can also read our full review of Everest Forms.
But for now, let’s start to build a PayPal payment form for the WordPress website.
How to Create PayPal Payment Form in WordPress?
Creating a PayPal payment form in WordPress is super-easy when you’ve got a payment plugin like Everest Forms. All you need to do is follow the simple steps as follows:
Step 1. Install and Activate Everest Forms and Everest Forms Pro
The first and foremost step in using any plugin is to install it. So, visit your WordPress login page and log in to your WordPress dashboard.
Now, navigate to Plugins >> Add New.

A new page appears on your screen, showing you the featured plugins. The page also has a search bar; you can search for the Everest Forms from here. The search result shows you Everest Forms plugins with the Install Now button. So, click on the button.

Again, as soon as the plugin is installed, it shows the Activate option. Thus, click on the button to activate the plugin on your site.
You just installed and activated the free version of the Everest Forms. But you’ll require a premium version of the Everest Forms to accept online payment through a payment form. Thus, to purchase a premium plan of the Everest Forms, go to the plugin’s official page.
To create a PayPal form in WordPress, you must integrate a PayPal payment gateway; that requires the PayPal Standard add-on of Everest Forms.
So, among the four plans of the Everest Forms: Agency, Professional, Plus, and Personal, the PayPal Standard add-on isn’t available in the Personal plan. Therefore, choose one among the other three suitable plans for your site and make a purchase.
After purchase, you’ll be able to log in to your WPEverest account. So, visit your account Dashboard and navigate to the Downloads tab. Next, look for the Everest Forms Pro and click on the Download button. It then downloads the zip file of the plugin to your device.

Also, under the License Keys tab, the license key for Everest Forms Pro is available. You need to copy it as you’ll require to paste it after following a few steps.

It’s now time to install and activate the Everest Forms Pro in your WordPress dashboard. So, navigate to the Plugins >> Add New just like we did for Everest Forms free version.
Now, click on the Upload Plugin and upload the zip files for the Everest Forms Pro that you just downloaded. Click on the Install Now button and then Activate button.

After activating the plugin, it asks you to enter your license key for the plugin. Paste the license key that you copied a few steps back.

Thus, the Everest Forms Pro is fully functional on your site.
Step 2. Install and Activate PayPal Standard Add-on
Let’s now install and activate the PayPal Standard add-on on your site. For this, navigate to Everest Forms >> Add-ons.

A new page appears on your interface, showing the available add-ons for Everest Forms. Scroll down until you see the PayPal Standard.
Hit the Install Addon button and then the Activate button as you see it.

After performing all these steps, you now have all the plugins and add-ons required for creating a PayPal payment form on the WordPress site.
Step 3. Create a PayPal Payment Form in WordPress
Now, let’s create a PayPal form in WordPress. Firstly, go to Everest Forms >> Add New.

Since Everest Forms provides several pre-built templates, you can use any of them and modify them as per your choice.

But for now, we’re creating the PayPal payment form from scratch. So, click on the Start From Scratch option.

It’ll ask you to give a name to your form. Thus, provide a suitable name and click on Continue.

You’ll now see a drag and drop form builder interface, where you can drag and drop the required field for your PayPal payment form on the right side.

Add Payment Fields
The best part about Everest Forms for creating a PayPal payment form in WordPress is that it has Payment Fields providing essential fields for any payment form.
So, on the left side, where you see the General Fields, scroll down until you get the Payment Fields. The fields available are Single Item, Multiple Choice, Checkboxes, Quantity, and Total.

Simply, drag the individual field from the left side of the interface and drop it on the right side, where you create a form.
a. Single Item: It lets you display a single item with its price on the form.

You can click on the field for further customization, which takes you to the Field Options tab. You can easily customize the field label, and description and set the item’s price and type. Further, the Item Type has three options under it:
Pre Defined: When you set the item as Pre Defined, it restricts users from changing the item’s price while purchasing from the frontend.
User Defined: It allows users to change the item’s price from the front end. This option is suitable for the donation form.
Hidden: This option hides the item’s price in the frontend.

b. Multiple Choice: It allows you to display various items so that customers can choose one from the displayed options.

To customize the field, just like above, click on the field, which takes you to the Field Options tab. You can set the Choices to customize the price for each item. At the same time, you can also use the image for each choice.

c. Checkboxes: It’s similar to Multiple Choice, but the only difference is that customers can choose multiple items.

d. Quantity: When you set the item as Quantity, it enables the user to set the desired quantity for the item chosen.

e. Total: As the name implies, the total displays the total price of all the items chosen by the customer.

When you finish adding the required fields to your PayPal payment form, don’t forget to click on the Save button.

In addition, to set the desired currency, go to the Everest Forms >> Settings and click on the Payments tab.

After that, using the Currency’s drop-down menu, choose the currency relevant to you, and hit the Save Changes button.

Step 4. Enable PayPal Payment as a Payment Option
After adding all the required fields for the PayPal payment form on your WordPress site, you must enable PayPal as the payment option for your customers.
For this, navigate to Everest Forms >> All Forms and open the form you just created.

Next, click on the Payments tab that you’ll see at the top.

To enable PayPal as the standard payment option in your WordPress site, check the Enable PayPal Standard.

Step 5. Configure PayPal Settings
Now configure the PayPal settings for the following options:
a. PayPal Email Address: It’s the email address of the payment receiver. Provide the identical email address that you’ve used in your PayPal account in this field.

b. Mode: It has two options:
Production: For going live with the changes.
Sandbox: For testing the payment process.
c. Payment Type: It allows you to choose the type of payment through the form.
Product & Service: For the payment of the product and services of the WordPress site.
Donation: For taking donations from the visitors of your site.
d. Cancel URL: Here, you can enter the URL to redirect customers if they cancel after redirecting to PayPal.
e. Enable Conditional Logic: You can use it to provide users with an option between PayPal and Stripe add-on. But you’ll require Conditional Logic add-on and Stripe add-on plus you’ll need to configure their settings.
Then, save the changes using the Save button at the top-right corner after finishing configuring the setting for your PayPal payment form.
Step 6. Add PayPal Payment Form to Your WordPress Site
As you’ve made the PayPal payment form ready for your WordPress site, it’s time to add it to your post or page. Let’s learn how.
First of all, copy the shortcode of your PayPal payment form available at the top.
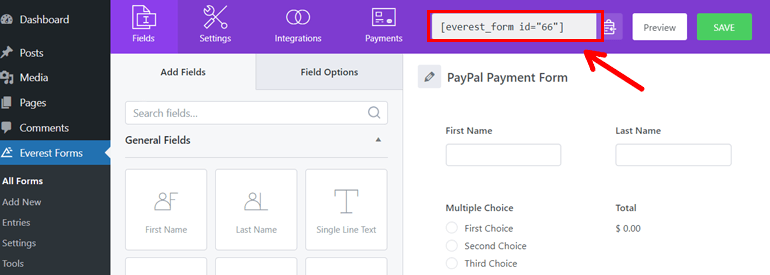
After that, open the page or post you’ve chosen to add the payment form. Now, paste the shortcode and provide a suitable heading to the form.

Alternatively, you can also use the block inserter on your page to add the form. Open the page or post where you want to add the form and click on the block inserter [+].

Next, search for the Everest Forms in the search bar, which shows you the Everest Forms block. Click on it, and it appears on your post or page editor on the right side.

Now, use the drop-down menu and select the form you just created as a PayPal payment form.

Give a title to the form. Now to preview how it actually looks on your site when it goes live, hit the Preview button at the top.

When you feel everything is fine, publish the form by hitting the Publish button at the top-right corner.

You’ve successfully created a PayPal form and published the form on your WordPress site.
Resource: Themegrill.com
The Tech Platform


Comments