
How to Create a List using SharePoint Framework (SPFx)
- The Tech Platform

- May 25, 2023
- 5 min read
SharePoint Framework (SPFx) empowers developers to build robust and customized solutions for SharePoint Online. One common requirement in SharePoint development is creating custom lists tailored to specific business needs. In this article, we will guide you through the process of creating a list using SharePoint Framework (SPFx) step by step. By leveraging the power of SPFx and TypeScript, you can create and provision lists effortlessly within your SharePoint environment. So let's dive in and explore how to create a list using SharePoint Framework!
Custom lists offer a wide range of benefits and opportunities for organizations to enhance their collaboration, data management, and workflow processes. Here are some key reasons why creating custom lists in SharePoint development is essential:
Tailored Data Management: SharePoint lists provide a flexible and customizable way to manage and store data specific to your organization's needs. By creating custom lists, you can define the fields, data types, and relationships that align with your business processes. This ensures that data is structured and organized in a manner that makes sense for your unique requirements.
Improved Collaboration: Custom lists facilitate collaboration among team members by enabling them to capture, share, and update information in a centralized location. Whether it's tracking tasks, managing projects, or maintaining contact information, custom lists offer a collaborative platform where team members can contribute, view, and edit data in real time. This promotes efficient teamwork and fosters better communication within the organization.
Workflow Automation: SharePoint lists can be integrated with workflows to automate business processes and streamline operations. By defining workflows on custom lists, you can automate tasks, notifications, and approvals based on predefined conditions. This helps to eliminate manual and repetitive tasks, ensuring consistent and efficient processes across the organization. Workflow automation saves time, reduces errors, and enhances productivity.
Data Reporting and Insights: Custom lists provide a foundation for data reporting and analysis. SharePoint offers powerful tools such as Power BI and Excel Services to create interactive dashboards, reports, and visualizations based on the data stored in custom lists. By leveraging these capabilities, organizations can gain valuable insights, monitor performance, and make informed decisions to drive business growth.
Extensibility and Integration: SharePoint's extensibility allows developers to enhance custom lists with additional functionalities. By leveraging SharePoint Framework (SPFx) and other development tools, you can extend the capabilities of custom lists by adding custom forms, implementing business logic, integrating external systems, or incorporating third-party solutions. This ensures that custom lists can adapt and evolve alongside evolving business requirements.
Compliance and Governance: Custom lists in SharePoint adhere to the platform's security and governance features, ensuring data integrity and compliance with organizational policies and regulations. SharePoint provides robust security controls, versioning, access permissions, and audit trails to protect sensitive information stored in custom lists. This promotes data governance, confidentiality, and regulatory compliance.
Creating custom lists in SharePoint development empowers organizations to optimize data management, enhance collaboration, automate workflows, derive insights, extend functionalities, and ensure compliance. By leveraging the flexibility and customization options offered by SharePoint, businesses can tailor custom lists to their specific needs and unlock the full potential of the platform for efficient and effective operations.
Create a list using the SharePoint Framework (SPFx)
Step 1: Creating a New SPFx Solution
To begin, we need to set up a new SPFx solution using the Yeoman SharePoint Generator. This generator provides a scaffolding tool for creating SharePoint client-side solutions.
Open the Node.js command prompt and create a directory for your SPFx solution:
md CheckListExistsNavigate to the newly created directory:
cd CheckListExistsRun the Yeoman SharePoint Generator to create the SharePoint client-side solution:
yo @microsoft/sharepointYeoman generator will present you with the wizard by asking questions about the solution to be created like below:
Solution Name: Hit Enter to have a default name (CheckListExists in this case) or type in any other name for your solution.
The target for the component: Here, we can select the target environment where we are planning to deploy the client web part; i.e., SharePoint Online or SharePoint On-premise (SharePoint 2016 onwards). Selected choice – SharePoint Online only (latest)
Place of files: We may choose to use the same folder or create a subfolder for our solution.Selected Choice – Same folder.
Deployment option: Selecting Y will allow the app to be deployed instantly to all sites and will be accessible everywhere. Selected Choice – N (install on each site explicitly)
Type of client-side component to create: We can choose to create a client-side web part or an extension. Choose the web part option. Select option – Web-part.
Web part name: Hit enter to select the default name or type in any other name. Type name – checkListExists
Web part description: Hit enter to select the default description or type in any other value.
Framework to use: Select any JavaScript framework to develop the component. Available choices are No JavaScript Framework, React, and Knockout. Select option – No JavaScript Framework
At this point, Yeoman installs the required dependencies and scaffolds the solution files along with the checkListExists web part. This might take a few minutes.
Step 2: Open the Solution in Visual Studio Code
In the command prompt, type the following command to open the solution in Visual Studio Code:


Step 3: Create a Custom List using SPFx
Open the "CheckListExistsWebPart.ts" file.
Replace the existing code with the following code snippet:
import { Version } from '@microsoft/sp-core-library';
import { BaseClientSideWebPart, IPropertyPaneConfiguration, PropertyPaneTextField } from '@microsoft/sp-webpart-base';
import { escape } from '@microsoft/sp-lodash-subset';
import styles from './CheckListExistsWebPart.module.scss';
import * as strings from 'CheckListExistsWebPartStrings';
import { SPHttpClient, SPHttpClientResponse, ISPHttpClientOptions } from '@microsoft/sp-http';

export interface ICheckListExistsWebPartProps
{
  description: string;
}

export default class CheckListExistsWebPart extends BaseClientSideWebPart<ICheckListExistsWebPartProps>
{
  private createSharePointList(): void
  {
    const getListUrl: string = this.context.pageContext.web.absoluteUrl + "/_api/web/lists/GetByTitle('My List')";
    this.context.spHttpClient.get(getListUrl, SPHttpClient.configurations.v1)
      .then((response: SPHttpClientResponse) =>
      {
        if (response.status === 200)
        {
          alert("List already exists.");
          return;
        }
        if (response.status === 404)
        {
          const url: string = this.context.pageContext.web.absoluteUrl + "/_api/web/lists";
          const listDefinition: any =
          {
            "Title": "My List",
            "Description": "My description",
            "AllowContentTypes": true,
            "BaseTemplate": 100,
            "ContentTypesEnabled": true,
          };
          const spHttpClientOptions: ISPHttpClientOptions = {
            "body": JSON.stringify(listDefinition)
          };
          this.context.spHttpClient.post(url, SPHttpClient.configurations.v1, spHttpClientOptions)
            .then((response: SPHttpClientResponse) =>
            {
              if (response.status === 201)
              {
                alert("List created successfully");
              } else {
                alert("Response status " + response.status + " - " + response.statusText);
              }
            });
        } else {
          alert("Something went wrong. " + response.status + " " + response.statusText);
        }
      });
  }

  public render(): void
  {
    this.domElement.innerHTML =
      `<div>
        <button type='button' class='ms-Button'>
          <span class='ms-Button-label'>Create List</span>
        </button>
      </div>`;
    this.createSharePointList = this.createSharePointList.bind(this);
    const button: HTMLButtonElement = this.domElement.getElementsByTagName("BUTTON")[0] as HTMLButtonElement;
    button.addEventListener("click", this.createSharePointList);
  }

  protected get dataVersion(): Version {
    return Version.parse('1.0');
  }

  protected getPropertyPaneConfiguration(): IPropertyPaneConfiguration {
    return {
      pages: [
        {
          header: {
            description: strings.PropertyPaneDescription
          },
          groups: [
            {
              groupName: strings.BasicGroupName,
              groupFields: [
                PropertyPaneTextField('description', {
                  label: strings.DescriptionFieldLabel
                })
              ]
            }
          ]
        }
      ]
    };
  }
}
Step 4: Run the SPFx Solution
In the command prompt, type the following command to start the local workbench:
gulp serveOpen the SharePoint workbench by navigating to a URL like the following:
https://<domain-name>.sharepoint.com/sites/<SiteName>/_layouts/15/workbench.aspxAdd the web part "CheckListExists" to the SharePoint workbench page.
Step 6: Create a SharePoint List
In the SharePoint workbench page, add the web part “CheckListExists”. Then it will show the “Create List” Button.

When you click on the button, the code will check if a list with the same title ("My List") already exists.

If the list exists, an alert message "List already exists" will be displayed.
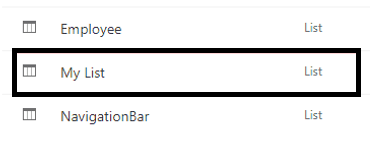
If the list does not exist, a new SharePoint list with the title "My List" will be created.
Conclusion
In this tutorial, we explored how to create a SharePoint list using SharePoint Framework (SPFx) and TypeScript. By following the step-by-step instructions, you can leverage the power of SPFx to create custom lists tailored to your specific needs. Experiment with this approach and extend it further to suit your SharePoint development requirements.


Comments