How to Create a List in SharePoint 2010 Using NINTEX Workflow
- Vijai Anand Ramalingam

- Mar 7, 2019
- 2 min read
Updated: Mar 18, 2019
Introduction
We will be creating a new list by calling the web service _vti_bin/lists.asmx. I have created a custom list named “List Templates” with the following values. Please refer to SPListTemplateType enumeration for list templates and their IDs.
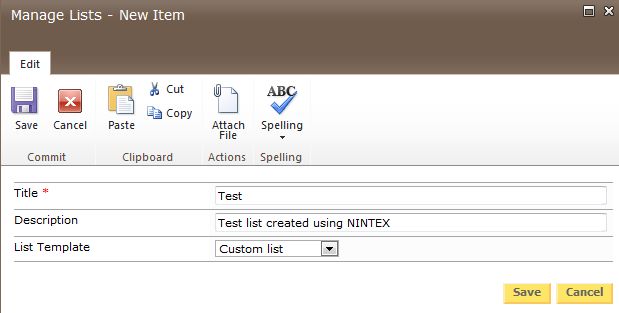
I have created a custom list named “Manage Lists” with the following columns.
The List Template column is a lookup column from the List Templates list and Template ID is a projected field.
Create list workflow
Navigate to the Manage Lists list.
Click on the List tab and then click on Workflow Settings.
Click on Create a Workflow in Nintex Workflow.
Click on Cancel.
Drag and drop the Call web service action from the Integration section.
You will see the warning symbol in the workflow action, clicking on that will show the following warning message.
Click on Configure from the drop down list in the Call web service action.
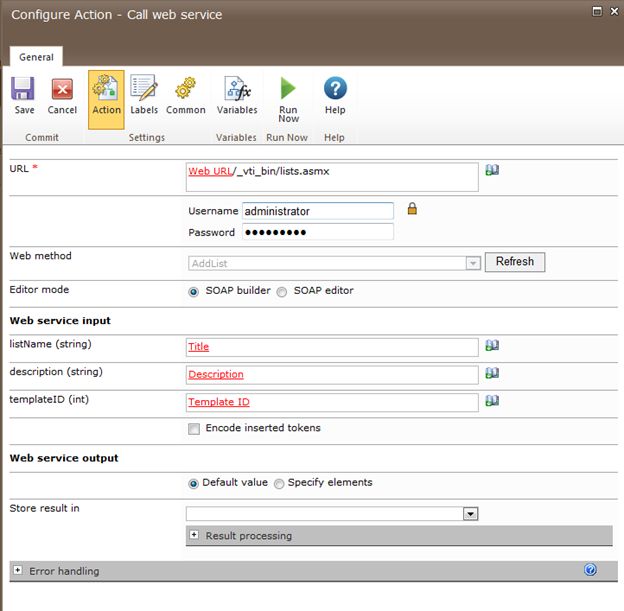
Click on the Insert Reference button for the URL column and then click on the Common tab. Select Web URL and then click on Ok.
Append /_vti_bin/lists.asmx in the URL column.
Enter the User Name and Password to call the web service and then click on the Reference button.
Click Ok.
All the web service methods will be populated. Select AddList web method that will be used to create a new list.
The Web Service Input section will be populated for passing the input values to the web method.
Click on the Insert Reference button for the listName column and then click on theItem Properties tab. Select Title and then click on Ok.
Click on the Insert Reference button for the description column and then click on the Item Properties tab. Select Description and then click on Ok.
Click on the Insert Reference button for the templateID column and then click on the Item Properties tab. Select Template ID and then click on Ok.
Click Save.
Publish the workflow
Click the Publish button in the ribbon interface.
Make sure the Title is set. Optionally you can set the values for Description and change the Comments.
Click on the Submit button.
The workflow is published successfully.
Test the workflow
Navigate to the Manage Lists list.
Create a new item.
Select the item and then click on Workflows in the ribbon interface.
Click on the Create List Workflow workflow and then click on the Start button.
After a few minutes the workflow status will be changed to Completed.
The list is created successfully.
Summary
Thus in this article you saw how to create a new list in SharePoint 2010 using a NINTEX workflow.


Comments