
How to change or set up an alternate Secure DNS provider in Edge
- The Tech Platform

- Feb 2, 2021
- 4 min read
In comparison to its legacy version, Microsoft Edge Chromium offers more personalization options. This, however, does not mean the browser focuses less on its safety and overall privacy. It has features that enable users to keep the content of their web traffic as well as its destination, private. For example, you can set an alternate secure DNS provider in Edge.
Microsoft has added a Secure DNS feature to Windows 10’s default web browser. Regardless of whether you use the Edge browser for work, you may want to enable the Secure DNS option on your browser. This article explains how to use the Secure DNS feature in Microsoft Edge and why you should do that.
Change Secure DNS Provider in Edge browser
What is Secure DNS
Secure DNS is a security feature that prevents attackers from eavesdropping into the DNS lookup requests made from your device. It is a little different from the conventional DNS lookup requests. Let’s have a look at the standard scenario of DNS nowadays:
As you might know, every device needs to send a DNS lookup request to access things on the internet. DNS converts the alphanumeric URL to the network address of the site. Although this has been the norm for decades, the security layers in this method aren’t great. There have been many instances where threat actors could snoop into the DNS lookup requests and thereby overrun user-privacy. In many cases, the default DNS servers used by Internet Service Providers worldwide are known for poor security and subpar speed.
Given these many problems, it isn’t the best decision to keep using the default DNS services from your ISP. That is where Secure DNS from Microsoft comes in.
To visit a website residing over the Internet, a browser generally needs to look up the network address (e.g. 93.184.216.34) for the hostname (e.g. example.com). It can be found under the URL of a website.
Secure DNS performs this operation using a service over an HTTPS connection to the DNS service provider. It’s referred to as DNS over HTTPS or DoH and looks up for any modification or eavesdropping by attackers on the network. By default, your current DNS service provider is used to avoid glitches. However, you can set an alternate secure DNS provider in Edge.
Why is Secure DNS is important?
The Secure DNS feature from Microsoft works in a simple yet effective manner.
Most ISPs and browsers use HTTP requests (non-secure) to perform DNS lookup requests. It means people with the right software/hardware tools can snoop into the same. However, Microsoft Edge can now upgrade the same HTTPS channel requests (secure and encrypted). Edge uses a tech called DNS-over-HTTPS to make this possible.
Here’s the catch, though. Not all DNS providers offer support for DoH now. Fortunately, Edge now lets you choose a third-party DNS service if your current one doesn’t support Secure DNS. For instance, Cloudflare DNS, free to use, is one of the pioneers in DNS-over-HTTPS. You can upgrade to Cloudflare from your default DNS provider.
Now that you know how Secure DNS works let’s see how to use the same.
Setting up a service provider
If your current DNS service provider supports Secure DNS, all should be fine. If it doesn’t, Edge will say that ‘your current service provider may not provide secure DNS.
If the current DNS service provider doesn’t support Secure DNS, you can choose one that does.
From the two options, pick ‘Choose a service provider.’
You can either enter the custom DNS provider details or choose one from the available options.
To configure Secure DNS in Edge browser:
Lauch Microsoft Edge
Go to Settings
Choose Privacy, Search, and Services.
Scroll down to the Security section.
Set or alternate secure DNS provider
Close the Settings and Exit.
DNS over HTTPS or DoH protocol encrypts the data and improves overall online privacy and security of the network.
Let’s get started!
Navigate to browser Settings in Edge.
Chose the Privacy, Search, and Services section.
Switch to the Right-pane and scroll down to the Security section.

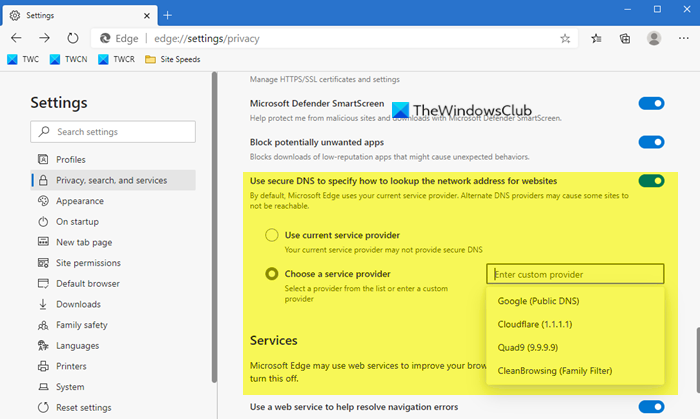
Under it, look for the setting bearing the following description – Use Secure DNS to specify how to look up the network address for websites.
Here, you will notice that Edge, by default, uses the current service provider. However, you can also enable the ‘choose a service provider’ option if the active provider lacks support for a Secure DNS (Domain Name System).
When you switch to the latter option i.e., Choose a service provider, you will see a list of service providers. Choose the one you wish to use.
CleanBrowsing
Google
Cloudflare
Quad9
Once done, the Secure DNS feature in Edge browser will be enabled
If required, you can switch to a custom service provider. Simply copy-paste the DNS server address into the empty field.
You can select a number of domains that have been reserved under policy grounds. All of them have been temporarily delegated by IANA for the IDN Evaluation being conducted by ICANN.
You need to understand the Secure DNS works only when you browse websites using the Edge browser. If you use another web browser, it may use the standard DNS technology. If you want this extra security across the system/network, you will have to set it up in the Network Preferences. The problem is that your OS may not support Secure DNS yet.
Source: windowsclub
The Tech Platform


Comments