
How To Build Your Own Chatbot Using Deep Learning
- The Tech Platform

- Nov 8, 2020
- 9 min read
Updated: Feb 27, 2024
In this comprehensive step-by-step guide, we will walk through the process of creating a domain-specific intelligent chatbot solution using deep learning with Keras. Rather than relying on pre-existing bot development frameworks or platforms, we will build our chatbot from scratch, allowing for a deeper understanding of the underlying concepts and mechanisms.


Conceptual Overview:
Before delving into the coding aspect, it's crucial to grasp some fundamental design concepts. At the core of our chatbot's functionality lies the understanding of user intents. An intent represents the purpose or goal behind a user's message when interacting with the chatbot. These intents are central to guiding the chatbot's responses and actions.
Defining Intents:
The first step is to identify and define the intents relevant to the domain of our chatbot. Intents can vary depending on the specific application or industry. By understanding the typical interactions users will have with the chatbot, we can enumerate the various intents it needs to recognize and respond to effectively.
Training Data Generation:
With the intents defined, we proceed to create a dataset for training our chatbot model. Since this is a simple chatbot, we can generate our own training data rather than relying on large external datasets. Each training sample consists of a user message and its corresponding intent label. This dataset serves as the foundation for training our deep learning model.
Model Training:
Using the Keras framework, we design and train our deep learning model to recognize intents from user messages. The training data serves as the input (X), while the intent labels serve as the target categories (Y). Through an iterative process of training and evaluation, the model learns to accurately classify user intents.
Integration and Deployment:
Once the model is trained and validated, we integrate it into our chatbot application. This involves developing the necessary infrastructure for receiving user messages, passing them through the model for intent recognition, and generating appropriate responses based on the recognized intent. The chatbot is then ready for deployment in real-world scenarios.
Implementation
STEP 1: Required Packages
Before we begin building our chatbot, we need to ensure that we have the necessary Python packages installed.
Here are the required packages along with their versions:
tensorflow==2.3.1: TensorFlow is a popular open-source machine learning framework developed by Google.
nltk==3.5: NLTK (Natural Language Toolkit) is a powerful library for natural language processing tasks such as tokenization, stemming, tagging, parsing, and more.
colorama==0.4.3: Colorama is a library used for adding colored text and styling to terminal output.
numpy==1.18.5: NumPy is a fundamental package for numerical computing with Python, providing support for arrays, matrices, and mathematical operations on them.
scikit_learn==0.23.2: Scikit-learn is a library for machine learning algorithms and utilities, including tools for data preprocessing, model evaluation, and more.
Flask==1.1.2: Flask is a lightweight web framework for building web applications in Python.
pip install tensorflow==2.3.1
pip install nltk==3.5
pip install colorama==0.4.3
pip install numpy==1.18.5
pip install scikit_learn==0.23.2
pip install Flask==1.1.2
STEP 2: Define Intents
Now, let's define the intents for our chatbot. Intents represent the various purposes or goals behind user messages. Each intent consists of patterns (user messages) and corresponding responses. We'll organize these intents into a JSON file named "intents.json".
{
	"intents": [
    {
	"tag": "greeting",
	"patterns": ["Hi", "Hey", "Is anyone there?", "Hello", "Hay"],
	"responses": ["Hello", "Hi", "Hi there"]
    },
    {
	"tag": "goodbye",
    "patterns": ["Bye", "See you later", "Goodbye"],
    "responses": ["See you later", "Have a nice day", "Bye! Come back
     again"]
    },
    {
	"tag": "thanks",
    "patterns": ["Thanks", "Thank you", "That's helpful", "Thanks for
    the help"],
    "responses": ["Happy to help!", "Any time!", "My pleasure", "You're
    most welcome!"]
    },
    {
	"tag": "about","patterns": ["Who are you?", "What are you?", "Who
    you are?" ],
    "responses": ["I.m Joana, your bot assistant", "I'm Joana, an
    Artificial Intelligent bot"]
    },
    {
	"tag": "name",
    "patterns": ["what is your name", "what should I call you", "whats
    your name?"],
    "responses": ["You can call me Joana.", "I'm Joana!", "Just call me
    as Joana"]
    },
    {
	"tag": "help",
    "patterns": ["Could you help me?", "give me a hand please", "Can
    you help?", "What can you do for me?", "I need a support", "I need
    a help", "support me please"],
    "responses": ["Tell me how can assist you", "Tell me your problem
    to assist you", "Yes Sure, How can I support you"]
    },
    {
	"tag": "createaccount",
    "patterns": ["I need to create a new account", "how to open a new
    account", "I want to create an account", "can you create an account
    for me", "how to open a new account"],
    "responses": ["You can just easily create a new account from our
    web site", "Just go to our web site and follow the guidelines to
    create a new account"]
    },
    {
	"tag": "complaint",
    "patterns": ["have a complaint", "I want to raise a complaint",
    "there is a complaint about a service"],
    "responses": ["Please provide us your complaint in order to assist
    you", "Please mention your complaint, we will reach you and sorry
    for any inconvenience caused"]
    }
	]
}
STEP 3: Data Preparation
In this step, we'll prepare the data required for training our chatbot. This involves importing necessary packages, loading intents from a JSON file, and extracting the relevant data such as training sentences, labels, and responses.
Import Necessary Packages:
import json
import numpy as np
import tensorflow as tf
from tensorflow import keras
from tensorflow.keras.models import Sequential
from tensorflow.keras.layers import Dense, Embedding, GlobalAveragePooling1D
from tensorflow.keras.preprocessing.text import Tokenizer
from tensorflow.keras.preprocessing.sequence import pad_sequences
from sklearn.preprocessing import LabelEncoderjson: This package is used to work with JSON data, which is a popular format for storing and exchanging structured data.
numpy: NumPy is a fundamental package for numerical computing with Python, providing support for arrays, matrices, and mathematical operations on them.
tensorflow and keras: TensorFlow is an open-source machine learning framework, and Keras is an API used for building and training deep learning models.
LabelEncoder: This class from scikit-learn is used to encode categorical labels into numerical form.
Load Intents from JSON File:
with open('intents.json') as file:
	data = json.load(file)
Here, we open the "intents.json" file, which contains the intents for our chatbot, using the open() function.
The json.load() function is then used to load the JSON data from the file into the data variable.
Extract Training Sentences, Labels, and Responses from Intents:
training_sentences = []
training_labels = []
labels = []
responses = []

for intent in data['intents']:
	for pattern in intent['patterns']:
		training_sentences.append(pattern)
		training_labels.append(intent['tag'])
	responses.append(intent['responses'])

	if intent['tag'] not in
		labels: labels.append(intent['tag'])

num_classes = len(labels)
In the above code:
We iterate over each intent in the loaded JSON data.
For each intent, we iterate over the patterns (user messages) and extract them as training sentences, while also extracting the corresponding intent tag as training labels.
We collect the responses associated with each intent for later use.
Additionally, we maintain a list of unique intent labels.
Finally, we determine the number of unique intent labels (classes) for classification.
STEP 4: Label Encoding and Tokenization
In this step, we'll perform label encoding to convert the target labels into a format understandable by the model, and tokenization to vectorize our text data corpus. Let's break down the process:
Label Encoding:
The variable training_sentences contains all the training data, i.e., the sample messages in each intent category. The training_labels variable holds all the target labels corresponding to each training data.
//Label Encoding
lbl_encoder=LabelEncoder()
lbl_encoder.fit(training_labels)
training_labels=lbl_encoder.transform(training_labels)
The LabelEncoder class from scikit-learn is used to encode categorical labels into numerical form. It assigns a unique integer to each unique label, making it easier for the model to understand and process the labels during training.
Tokenization:
We'll vectorize our text data corpus using the Tokenizer class, which allows us to convert text into numerical sequences. Additionally, we'll set limits on the vocabulary size and handle out-of-vocabulary words.
// Tokenization
vocab_size=1000
embedding_dim=16
max_len=20
oov_token="<OOV>"

tokenizer=Tokenizer(num_words=vocab_size, oov_token=oov_token)
tokenizer.fit_on_texts(training_sentences)
word_index=tokenizer.word_index
sequences=tokenizer.texts_to_sequences(training_sentences)
padded_sequences=pad_sequences(sequences, truncating='post', maxlen=max_len)Tokenizer: The Tokenizer class from Keras is used to preprocess text data. It converts text into a sequence of tokens or integers. We specify the num_words parameter to limit the vocabulary size, oov_token parameter to handle out-of-vocabulary words, and fit_on_texts() method to create the word index based on the training sentences.
pad_sequences: This function is used to ensure that all sequences have the same length by padding or truncating them as needed. We specify the maximum length (max_len) to ensure uniformity in sequence length.
STEP 5: Model Training
In this step, we define the architecture of our neural network model using the Sequential model class from Keras. We then compile the model with appropriate loss function, optimizer, and metrics, and proceed to train the model using the training data.
Define Model Architecture:
We use the Sequential model class from Keras to define our neural network architecture. The architecture consists of an embedding layer, followed by global average pooling, and multiple dense layers.
// Define Model Archiecture
model=Sequential()
model.add(Embedding(vocab_size, embedding_dim, input_length=max_len))
model.add(GlobalAveragePooling1D())
model.add(Dense(16, activation='relu'))
model.add(Dense(16, activation='relu'))
model.add(Dense(num_classes, activation='softmax'))
Embedding Layer: This layer converts integer indices into dense vectors of fixed size. It is used to create word embeddings, which capture semantic meanings of words.
GlobalAveragePooling1D: This layer computes the average of the embeddings across the sequence dimension, effectively reducing the sequence length to a fixed size.
Dense Layers: These are fully connected layers that perform non-linear transformations on the input data.
Activation Functions: ReLU (Rectified Linear Unit) activation function is used in the
dense layers for introducing non-linearity.
Output Layer: The output layer consists of num_classes neurons with softmax activation, which outputs probability scores for each class.

Compile the Model:
After defining the model architecture, we compile the model with appropriate loss function, optimizer, and metrics.
model.compile(loss='sparse_categorical_crossentropy',
              optimizer='adam',
              metrics=['accuracy'])
Loss Function: We use sparse categorical crossentropy as the loss function since we are dealing with integer-encoded labels.
Optimizer: Adam optimizer is used for gradient descent optimization.
Metrics: We monitor the accuracy of the model during training.
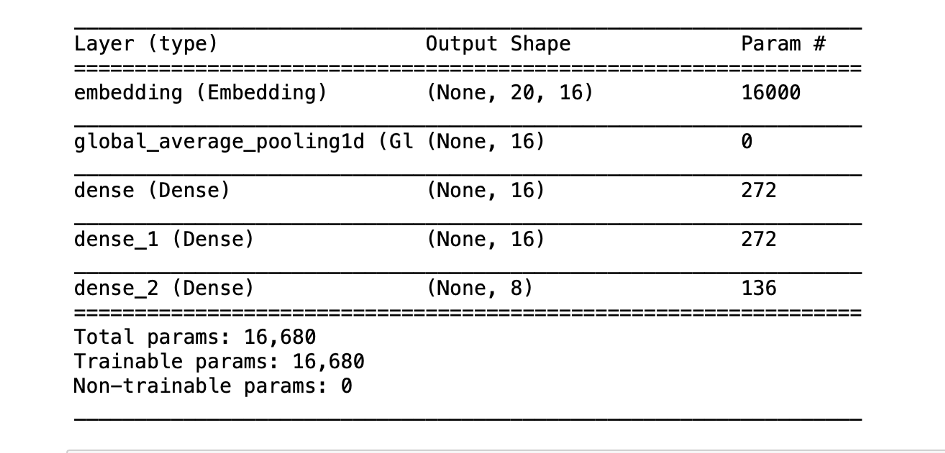
Model Summary:
We can print a summary of the model architecture to visualize the layers and parameters.
model.summary()This provides a concise overview of the model architecture, including the number of parameters in each layer.
Train the Model:
Now, we train the model using the fit method, passing the padded sequences (input data) and corresponding training labels.
# Train Model
epochs = 500 history = model.fit(padded_sequences, np.array(training_labels), epochs=epochs)epochs: This parameter specifies the number of times the model will iterate over the entire training dataset.
history: The fit method returns a History object containing information about the training process, such as loss and accuracy metrics over epochs.
STEP 6: Model Saving
After training our chatbot model, it's essential to save all the necessary components for later use during inference. This step involves saving the trained model, fitted tokenizer object, and fitted label encoder object to disk.
Save Trained Model:
We save the trained model using the save() method provided by Keras. This method saves the entire model architecture, weights, and training configuration to a single file.
# Save Trained Model model.save("chat_model")This line saves the trained model with the name "chat_model" to the current directory.
Save Tokenizer:
We use the pickle module to serialize the tokenizer object and save it to a file. This tokenizer will be used to preprocess text data during inference.
# Save Tokenizer
with open('tokenizer.pickle', 'wb') as handle: pickle.dump(tokenizer, handle, protocol=pickle.HIGHEST_PROTOCOL)
Here, we open a file named "tokenizer.pickle" in binary write mode and use pickle.dump() to serialize and save the tokenizer object to the file.
Save Label Encoder:
Similarly, we save the fitted label encoder object using the pickle module. This encoder will be used to encode categorical labels during inference.
# Save Label Encoder
with open('label_encoder.pickle', 'wb') as ecn_file: pickle.dump(lbl_encoder, ecn_file, protocol=pickle.HIGHEST_PROTOCOL)
Here, we open a file named "label_encoder.pickle" in binary write mode and use pickle.dump() to serialize and save the label encoder object to the file.
STEP 7: Inference
In this step, we implement a chat function that allows users to interact with the trained chatbot model. When a new user message is received, the chatbot predicts the intent behind the message and generates an appropriate response.
import json
import numpy as np
from tensorflow import keras
from sklearn.preprocessing import LabelEncoder

import colorama
colorama.init()
from colorama import Fore, Style, Back

import random
import pickle

# Load intents from JSON file
with open("intents.json") as file:
    data = json.load(file)

def chat():
    # Load trained model
    model = keras.models.load_model('chat_model')

    # Load tokenizer object
    with open('tokenizer.pickle', 'rb') as handle:
        tokenizer = pickle.load(handle)

    # Load label encoder object
    with open('label_encoder.pickle', 'rb') as enc:
        lbl_encoder = pickle.load(enc)

    # Parameters
    max_len = 20

    while True:
        print(Fore.LIGHTBLUE_EX + "User: " + Style.RESET_ALL, end="")
        inp = input()
        if inp.lower() == "quit":
            break

        # Preprocess user input
        sequence = tokenizer.texts_to_sequences([inp])
        padded_sequence = keras.preprocessing.sequence.pad_sequences(sequence, truncating='post', maxlen=max_len)

        # Predict intent
        result = model.predict(padded_sequence)
        tag = lbl_encoder.inverse_transform([np.argmax(result)])

        # Find corresponding intent
        for intent in data['intents']:
            if intent['tag'] == tag:
                print(Fore.GREEN + "ChatBot: " + Style.RESET_ALL, np.random.choice(intent['responses']))

print(Fore.YELLOW + "Start messaging with the bot (type quit to stop)! " + Style.RESET_ALL)
chat()
You can see that it’s working perfectly!!!

Integration With Chat Applications
This Flask application provides an interface for integrating the trained chatbot model with other applications or services. It listens for HTTP POST requests containing a message sent to the '/chat' endpoint and returns a JSON response containing the chatbot's reply.
from flask import Flask, request, jsonify
import json
import numpy as np
from tensorflow import keras
import pickle

app = Flask(__name__)

# Load model and tokenizer
model = keras.models.load_model('chat_model')
with open('tokenizer.pickle', 'rb') as handle:
	tokenizer = pickle.load(handle)

@app.route('/chat', methods=['POST'])
def chat()
   data = request.get_json()
   message = data['message']

	max_len = 20
    result = model.predict(keras.preprocessing.sequence.pad_sequences(tokenizer.texts_to_sequences([message]), truncating='post', maxlen=max_len))
    predicted_class = np.argmax(result)

    with open('intents.json') as file:
        intents = json.load(file)

    for intent in intents['intents']:
        if intent['tag'] == predicted_class:
           response = np.random.choice(intent['responses'])
            return jsonify({'response': response})

if name == '__main__':
    app.run(debug=True)
Conclusion
In conclusion, we've covered the development of a chatbot model using deep learning from scratch. This approach allows for engaging with real users effectively.
For further enhancements:
Leverage More Data: Increasing the training dataset size with diverse intents can improve the chatbot's performance.
Explore NLP Techniques: Incorporate techniques like Named Entity Recognition (NER) and Sentiment Analysis to enrich the chatbot's capabilities. NER helps identify entities in user messages, while Sentiment Analysis detects different sentiment tones, enhancing interactions.
Experiment with Neural Network Architectures: Try various neural network architectures and hyperparameters to optimize performance.
Add Emojis: Integrate emojis to make conversations more expressive and engaging for users.
By exploring these avenues, you can enhance the functionality and effectiveness of your chatbot across different domains.


Comments