Get Started With SharePoint Migration From SharePoint On-Premise To Online Using ShareGate
- Dhruvin Shah

- Mar 14, 2019
- 4 min read
Overview
In this article, we will learn how we can start the migration from source site collection to the destination site collection. Then, we will talk about "Incremental Delta Sync" for the migration and at last, will talk about common migration errors and their resolution.
If you didn’t visit my previous articles of this series, please do visit using the following URLs.
So now, let’s get started!
Start Migration on On-Premise Site Collection to Online
Please make sure all the documents/files are checked in before performing the migration.
Sharegate should be installed on On-premise environment so that it will be able to connect to the On-premise farm.
Your team should have the farm administrative and site collection administrator user account through which they can perform the migration.
For destination, you should have Global Administrator/SharePoint Online Administrator account.
Open Sharegate and go to the Migration tab.
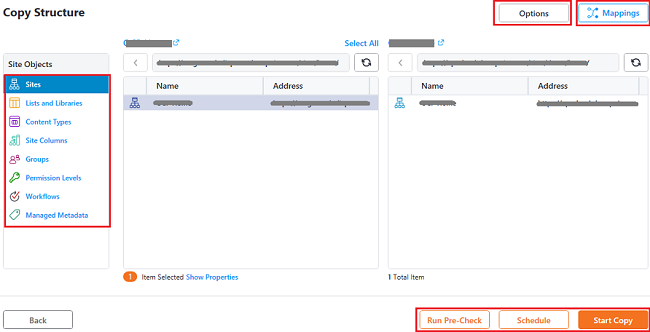
Click on “Copy Structure” in “Migration” tab from the left navigation panel.
Note: “Copy structure” will migrate Sites, List and Libraries, User and Groups, Managed Metadata, etc.“
Copy Content” will migrate only the content of the Lists/Libraries.
Enter the source site collection URL with “Full Control” permissions to the user account credentials and click on the “Connect” button. Next, select source root site and click the “Next” button.
After connecting to the source, enter target URL with “Full Control” permissions to user account credentials and click the “Connect” button. Next, select the destination root site and click “Next”.
Note: I recommend connecting On-Premise/Online site collections using SharePoint Online Administrative permission user account for migration.
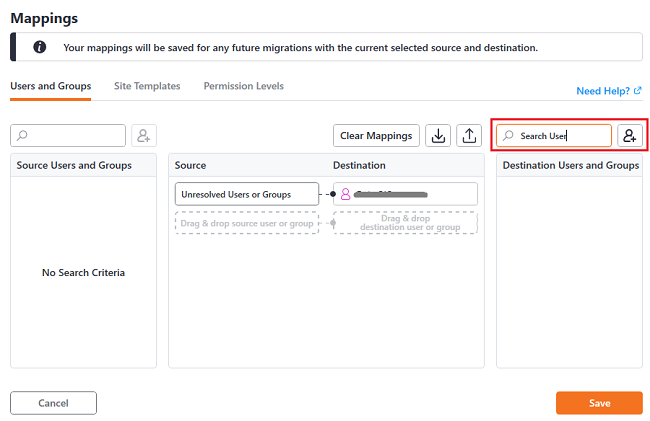
In “Copy Structure” tab, select site collection and click on “Mappings”.
In the Mappings window, we can map unsolved sources, such as Users and Groups, Site Templates, and Permission Levels.
Note We map a user because the source site users or groups may not be available in the target site collection; so, it will assign the missing users’ content to the mapped user in a target site collection.
Save the mappings and close the window.
Next, we need to click the “Options” button from the top-right side.
Note I recommend looking at the “Options” before “Start Copy”. Make changes in configurations available in “Options” window.
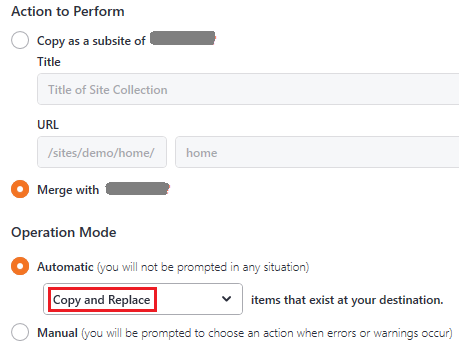
We need to select “Merge with” <Site Title> under “Action to Perform” section, it will copy the content of the source site collection to the test site collection.
Under the Operation Mode section, select “Automatic” and under that, select the “Copy and Replace” option.
While migrating for the first time, we select Copy and Replace.
Under the Configuration section, we can configure what things we can include or exclude from the migration.
After checking all the necessary configuration options, just close the window.
We recommend running Pre-Check reports before performing an actual migration. So, before starting the actual migration, please go through the pre-check report and resolve the issues.
Click on “Start Copy” and it will start the migration from source to destination.
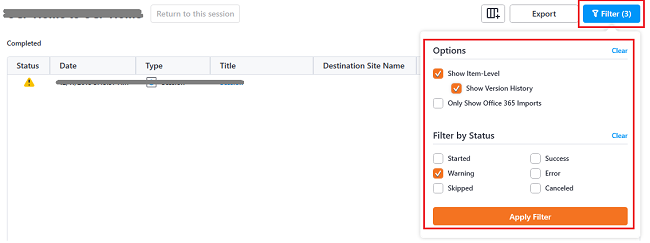
After completion of the migration, it will display a migration report.
We can also filter the errors, warnings, etc. by clicking on “Filter”.
Perform Incremental Delta Sync
We perform delta sync to finalize the migration from a source environment to the destination once we have performed the initial migration. We have to verify the initial migration and when you want to make it live, you should perform incremental migration.
Repeat Step 1 to Step 5 from the above section.
After performing these steps, select “Automatic” and “Copy If Newer (Incremental)” under “Operation Mode”.
The rest of the steps are the same as mentioned in the above section.
Now, let’s check some common migration errors, with their resolution.
Common Migration Errors
There will be errors of custom solutions and features deployed in the farm. So, you can ignore those errors.
Customized pages will not get migrated as they are available in custom solutions.
Running Workflow instances will not get migrated to Online using Sharegate Migration.
Apart from this, you will have some common migration issues. Here, I have mentioned these issues with resolution.
Error 1
Cannot perform this operation because the item you try to replace is currently checked out <file name> by <user name>.
Solution - This error occurs if any content is checked out by any users in the source environment. We should make sure before starting the migration that all the content in the source environment is checked in.
Error 2
<option name> option does not exist in choice field in <source list name>
Solution - The error occurs because the specified value is not a valid choice for this column. The most common cause for this is if there was a value that was a valid choice in the past and was used in some items, but it has now been removed from the list of valid choices.
Temporarily set the problematic column to allow fill-in choices while you perform the migration with Sharegate.
Go to the list/library settings on the destination site.
Click on the column and setting "Allow 'Fill-in' choices" to Yes.
Error 3
Cannot detect feature when doing pre-migration check
Solution - There is no solution/workaround for this. If there is a missing or obsolete feature in the destination version of SharePoint that you are migrating to, the Sharegate Desktop will not be able to detect it.
Error 4
Office 365 Throttling – When running your Office 365 migration you may get an error indicating the status code 429 Too Many Requests.
Solution
Sharegate Desktop's goal is to complete your migration simply and efficiently - and that means processing the requests as fast as possible.
Due to this, there might be a heavy load on your tenant that contributes to throttling.
The best way to prevent throttling is to schedule large migration procedures outside of business hours.
If you are dealing with a business that runs across different time zones (thus eliminating the opportunity to run the migration with low server load), review the applications that use your tenant to run. Limiting background application activity during the migration procedure reduces the chance of throttling.
If neither of those options is possible, it may be the best to split a large migration into smaller intervals. Migrate a bit at a time, and the request load on the server will be significantly less.
Conclusion
I hope now you have a clear idea of the entire migration process using Sharegate. Stay connected with me for more amazing articles!


Comments