Developing SharePoint Web Parts With ReactJS - Part Two
- Nakkeeran Natarajan

- Apr 29, 2019
- 2 min read
Introduction
In this article, you will learn how to develop SharePoint web parts using React JavaScript library and with the help of offline React compilers.
In my previous article, you have learned the basics, prerequisites, and the environment setup for developing SharePoint web parts using React offline compilers.
Steps Involved
Create/ Open project
Open the project using IDE - in this case, Visual Studio code. If you don't have any IDE, you can simply use notepad to create necessary files.
Create necessary files
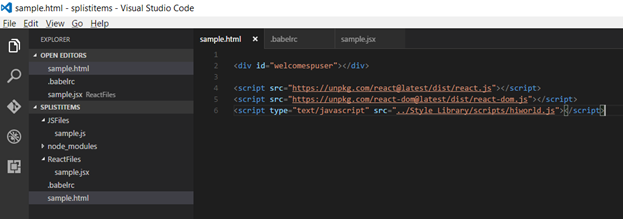
HTML file to hold the html elements.
<div id="welcomespuser"></div>
<script src="https://unpkg.com/react@latest/dist/react.js">
</script> <script src="https://unpkg.com/react-dom@latest/dist/react-dom.js">
</script> <script type="text/javascript" src="../Style Library/scripts/hiworld.js">
</script>
Create folder to hold the React components (.jsx files).
Create a .jsx file to put the React data (sample.jsx).
class GetUserDetails extends React.Component{
constructor(props) {
super(props);
this.state = {
user:""
};
}
componentWillMount(){
this.GetListItems();
}
GetListItems(){
var reactHandler = this;
var request = new XMLHttpRequest();
request.open('GET', `/_api/Web/CurrentUser?
$select=Title`, true);
request.setRequestHeader('Accept', 'application/json;odata=verbose;');
request.onreadystatechange = function()
{
if (request.readyState === 4 && request.status === 200){
var returnedJson = JSON.parse(request.responseText);
if(returnedJson.d != null && returnedJson.d.Title != null)
{
reactHandler.setState(
{
user: returnedJson.d.Title
}
);
}
}
else
if (request.readyState === 4 && request.status !== 200)
{
console.log('Error in retrieving data!');
}
};
request.send();
}
render(){
return (
<div>
Welcome {this.state.user}!
</div>
);
} }
ReactDOM.render(
<GetUserDetails />, document.getElementById('welcomespuser')
);
Create a folder to hold JavaScript files. JavaScript files will not be created manually here. The files (generated) translated using the babel compiler will be present here.
From the root folder, create .babelrc file. This will help in compiling your JSX content into any virtual DOM elements. The file will contain the following code snippet.
{
"plugins": ["transform-react-jsx"]
}
The React component file will then, be translated to JavaScript file using babel compiler. Run the following command from the root folder to translate the .jsx content using the command prompt.
babel --preset react ReactFiles --watch --out-dir JSFiles
The following snapshot shows the auto generated JavaScript file.
Note - The basic folder structure of the current project is shown below.
Deploy/ Run
Drop the HTML and JavaScript files into the SharePoint site (here, style library). Create any page with content editor web part or normal custom editor web part. Refer to the HTML and JavaScript files from the web parts, and then execute/run the page.
The below snapshot shows the content editor web part in edit mode which shows the HTML reference file placed on style library. The web part also displays the React component results (username of current logged in user). Similarly, the other data can be retrieved and shown.
Summary
Thus, you have learned developing the SharePoint web part using React components. The React file is compiled and translated to JavaScript file using the babel compiler. The translated JavaScript files are then used as references in HTML of SharePoint web part.


Comments