
Creating Scheduled Jobs Using Hangfire
- The Tech Platform

- Apr 14, 2022
- 5 min read
In this article, we will make a .NET CORE application that sends mail using the Hangfire framework. Without giving much theoretical information about Hangfire, I will try to provide information such as what Hangfire is, its purposes of use, use of Hangfire dashboard through the demo application. In our demo application, we will write web-APIs that are sent once, after a certain period of time, at certain intervals, and that send mail within certain rules.
What is Hangfire?
Is an open-source framework that helps you to create, process, and manage your background jobs in a reliable way.
It has different usages like Fire-and-Forget Jobs, Delayed Jobs, Recurring Jobs, and Continuations. Also If you have a pro account you can use Batches and Batch Continuations.
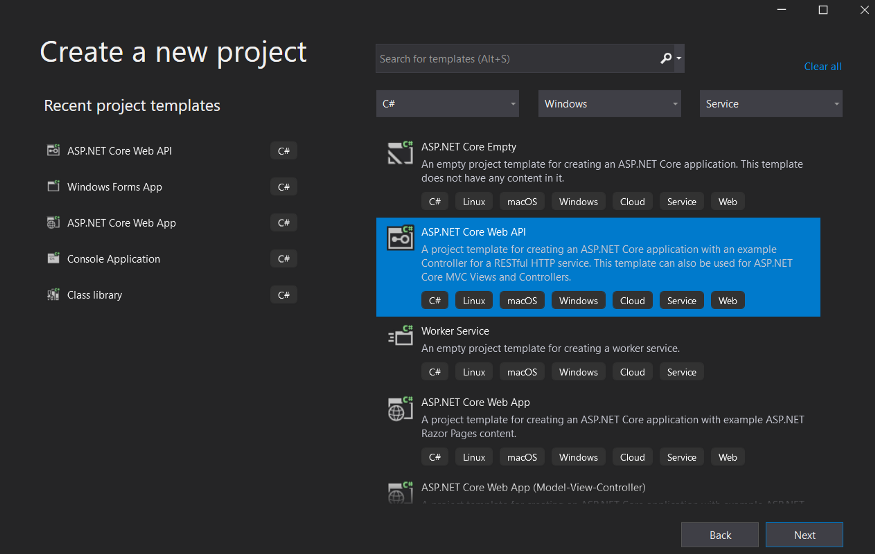
First of all, we create an ASP.NET Core Web API project through visual studio.
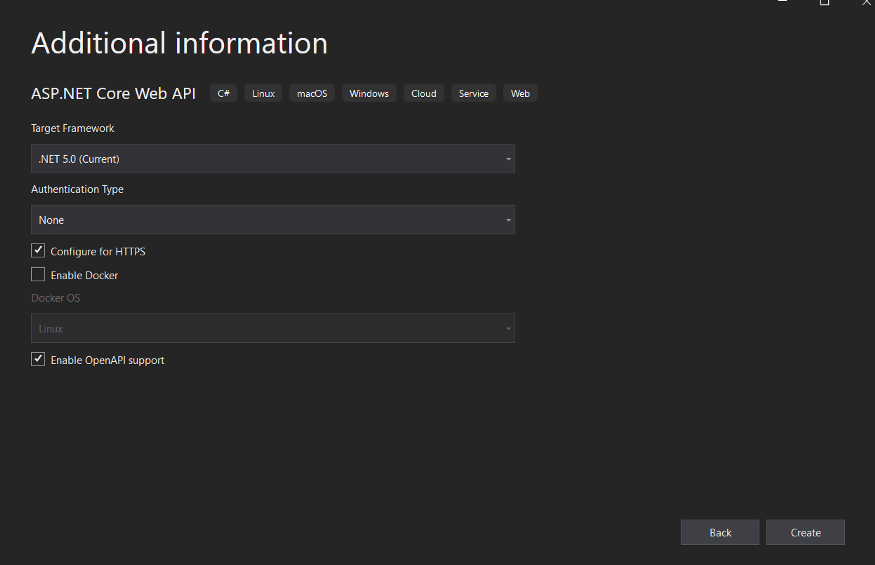
After giving your project a suitable name, choosing the framework, and making the necessary configuration choices, we continue. (If you select the Enable OpenAPI support option, swagger will come installed in your project, where you can call your services.)
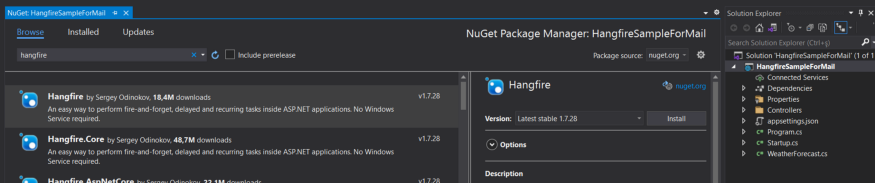
After creating our project, we need to install the Hangfire NuGet package.
After installing the Hangfire framework in our project, we need to configure the database and Hangfire settings in Startup.cs. For this, we need to add the following code block (Code1.1) to the ConfigureServices method in Startup.cs. I used a local database as connection string. You can put your own server’s connection string in this part. We need to manually create the database named “HangfireSample”, which we wrote in the Initial Catalog, in our server. After the project is run, Hangfire will automatically create the tables it will use.
Code 1.1: (Line 3 & 4)
public void ConfigureServices(IServiceCollection services)
{
    services.AddHangfire(x=>x.UseSqlServerStorage
                            (@"Data Source=(localdb)\MSSQLLocalDB;
            Initial Catalog = HangfireSample;
            Integrated Security = True;"));
    services.AddHangfireServer();

    services.AddControllers();
    services.AddSwaggerGen(c=>
    {
        c.SwaggerDoc("v1", new OpenApiInfo
        {
            Title="HangFireSample",
            Version="v1"
        });
    });
}
In another configuration, we add the following code (code 1.2) to the Configure method in Startup.cs. With this code block, when the “hf-dashboard” address is called, it will allow us to access Hangfire’s dashboard. In this section, you can give the name you want instead of “hf-dashboard”.
Code 1.2: (Line 21)
public void Configure(IApplicationBuilderapp, IWebHostEnvironmentenv)
{
    if (env.IsDevelopment())
    {
        app.UseDeveloperExceptionPage();
        app.UseSwagger();
        app.UseSwaggerUI(c=>c.SwaggerEndpoint
                ("/swagger/v1/swagger.json", "HangFireSample v1"));
    }

    app.UseHttpsRedirection();

    app.UseRouting();

    app.UseAuthorization();

    app.UseEndpoints(endpoints=>
    {
        endpoints.MapControllers();
    });

    app.UseHangfireDashboard("/hf-dashboard");
}
Let’s write a helper method for sending mail before creating our API methods. For this, we create a new folder called Helper for the project. Let’s open a class called MailHelper in the folder. I created two methods called SendMail and NotifySystemAdmin in Helper. You can fill in the information in SendMail according to you. Since it is a sample application, I have written the information clearly, if you want a more secure structure, you can get the credential information from the config instead of writing it explicitly. The purpose of the NotifySystemAdmin method is when we write the Continuations method, we will use it for an example of sending mail after a job is triggered.
public class MailHelper
{
public void SendMail(stringusername, stringsubject, stringmailBody)
{
try
{
MailMessagemail = new MailMessage();
SmtpClientSmtpServer = new SmtpClient("smtp.gmail.com");
mail.From = new MailAddress("hangfiresample@gmail.com");
mail.To.Add(username);
mail.Subject=subject;
mail.IsBodyHtml=true;
mail.Body=mailBody;
SmtpServer.Port=587;
SmtpServer.Credentials = new NetworkCredential
("hangfiresample@gmail.com", "hangfire123456");
SmtpServer.EnableSsl=true;
SmtpServer.Send(mail);
}
catch (Exceptione)
{
Console.WriteLine(e);
throw;
}
}
public void NotifySystemAdmin()
{
Console.WriteLine("Continuations will start soon...");
}
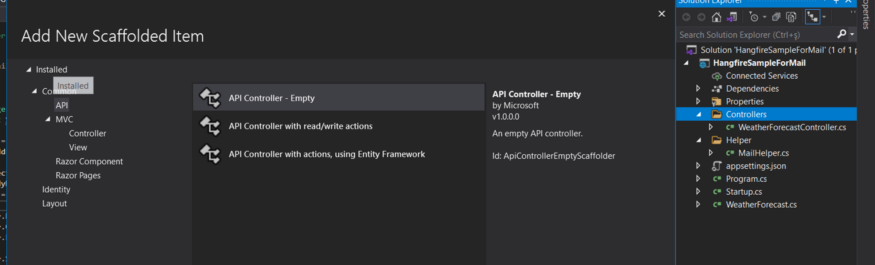
}After creating our Helper method, let’s add a new controller to the Controller section. For this, you can create API Controller — Empty after right-clicking on the controller folder and adding Add > Controller.
After creating a new Controller, we can start writing our first API.
Fire-and-Forget Jobs
using Hangfire;
using HangFireSample.Models;
using Microsoft.AspNetCore.Mvc;

namespace HangFireSample.Controllers
{
    [Route("api/[controller]")]
    [ApiController]
    public class HangFireController : ControllerBase
    {
        MailHelper_mailHelper = new MailHelper();
        [HttpPost]
        [Route("welcome")]
        public IActionResult Welcome(string mailAddress)
        {
            //Fire-and-Forget Jobs
            //Fire - and - forget jobs are executed only once and almost immediately after creation.
            var mailSubject = $"Welcome {mailAddress}";
            var mailBody = $"<p>Thanks for join us!</p>";
            var jobId = BackgroundJob.Enqueue(()=>_mailHelper.SendMail(mailAddress, mailSubject, mailBody));
            return Ok($"JobId : {jobId} Completed. Welcome Mail Sent");
        }
    }
}
The purpose of the Welcome method is to send a one-time mail to the user. We write the code that will send the mail via the BackgroudJob.Enqueue method, with the mail information received in the method signature and the mail header and body information that we have determined in the method. We call the SendMail method, which we wrote in the MailHelper class before, to the Enqueue method, and we send the mail contents that we have determined in our API.
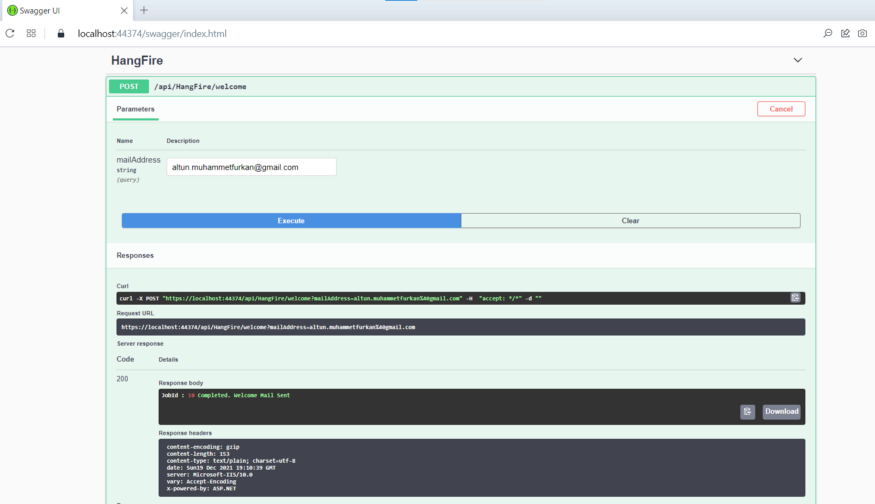
After running our project, we can call the welcome method under the Hangfire controller via swagger as follows. After calling the service with a valid e-mail address, you can see that the e-mail is sent.
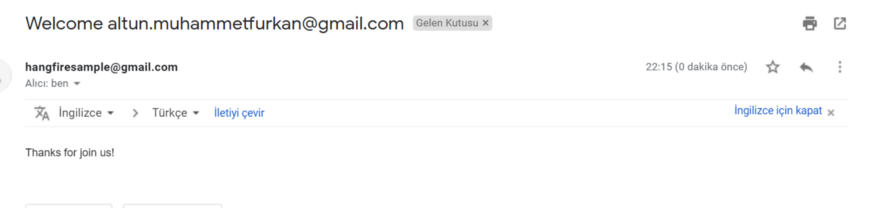
Note: We need to change the security definitions of the Gmail address we defined in MailHelper.cs from the Gmail service settings, otherwise it may not be able to connect to the mail server for security reasons. Emails may go to spam after sending.
Delayed Jobs
Another type of Hangfire job is Delayed Jobs. Delayed Jobs are used for jobs that we can run with a certain delay time. Let’s add the following API method to our HangfireController. Again, we define the mail subject and body in the method. E-mail is sent 20 seconds after the job starts.
[HttpPost]
[Route("welcome-delayed")]
public IActionResult WelcomeDelayed(stringmailAddress)
{
    //Delayed Jobs
    //Delayed jobs are executed only once too, but not immediately, after
    a certain time interval.
    var mailSubject = $"Welcome {mailAddress}";
    var mailBody = $"<p>Thanks for join us!</p></br><p>This mail is
    delayed mail.!</p>";

    var jobId = BackgroundJob.Schedule(() =>
            _mailHelper.SendMail(mailAddress, mailSubject, mailBody),
            TimeSpan.FromSeconds(20));
    return Ok($"JobId : {jobId} Completed. Welcome Mail Sent");
}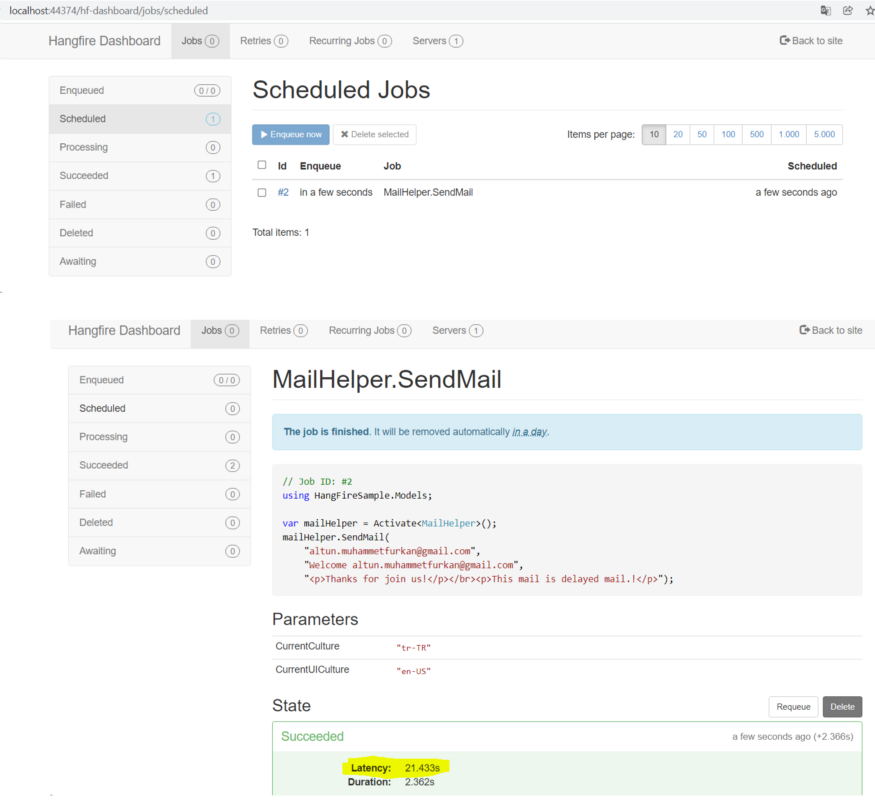
On the Hangfire dashboard, we can see that the job is running with a delay of 20 seconds.
Recurring Jobs
The most used hangfire job type is Recurring Jobs. It is used so that the job can be run again in a certain time interval. For example, daily campaigns, Weekly total sales information, or monthly reports can be sent by mail using recurring jobs. We add our new API to our method in HangfireController as follows. We called our method RecurringJob.AddOrUpdate and specify that the method should run every 1 minute.
 [HttpPost]
 [Route("welcome-recurring")]
 public IActionResult WelcomeRecurring(string mailAddress)
 {
    //Recurring Jobs
    //Recurring jobs fire many times on the specified CRON schedule.
    var mailSubject = $"Welcome {mailAddress}";
    var mailBody = $"<p>Thanks for join us!</p></br><p>This mail is
    recurring every minute</p>";

    RecurringJob.AddOrUpdate(() =>_mailHelper.SendMail
                    (mailAddress, mailSubject, mailBody), Cron.Minutely);
    return Ok($"Recurring job started, mails will send in every minute");
}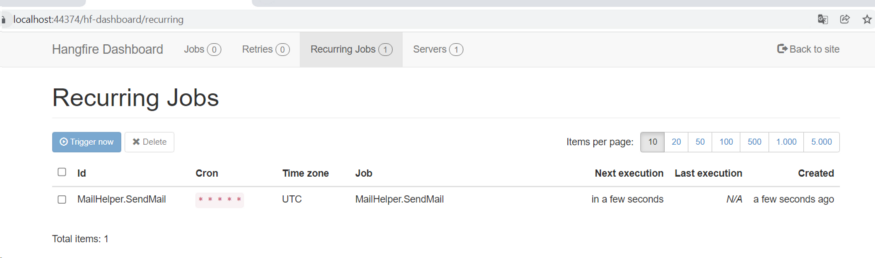
We can follow the Recurring Jobs from the Recurring Jobs section on the Hangfire dashboard. We can see when the job was the last run or created on the dashboard. We can also manually trigger and run the job ahead of its scheduled time. We can stop the ongoing recurring Job.
We can follow the Recurring-Job and other Hangfire jobs from our database from the tables created by Hangfire.
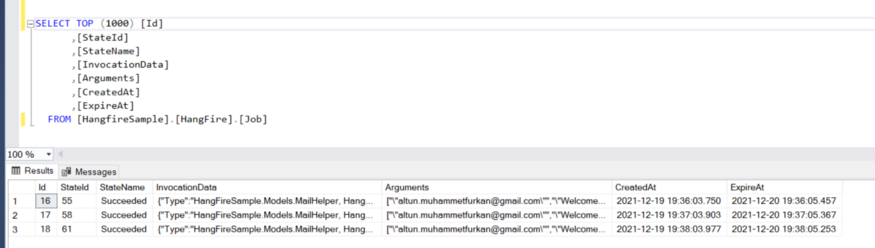
After the recurring job we created above is run, it sends mail every minute. You can follow the status and sending date of the running job from the HangFire.Job table.
Continuations Jobs
Continuations Jobs are used to running a job after a particular job has run. We have created a method called NotifySystemAdmin in MailHelper. After this method works, we will write a job that will run the SendMail method.
[HttpPost]
[Route("welcome-continuation")]
public IActionResult WelcomeContinuation(string mailAddress)
{
    //Continuations Jobs
    //Continuations are executed when its parent job has been finished.

    //First job
    var jobId = BackgroundJob.Enqueue(() =>
                                    _mailHelper.NotifySystemAdmin());

    var mailSubject = $"Welcome {mailAddress}";
    var mailBody = $"<p>Thanks for join us!</p></br><p>This mail is
    continuations hangfire job example.<br>Job started after
    NotifySystemAdmin process</p>";

    BackgroundJob.ContinueJobWith(jobId, () =>
            _mailHelper.SendMail(mailAddress, mailSubject, mailBody));
    return Ok($"Recurring job started, mails will send in every minute");
}
Source: Medium - Furkan ALTUN
The Tech Platform


Comments