Creating Page Layouts with Rich HTML Field Editors on Office 365 SharePoint
- Nakkeeran Natarajan

- Feb 18, 2019
- 2 min read
You would have seen several articles for creating page layouts with custom content types. But in this article let us look how to provision page layouts with multiple rich text fields.
Problem Statement: OOB publishing HTML field (Rich Field Text Column) can be used to create the content type for page layouts manually. But if you require more than one Rich Field Text Column, then we need to create those publishing HTML field programmatically.
Create Page Layout with Rich HTML Fields:
The following are the points to be considered while creating page layouts.
Create Site Columns
Create Site Content type
Add Site Columns to the Content type
Create Page Layout using the Content type.
Since few properties needs to enabled on a field, this is only possible with programming way. The field XML is built and then the field is created using the field XML.
This approach might be possible in multiple programming ways including PowerShell, CSOM PowerShell, CSOM, JSOM or REST API. But in the samples below, let us use PnP PowerShell for provisioning required components. Create Site Columns: The rich field column needs to be created here. Let us create the column programmatically using field XML.
Note: Here you can add/remove the required constraints. The constraints are applied with the help of field control properties. The control properties are listed on the documentation site. For example, in the following sample embedding iFrames are allowed by setting the AllowEmbedding property to true. Similarly, other control properties like AllowExternalUrls, AllowFonts, AllowHtmlSourceEditing, etc., can be set.
The following snippet shows adding the field/column using XML. Connect-PnPOnline -Url https://nakkeerann.sharepoint.com/sites/teamsite -Credentials (Get-Credential)
# create fields with the the help of field XML
$field1XML = "<Field ID='{23e4f26e-a007-473a-9a5a-7e3d9d4002c7}' Name='PublishingPageContent1'
StaticName='PublishingPageContent1' DisplayName='PublishingPageContent1' Type='HTML' Required='FALSE' Sealed='TRUE' RichText='TRUE'
RichTextMode='FullHtml' AllowEmbedding='TRUE' AllowInsert='TRUE' SourceID='http://schemas.microsoft.com/sharepoint/v3' Group='Demo Columns' Description='First Custom Page Content Column created for Page Layout Demo' />"
$field2XML = "<Field ID='{e428cd7b-c4cb-4c86-9b0f-69958322c6dd}' Name='PublishingPageContent2'
StaticName='PublishingPageContent2' DisplayName='PublishingPageContent2' Type='HTML' Required='FALSE' Sealed='TRUE' RichText='TRUE'
RichTextMode='FullHtml' AllowEmbedding='TRUE' AllowInsert='TRUE' SourceID='http://schemas.microsoft.com/sharepoint/v3' Group='Demo Columns' Description='Second Custom Page Content Column created for Page Layout Demo' />"
$richTextField1 = Add-PnPFieldFromXml -FieldXml
$field1XML$richTextField2 = Add-PnPFieldFromXml -FieldXml $field2XML
Create Content Type and Add Fields to Content Type: The custom content type is created by setting base content type. The base content type is Page. Once the custom content type is created, the custom created fields can be added. The following snippet shows both operations.
# create content type
$ParentCT = Get-PnPContentType -Identity Page
$customPageCT = Add-PnPContentType -Name "CustomPageContentType" -Description "Content Type with rich field publishing HTML Columns" -Group "Demo Content Types" -ParentContentType $ParentCT
# Add Created Custom Rich Text Columns to Custom Content Type created
Add-PnPFieldToContentType -Field $richTextField1 -ContentType $customPageCT
Add-PnPFieldToContentType -Field $richTextField2 -ContentType $customPageCT
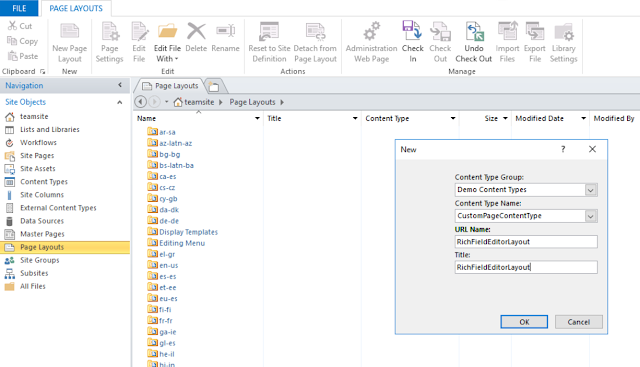
Create Page Layout Manually: Go to SharePoint Designer and create a page layout from the option available on the designer ribbon. Provide the custom page layout name and associate the custom content type by selecting the same.
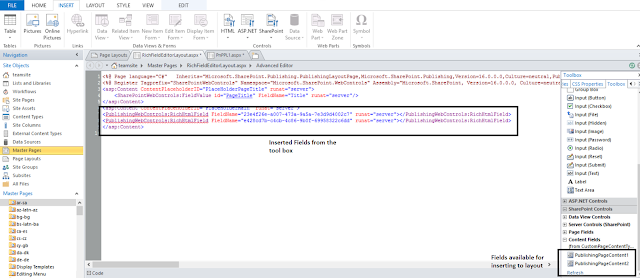
Then insert the rich text fields created into the layout by dragging the elements. Save and publish the page layout.
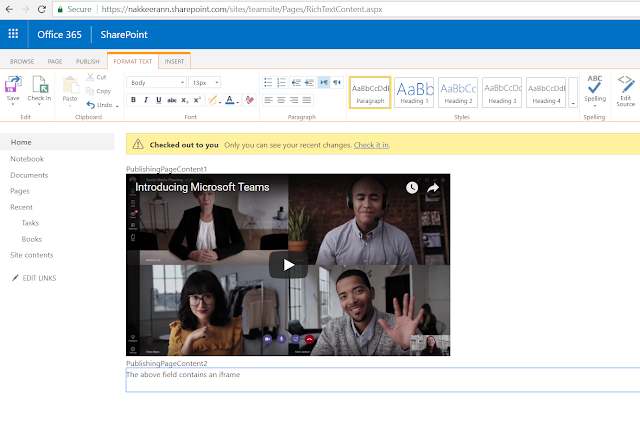
Create the page using custom page layout created. The below snapshot shows the edited page with the rich text columns created.


Comments