Creating An Angular 9 App via CLI
- The Tech Platform

- Dec 12, 2020
- 4 min read
Angular is one of the most popular web frameworks around today! It has a strong following and is maintained and developed by Google. It has been around since September of 2016. Thus, it has great support and having such a great team behind it, we don’t have to worry that it will be abandoned anytime soon! With that little bit of intro into Angular, let’s get started creating an Angular 9 app shall we?
Before we can get started with Angular in any way on our local machine, we need to have Node.js and NPM installed on our system. To do that, go to the Node.js download page and grab the correct package for your system. This package will include both Node.js and NPM. This is required before we can install the Angular CLI.
Here is the video version of this blog post if you would rather watch a video:
Installing Angular CLI
To install the Angular CLI, run the following command npm install -g @angular/cli. This will install the latest version of the Angular CLI, which as of this writing is v9.1.1. You now will have all of the Angular commands available anywhere on your system.
Creating Our Angular App
Now that the CLI is installed, change into the directory that you wish to create the app in. Now we will run the following command to create an Angular app: ng new <your project name here>. This will create an app with all default behaviors and configuration. If you want to create an application with some customized pieces, you can check out all of the options you can pass to ng new command here.
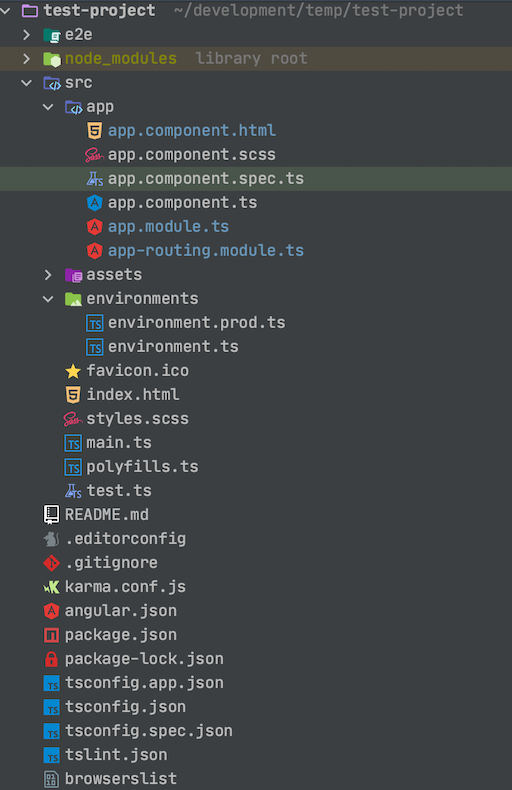
Let’s take a look at the layout of the generated application:
The main part of our Angular application that we will be adding our custom code to is src/app. This is where all of our custom components and services will reside.
We have our shiny new base Angular 9 app all ready to go. If you now run npm start, your app should compile and start a development server at http://localhost:4200. Of course we want to customize our Angular app! So next up we will create a custom component and wire it up in our app.
Customizing Our Angular App
Creating A Custom Component
Let’s start customizing our app now by adding a custom component and custom service. First, we’ll create the component. To create a custom component, we’ll run the ng g c <custom component name> -m app. Do not include the word Component in the component name in the previous command as Angular does that by default. Otherwise you’ll end up with a component that has the word Component in it twice.
We specify that we want this new component to be associated with the base app module by passing -m app flag to the generate component command. This automatically adds the references for the new component to the app.module.ts. This saves us having to add it manually ourselves.
Our new component should now be found at src/app/<new component name>. So lets say our new component name was new, we would find our new component at src/app/new as shown below.
Go ahead and edit the new.component.html file to include whatever HTML you desire. This is the file that will be the HTML for our new component. The logic to handle events will go into the new.component.ts file. Any styles you wish to add specific to the component will go into the component’s style file. Here my project was generated with SCSS stylesheets. Yours could use normal CSS, Less, SASS, or something else.
Now we need to add a route to the app-routing.module.ts so that we can see our new component in action! Open up app-routing.module.ts and add the following to the Routes array:
const routes: Routes = [
  {
    component: NewComponent, path: 'test', pathMatch: 'full'
  }
];
The Angular compiler should automatically recompile your app when you save your files. So if you now go to http://localhost:4200/test, you should see your new component displayed.
Creating A Custom Service
We have our custom component setup, now let us create a custom service. Services in Angular are the primary place we should place any calls to database logic and/or HTTP network calls. This is because services are shared among all modules and should not store any state like components do. This keeps all of your calls to these outside services consistent across the entire application. To create a service, run the following command:
ng g s test <custom path>This command tells Angular to create a new service called TestService at the <custom path> location. If <custom path> isn’t passed in, it will create the service directly under the src/app directory.
When using services in your app, you will normally always need to add the service to the providers: [] array in the module file you wish to use the service inside of. Here, we only have the app.module.ts module. So we should open that file and update it as such providers: [TestService].
Now open up TestService.ts file and add a public method to it as such:
public getName(): string {
    return 'Test User';
}
Now back in our new.component.ts file, add a public method there as well under the ngOnInit() method that will use our TestService method getName() and display it inside our template. To do so, add the following method:
constructor(private testService: TestService) { }public getName(): string {
  return this.testService.getName();
}
Make sure we add the declaration inside of the constructor as shown above. This injects the service into our component so that we can use it. Now inside our new.component.html file, add a section as shown below so we can test if our service is indeed working:
<p>Hello {{getName();}}!</p>This should show Hello Test User! in your browser that proves our service is working correctly.
Source: Medium.com


Comments