Create, Retrieve, Update Or Delete List Views Using CSOM with PowerShell On SharePoint Online
- Nakkeeran Natarajan

- Feb 27, 2019
- 2 min read
In this article, you will learn how we can retrieve, create, update or delete list views using CSOM with PowerShell. This is mainly focused on using PowerShell scripts for SharePoint online sites.
Get Views:
First we will see how we can get the existing views available on the SharePoint site. The steps followed here are very similar to the steps following CSOM or JSOM programming.
Initialize context object with the site URL parameter. Then initialize the SP Online Credentials with the above parameters and set it to the context.
Then access the list using the context and then the views from the list, load the objects and execute the query.
Loop through the result object and get the necessary view information.
$siteURL = ""
$userId = ""
$pwd = Read-Host -Prompt "Enter password" -AsSecureString
$creds = New-Object Microsoft.SharePoint.Client.SharePointOnlineCredentials($userId, $pwd)
$ctx = New-Object Microsoft.SharePoint.Client.ClientContext($siteURL)
$ctx.credentials = $creds
try
{
$list = $ctx.web.Lists.GetByTitle("TestList")
$views = $list.views
$ctx.load($views)
$ctx.executeQuery()
foreach($view in $views)
{
write-host $view.Title
} }
catch
{
write-host "$($_.Exception.Message)" -foregroundcolor red
}
This will get all the view names available for the list on the site. Next, we will see how we can get one particular list on the site.
Get View:
The operations are similar as the above section. After getting the list views, get the particular view using GetByTitle method.
$siteURL = ""
$userId = "" $pwd = Read-Host -Prompt "Enter password" -AsSecureString
$creds = New-Object Microsoft.SharePoint.Client.SharePointOnlineCredentials($userId, $pwd)
$ctx = New-Object Microsoft.SharePoint.Client.ClientContext($siteURL)
$ctx.credentials = $creds
try
{
$list = $ctx.web.Lists.GetByTitle("TestList")
$view = $list.views.GetByTitle("CustomView")
$ctx.load($view)
$ctx.executeQuery()
write-host $view.Title
}
catch
{
write-host "$($_.Exception.Message)" -foregroundcolor red
}
Create View:
Here we will see how we can create a list view. The following steps depict the flow.
Initialize context object with the site URL parameter. Then initialize the SP Online Credentials with the above parameters and set it to the context.
Initialize the ViewCreationInformation object.
Set the required parameters for new view. The necessary parameters are view name, type and view fields.
Add new view to the view collection. Then Load and execute the query.
$siteURL = ""
$userId = ""
$pwd = Read-Host -Prompt "Enter password" -AsSecureString
$creds = New-Object Microsoft.SharePoint.Client.SharePointOnlineCredentials($userId, $pwd)
$ctx = New-Object Microsoft.SharePoint.Client.ClientContext($siteURL)
$ctx.credentials = $creds
try
{
$list = $ctx.web.Lists.GetByTitle("TestList1")
$views = $list.views
$viewInfo = New-Object Microsoft.SharePoint.Client.ViewCreationInformation
$viewInfo.Title = "CustomView"
$viewInfo.ViewTypeKind = [Microsoft.SharePoint.Client.ViewType]::None
$viewInfo.ViewFields = @("ID", "Title", "Author")
$view = $views.Add($viewInfo)
$ctx.load($view)
$ctx.executeQuery()
write-host $view.Title
}
catch
{
write-host "$($_.Exception.Message)" -foregroundcolor red
}
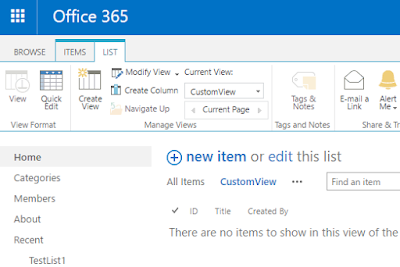
The view will be added to the list. You will now see the view name changes. The following shows you the snapshot.
Delete List View:
Here we will see how we can delete the list view. The following steps depict you the flow.
Initialize context object with the site URL parameter. Then initialize the SP Online Credentials with the above parameters and set it to the context.
Get the list using GetByTitle method and then get views. From the view collection, find out the view to be deleted using GetByTitle method.
Then, remove the view using the delete object method.
Using the context, execute the query.
$siteURL = ""
$userId = ""
$pwd = Read-Host -Prompt "Enter password" -AsSecureString
$creds = New-Object Microsoft.SharePoint.Client.SharePointOnlineCredentials($userId, $pwd)
$ctx = New-Object Microsoft.SharePoint.Client.ClientContext($siteURL)
$ctx.credentials = $creds
try
{
$list = $ctx.web.Lists.GetByTitle("TestList")
$views = $list.views
$view = $views.GetByTitle("CustomView")
$view.DeleteObject()
$ctx.executeQuery()
Write-Host "View Deleted" }
catch
{
write-host "$($_.Exception.Message)" -foregroundcolor red
}
The view will be deleted from the list.
Update List View:
Here we will see how we can update the list view. The following steps depict you the flow.
Initialize context object with the site URL parameter. Then initialize the SP Online Credentials with the above parameters and set it to the context.
Get the list using GetByTitle method and then get views. From the view collection, find out the view to be updated using GetByTitle method.
In my case, I am trying to add a field to the view (Update Operation). You can do your own custom operation with your custom logic here.
Then, update the view using the update method.
Using the context, execute the query.
$siteURL = ""
$userId = ""
$pwd = Read-Host -Prompt "Enter password" -AsSecureString
$creds = New-Object Microsoft.SharePoint.Client.SharePointOnlineCredentials($userId, $pwd)
$ctx = New-Object Microsoft.SharePoint.Client.ClientContext($siteURL)
$ctx.credentials = $creds
try
{
$list = $ctx.web.Lists.GetByTitle("TestList1")
$views = $list.views
$view = $views.GetByTitle("CustomView")
$viewFields = $view.ViewFields
$viewFields.Add("Created")
$view.Update()
$ctx.executeQuery()
}
catch
{
write-host "$($_.Exception.Message)" -foregroundcolor red
}
The view will be updated.


Comments