
CREATE A LOADBALANCER WITH HAPROXY ON AWS USING ANSIBLE
- The Tech Platform

- Jan 23, 2021
- 5 min read


HAproxy
HAProxy is free, open source software that provides a high availability load balancer and proxy server for TCP and HTTP-based applications that spreads requests across multiple servers.
Ansible
Ansible is an open-source software provisioning, configuration management, and application-deployment tool enabling infrastructure as code.
This story demonstrates how one can create a loadbalancer with HAproxy on AWS using Ansible.
Pre-requisites:
Ansible
AWS Account
Process
The first and foremost task is to create a playbook that will bind the processes of creating an instance, and deploying the load balancer web servers. I have used the concept of roles in Ansible for easier management of the whole process. I have also used vaults for the important credentials that I will be requiring for the task.
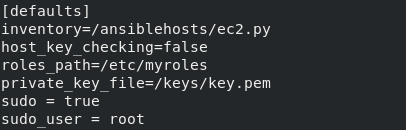
Configuration file for ansible

ansible-playbook
- hosts: localhost
  roles:
          - role: launch1- hosts: tag_Name_LoadBalancer
  remote_user: ec2-user
  become: yes
  become_user: root
  roles:
          - role: lbserver- hosts: tag_Name_Webserver
  remote_user: ec2-user
  become: yes
  become_user: root
  roles:
          - role: webserver
Now lets discuss about different parts of the playbook.
Creating the instances:
1. Each playbook requires one or more hosts where the task is going to be carried.
- hosts: localhost
  roles:
          - role: launch1
This segment selects localhost as the host and uses the role launch1 to create the instances for the loadbalancer and web servers.
2. The structure of role launch1 is

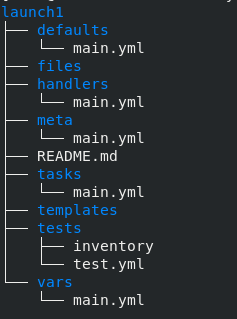
3. The main.yml file in tasks directory consists of all the tasks that creates the EC2 instances on AWS. tasks/main.yml
---
#tasks file for ec2
          - name: Create ec2 key
            ec2_key:
                    name: "key"
                    region: "ap-south-1"
                    aws_access_key: "{{ access_key }}"
                    aws_secret_key: "{{ secret_key }}"
            register: ec2_key
          - name: Save the key in a file
            copy:
              content: "{{ ec2_key.key.private_key }}"
              dest: "/keys/key.pem"
              mode: 0400
            when: ec2_key.changed
          - name: LoadBalancers on aws
            ec2:
                    key_name: "key"
                    instance_type: "t2.micro"
                    image: "ami-0ebc1ac48dfd14136"
                    wait: yes
                    count: 1
                    vpc_subnet_id: "subnet-3df9c355"
                    instance_tags: {"Name":"LoadBalancer"}
                    assign_public_ip: yes
                    region: "ap-south-1"
                    state: present
                    group_id: "sg-035d6d20f3467a621"
                    aws_access_key: "{{ access_key }}"
                    aws_secret_key: "{{ secret_key }}"
            register: ec21
          - name: Webservers on aws
            ec2:
                    key_name: "key"
                    instance_type: "t2.micro"
                    image: "ami-0ebc1ac48dfd14136"
                    wait: yes
                    count: 4
                    vpc_subnet_id: "subnet-3df9c355"
                    instance_tags: {"Name":"Webserver"}
                    assign_public_ip: yes
                    region: "ap-south-1"
                    state: present
                    group_id: "sg-035d6d20f3467a621"
                    aws_access_key: "{{ access_key }}"
                    aws_secret_key: "{{ secret_key }}"
            register: ec22
          - name: Wait for Loadbalancer to launch
            wait_for:
                    host: "{{ item.public_ip }}"
                    port: 22
                    state: started
            with_items: "{{ ec21.instances }}"
          - name: Wait for Webserver to launch
            wait_for:
                    host: "{{ item.public_ip }}"
                    port: 22
                    state: started
            with_items: "{{ ec22.instances }}"
          - name: "Refresh Inventory"
            meta: refresh_inventory
4. The first part is to create the key and save it to a file. This file will be used to login into the instance. It is an essential part since without this key we can’t deploy web server in the instance.
- name: Create ec2 key
            ec2_key:
                    name: "key"
                    region: "ap-south-1"
                    aws_access_key: "{{ access_key }}"
                    aws_secret_key: "{{ secret_key }}"
            register: ec2_key
          - name: Save the key in a file
            copy:
              content: "{{ ec2_key.key.private_key }}"
              dest: "/keys/key.pem"
              mode: 0400
            when: ec2_key.changed
5. The next part creates the instances according to our needs. The ec2 module does just that. It helps us in configuring the instances and then creates them.
- name: LoadBalancers on aws
            ec2:
                    key_name: "key"
                    instance_type: "t2.micro"
                    image: "ami-0ebc1ac48dfd14136"
                    wait: yes
                    count: 1
                    vpc_subnet_id: "subnet-3df9c355"
                    instance_tags: {"Name":"LoadBalancer"}
                    assign_public_ip: yes
                    region: "ap-south-1"
                    state: present
                    group_id: "sg-035d6d20f3467a621"
                    aws_access_key: "{{ access_key }}"
                    aws_secret_key: "{{ secret_key }}"
            register: ec21
          - name: Webservers on aws
            ec2:
                    key_name: "key"
                    instance_type: "t2.micro"
                    image: "ami-0ebc1ac48dfd14136"
                    wait: yes
                    count: 4
                    vpc_subnet_id: "subnet-3df9c355"
                    instance_tags: {"Name":"Webserver"}
                    assign_public_ip: yes
                    region: "ap-south-1"
                    state: present
                    group_id: "sg-035d6d20f3467a621"
                    aws_access_key: "{{ access_key }}"
                    aws_secret_key: "{{ secret_key }}"
            register: ec22
6. After the instance is created it needs some time launch and get ready. For this purpose I have used the wait_for module. What this does is it creates a buffer for the instances to launch and get ready.
          - name: Wait for Loadbalancer to launch
            wait_for:
                    host: "{{ item.public_ip }}"
                    port: 22
                    state: started
            with_items: "{{ ec21.instances }}"
          - name: Wait for Webserver to launch
            wait_for:
                    host: "{{ item.public_ip }}"
                    port: 22
                    state: started
            with_items: "{{ ec22.instances }}"
7. Now the inventory has to be refreshed.
- name: "Refresh Inventory"
  meta: refresh_inventory
8. In the ec2 module I have used variables access_key and secret_key. These variable are declared in the main.yml file under vars directory. For better security I have used vaults to encrypt it. A vault can be created using the following command.
ansible-vault create foo.ymlNext we move on to the part of deploying the load balancer.
Deploying Load Balancer
The host for the loadbalancer is one of the EC2 instances. To have the host directly added to our inventory, we need to apply the concept of ansible dynamic inventory. EC2 instances can be added to our inventory using the ec2.py(It can be downloaded from here). To make this plugin work we have to export a few parameters throuth the shell.
export AWS_ACCESS_KEY_ID='AK123'
export AWS_SECRET_ACCESS_KEY='abc123'
export AWS_REGION='region-id'
1. Since the instance is tagged as “Ansible” in the ec2 module of the role “launch”, it can be referred to as “tag_Name_LoadBalancer”.
- hosts: tag_Name_LoadBalancer2. Different instances may have different logging in credentials but, here I have used the Amazon Linux 2 ami so, the username “ec2-user” has to be used. In the first part we have created a key for logging in to the instance. This has to be mentioned in the private_key_file section of the ansible configuration file.
3. By default the ec2-user does not have a lot of powers. To solve this problem the concept of privilege escalation is used.
become: yes
become_user: root
4. Next in line is the part of roles. I have created the role lbserver to configure deploy the loadbalancer.

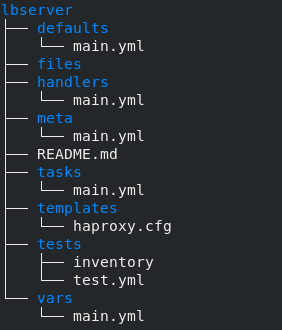
5. The HAproxy loadbalancer needs a configuration file. This is specified in the haproxy.cfg file under templates directory. It is used to create and copy the final configuration file for web server. The benefit is that we are able to use variables which help us in specifying parameters in the config file which are initialized during run time. The template files will usually have the . j2 extension, which denotes the Jinja2 templating engine used.
6. Now coming to the main.yml under tasks directory.
tasks/main.yml
- name: Install Haproxy
  package:
          name: haproxy
          state: present- name: Start Haproxy
  service:
          name: haproxy
          state: started- name: Configure Haproxy
  template:
          src: haproxy.cfg
          dest: "/etc/haproxy/haproxy.cfg"
  notify: Restart the LoadBalancer
This tasks file first installs the HAproxy loadbalancer and then starts it. The template module copies the configuration file to the designated folder and the notify keyword notifies a handler which has been configured to restart the loadbalancer with desired configuration.
handlers/main.yml
---
# handlers file for lbserver
- name: Restart the LoadBalancer
  service:
    name: "haproxy"
    state: restarted
Deploying the Web Servers
Now that the LoadBalancer is properly configured the web servers can be created.
1. The EC2 instances for the web servers have already been created. They can be acessed using the group
name “tag_Name_Webserver”.
- hosts: tag_Name_Webserver
2. Like LoadBalancer the role for web servers also needs privilege escalation to perform some specific tasks.
become: yes
become_user: root
4. Now the role web server can be created. This role will install httpd on the instances for web server and configure them.

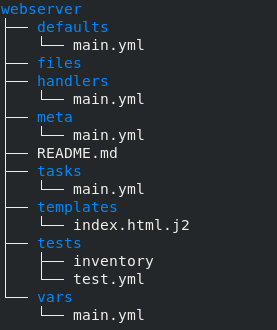
5. The main.yml file under tasks directory specifies all the tasks that the role is going to perform.
---
# tasks file for webserver- name: "Install Webserver"
  package:
          name: "httpd"
          state: present
  register: status- name: Webpage
  template:
    src: "index.html.j2"
    dest: "/var/www/html/index.html"
    mode: "0666"- name: "Start Webserver"
  service:
          name: httpd
          state: started
This role installs httpd web server on the instances, copies the index.html file to the designated directory and starts the web server. The copying part is done using the template module since, the index.html is configured to display the IP addresses of each instance.
templates/index.html.j2
<html>
<body bgcolor=aqua>
hello this is my project<br>
instance ip is {{ ansible_default_ipv4.address }}<br>
hostname - {{ ansible_hostname }}
</body>
</html>
6. Since now everything is configured, the playbook can be executed using the command.
ansible-playbook --vault-id aws@prompt webserver.ymlI have used one so, I have mentioned it in the command.

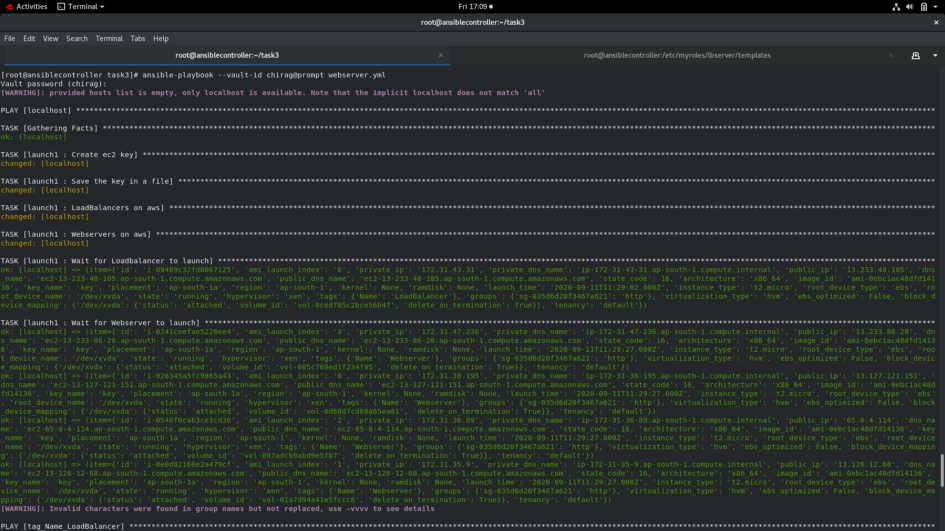

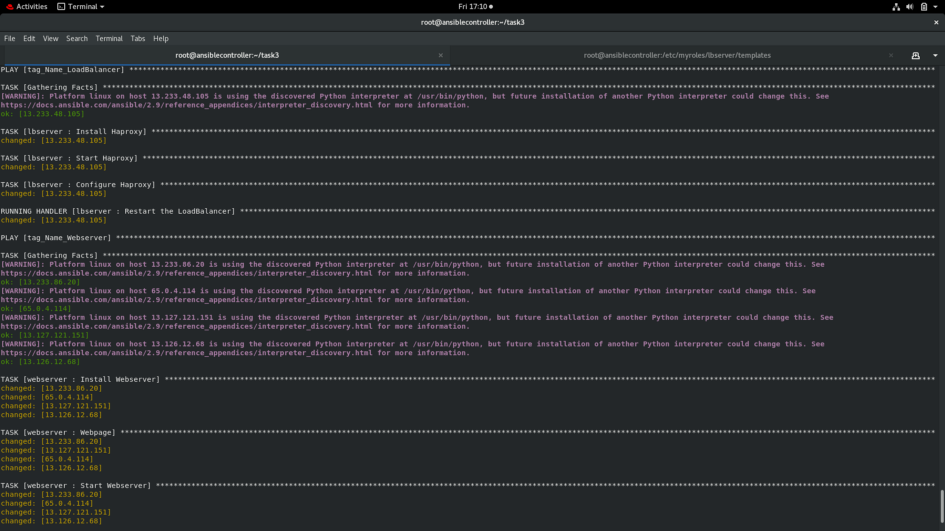

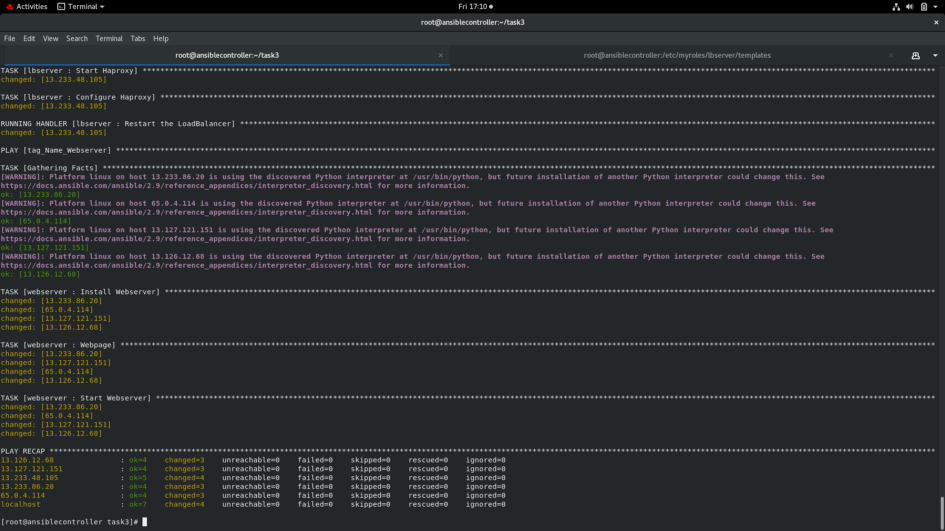
The instances are deployed.

The websites are accessible at <LoadBalancer public IP>:8080.


Source: Medium


Comments