
Create a custom tab in the SharePoint ribbon interface
- Vijai Anand Ramalingam

- Apr 2, 2019
- 2 min read
Introduction:
In this article we will be seeing how to create a custom tab, group and button to the server ribbon in Sharepoint 2010. Tabs are the root of the Server ribbon and they contain one or more groups. Every tab in the ribbon contains a series of one or more groups. Groups are used to associate controls with similar functionality. Controls are the items that live inside the ribbon that users can interact with. In this we will be creating a tab, group and control as shown in the following
Prerequisites
SharePoint Server 2010
SharePoint development tools in Microsoft Visual Studio 2010
Create a SharePoint project:
Open Visual Studio 2010.On the File menu, go to New, and then click Project.
In Project Types, under Visual C#, select Empty SharePoint Project.
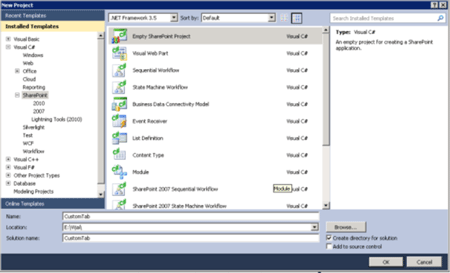
Enter CustomTab as the project name, and then click OK.
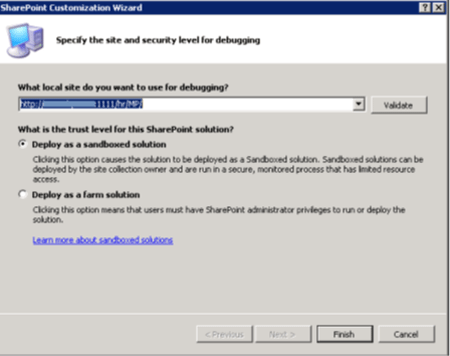
In the SharePoint Customization Wizard, select Deploy as a sandboxed solution, and then click Finish.
Right click on the solution, click on Add => New item.
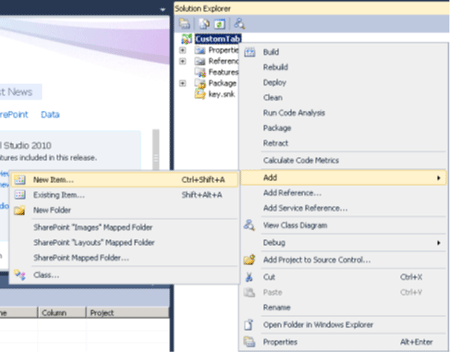
Select Empty Element template and enter the name as CustomTab.
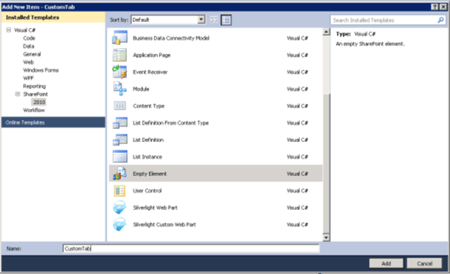
Click on Ok.
Open Elements.xml and replace the xml with the following
<?xml version="1.0" encoding="utf-8"?>
<Elements xmlns="http://schemas.microsoft.com/sharepoint/">
<CustomAction Id="CustomRibbonTab" Location="CommandUI.Ribbon" RegistrationId="101" RegistrationType="List">
<CommandUIExtension>
<CommandUIDefinitions>
<CommandUIDefinition Location="Ribbon.Tabs._children">
<Tab Id="Ribbon.CustomTab" Title="Custom Tab" Description="Custom Tab !!!" Sequence="501">
<Scaling Id="Ribbon.CustomTab.Scaling">
<MaxSize Id="Ribbon.CustomTab.MaxSize" GroupId="Ribbon.CustomTab.CustomGroup" Size="OneLargeTwoMedium"/>
<Scale Id="Ribbon.CustomTab.Scaling.CustomTabScaling" GroupId="Ribbon.CustomTab.CustomGroup" Size="OneLargeTwoMedium" />
</Scaling>
<Groups Id="Ribbon.CustomTab.Groups">
<Group Id="Ribbon.CustomTab.CustomGroup" Description="Custom Group!" Title="Custom Group" Sequence="52" Template="Ribbon.Templates.CustomTemplate">
<ControlsId="Ribbon.CustomTab.CustomGroup.Controls">
<Button Id="Ribbon.CustomTab.CustomGroup.CustomButton" Command="CustomTab.CustomButtonCommand" Sequence="15" Description="" LabelText="Custom Button" Image32by32="/_layouts/images/PPEOPLE.GIF" TemplateAlias="cust1"/>
</Controls>
</Group>
</Groups>
</Tab>
</CommandUIDefinition>
<CommandUIDefinition Location="Ribbon.Templates._children">
<GroupTemplate Id="Ribbon.Templates.CustomTemplate">
<Layout Title="OneLargeTwoMedium" LayoutTitle="OneLargeTwoMedium">
<Section Alignment="Top" Type="OneRow">
<Row>
<ControlRef DisplayMode="Large"TemplateAlias="cust1" />
</Row>
</Section>
</Layout>
</GroupTemplate>
</CommandUIDefinition>
</CommandUIDefinitions>
<CommandUIHandlers>
<CommandUIHandler Command="CustomTab.CustomButtonCommand" CommandAction="javascript:alert('Hello, world!');" />
</CommandUIHandlers>
</CommandUIExtension>
</CustomAction>
</Elements>
Deploy the solution:
Right click on the solution, then click on Build.
Right click on the solution, then click on Deploy.
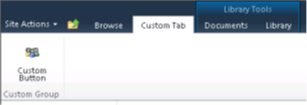
Go to the SharePoint site => Document Library (In the Elements.xml file we have mentioned RegistrationId="101" the custom tab that we have created will be available only in the document library ).
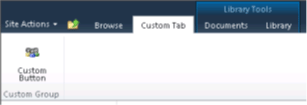
You could be able to see Custom Tab , Custom Group and the Custom Button as shown in the following


Comments