Configure Search Crawler Impact Rules In SharePoint 2013 Central Administration
- Manpreet Singh

- Mar 23, 2019
- 1 min read
This configuration will help you to adjust the load, which the crawler applies to the content sources and can adjust the frequencies, which is applied per crawl. This helps in balancing the load on the search crawl.
How to configure?
Let’s open Central Admin of SharePoint on your machine. On your Windows desktop screen, click Start >> Administrative Tools >> SharePoint 2013 Central Administration.
Run it as an administrator to have the elevated privileges.
You will see the screenshot given below.
Central Admin is configured under the categories given above.
Click General Application Settings.
Go to Search.
Click Crawler Impact Rules.
You will see the screen given below.
Click Add Rule to add a crawler rule.
Configuration
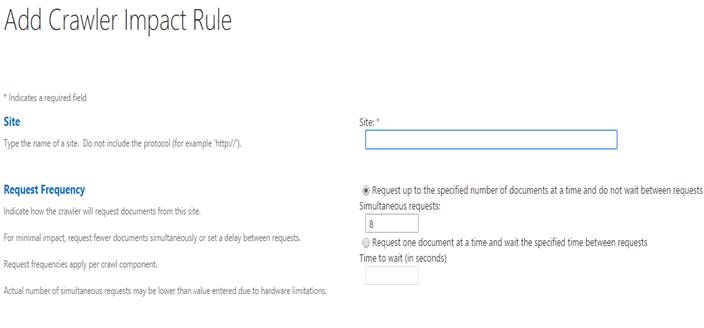
Site Provide the name of the site to set the crawl rule.
Request Frequency Here, you can provide the details as how will the crawler requests document from the site.
You can provide a count of the number of simultaneous reports, which should hit the search or you can choose, if the search should be one document at a time.
This setting assists the users to avoid maintaining the search crawling and provide delay in the requested search events, which can be loaded.
Hence, you can either set the crawling to a certain number of documents searched or to just one document at a time.
Once this configuration is done, the search crawling will be applied to the provided site and will be applied to all the sub sites within it.
In this article, we saw how to configure Search Crawler Impact rules in SharePoint 2013 Central Administration. There are more articles to come on Central Administration. Until then, keep reading and keep learning.


Comments